HelpHub
Learn how to get the most out of ActiveHub!
Intro to ActiveHub
This quick intro will show you how to navigate this simple, flexible and effective platform for learning, assessment and insights.
Getting Started
What's New

AH3.12 February 2024
ActiveHub Trust users can view School Insights
As an ActiveHub Trust user, you can now view any of your schools’ Insights pages, allowing you to delve into the detail for results at group and student level. To set this up, each of your schools needs to grant access in their ActiveHub Admin screens (Admin users only).
Editing task name
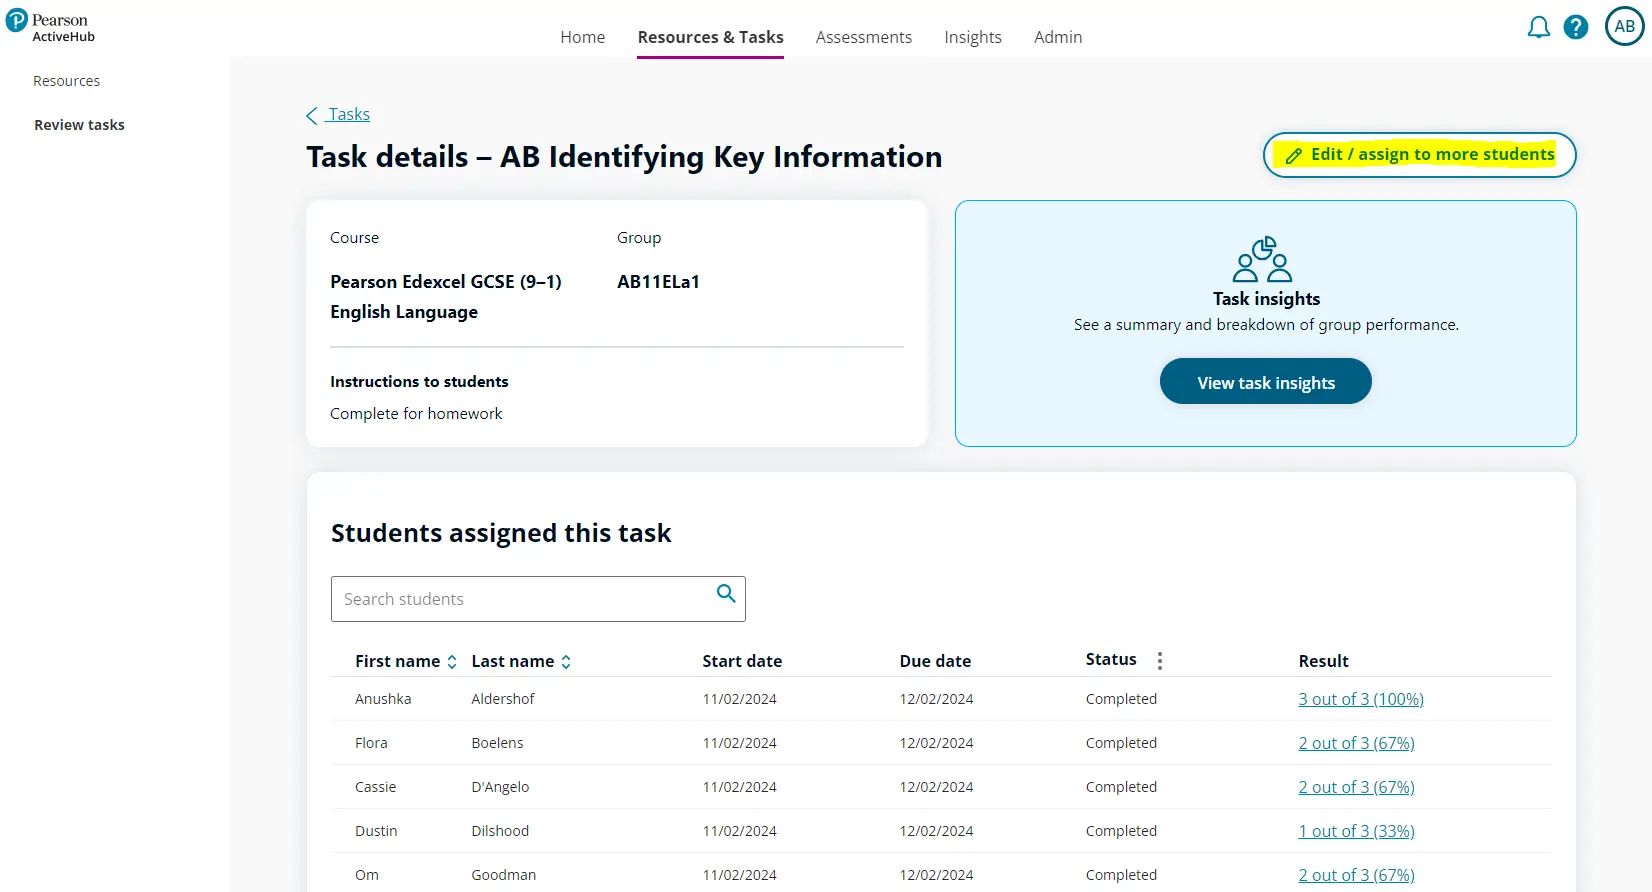
After setting a task for students, you can now edit the name of the task by selecting ‘Edit / assign to more students’.
New resource type icons
It is easier to identify the different types of resources that can be assigned to students as a task, by using the new icons.
What else is new?
- Updated ‘Overview’ pop-up in Resources now shows an overview of what the chapter/lesson is trying to deliver for students.
- In ActiveHub Trust, AQA English courses now show question-level analysis, skills analysis and topics analysis as well as next steps
Issue Description |
Status |
|
A limited number of users had access restricted and saw an error message about ‘Incorrect Product Model Region’ |
Fixed – users from other product regions can now access ActiveHub |
|
An error message displayed in the chart for ‘Topic strengths and weaknesses over time’ in Group Insights |
Fixed – the ‘Topic strengths and weaknesses over time’ chart is displaying correctly |
|
Schools were not able to see assessments shared by their trust after the window ended |
Fixed – schools can now still see assessments shared by their trust after the window has ended |
|
Schools were able to see a built assessment even once archived by the trust user |
Fixed – schools cannot see a built assessment if it has been archived by the trust user |
Pearson Gateway
Your Dashboard

Gateway Dashboard
Issue
What can I do on my Gateway dashboard.
Detailed Instructions
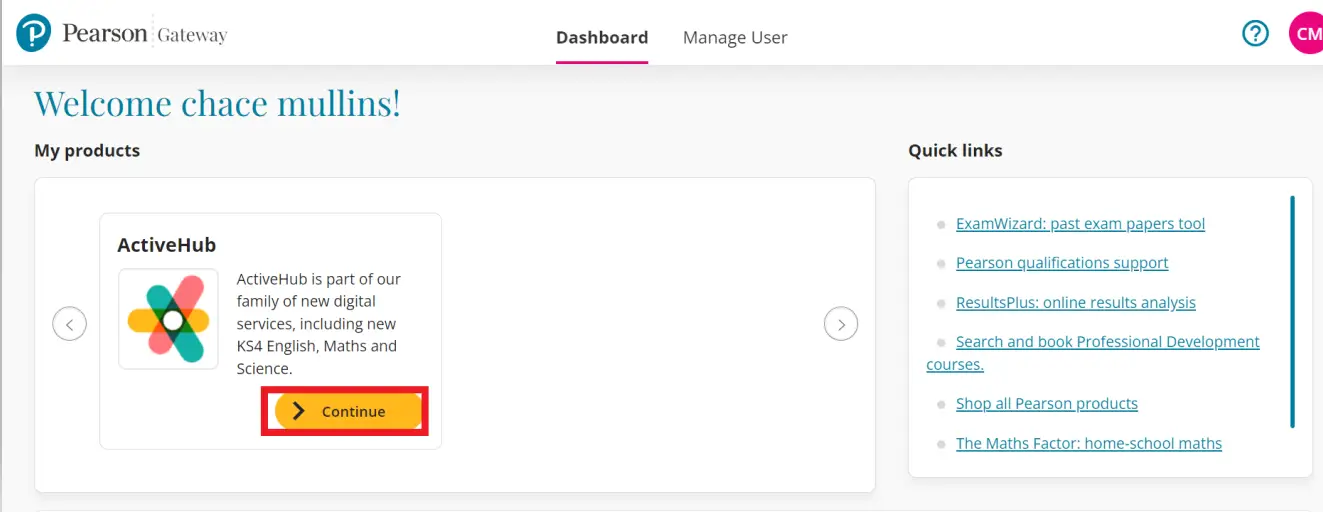
My Products:This is where you will be able to see and access all of the products your school are subscribed to. Here you will be able to search for lessons, find and create courses and create tasks for your pupils. We will continue to develop this area where you will eventually be able to access all of your products and platforms that your school is subscribed to, these will include ActiveLearn Primary, ActiveLearn Secondary, Exam wizard, Edexcel Online, Professional development academy, Results Plus and The Maths factor.
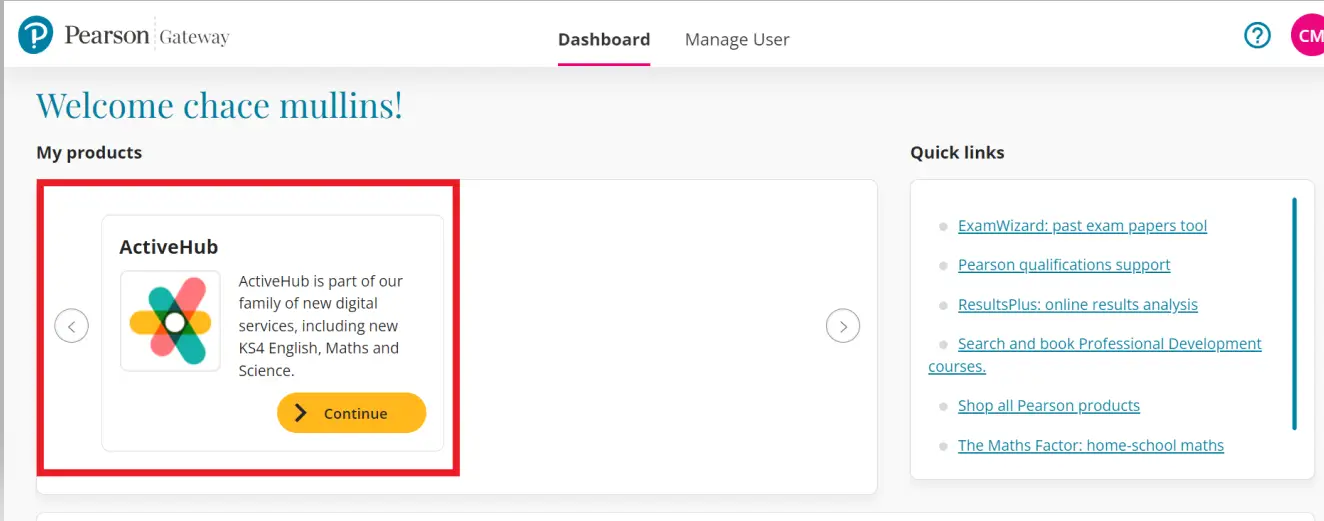
Active Hub
Active Hub is the first product to launch through the Gateway. It is where you will be able to access front of class teaching materials, search for lessons and access of your subscriptions through 1 platform, you will have access to your resource and planning materials, assessment material and our unique ‘Insights’ area which provides easy-to-understand analysis, visuals and nuanced insights to support effective progress tracking and targeted interventions.
Quick Links
We have added all the Pearson platforms under the ‘Quick links’ area where you can access other Pearson platforms that your school are subscribed to.
Live Chat
Can’t find what you need, speak to our support team by starting a live chat from your dashboard.
Creating a Single Group
Gateway - Creating a Single Group
Creating groups will allow staff to create tasks for learners.
FAQ
How do I create a single group and add users?
Detailed Instructions
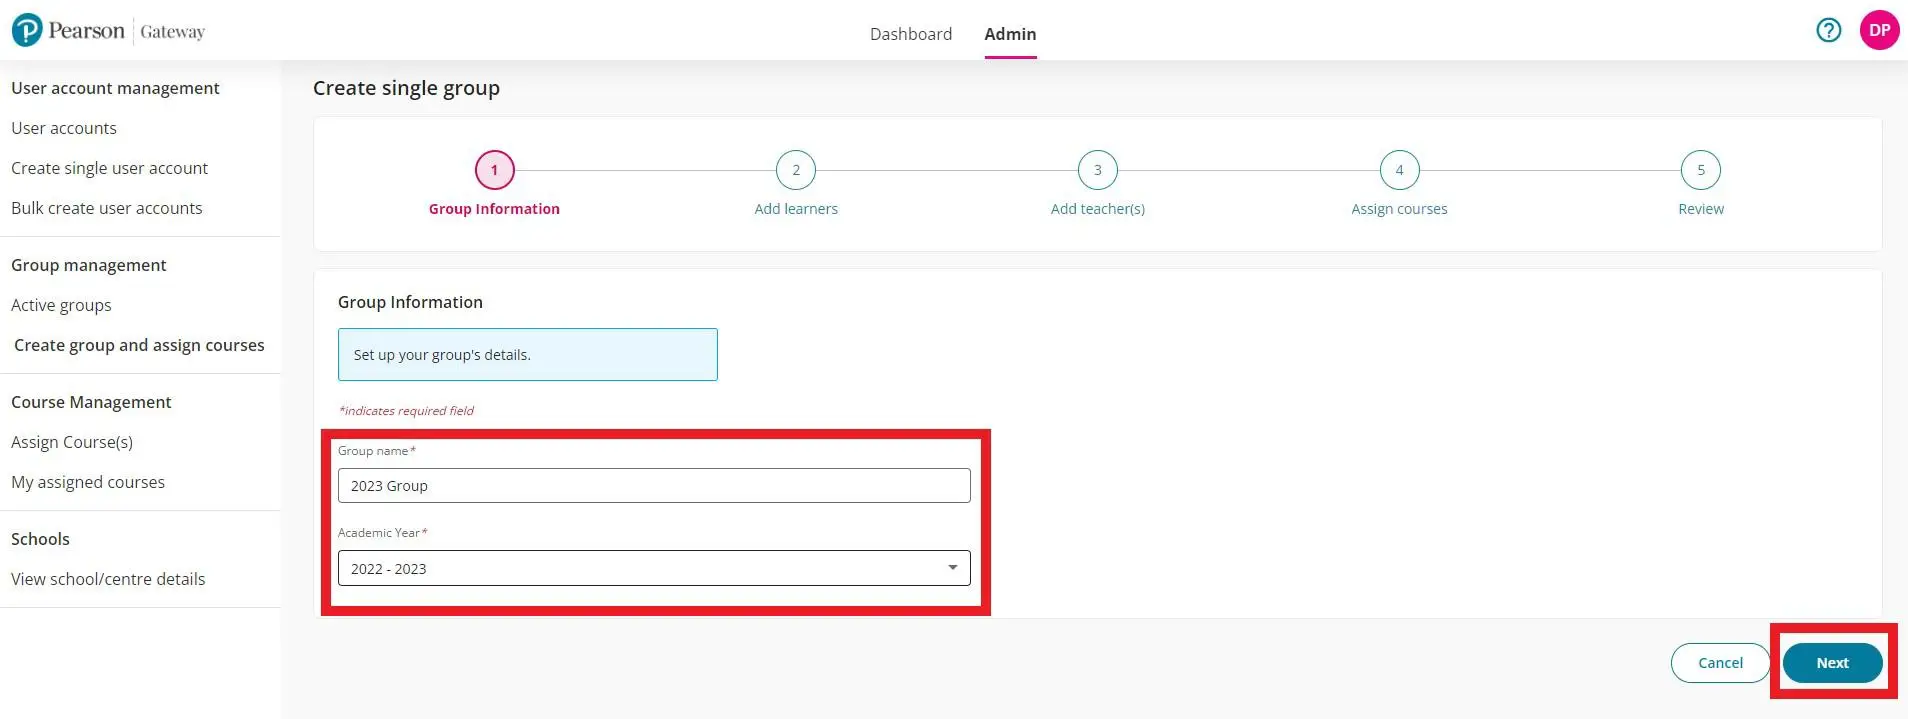
Creating a group within your school is quick and simple. Start by giving the group a name followed by choosing the academic year. Select ‘Next’ to move to the next part of the process
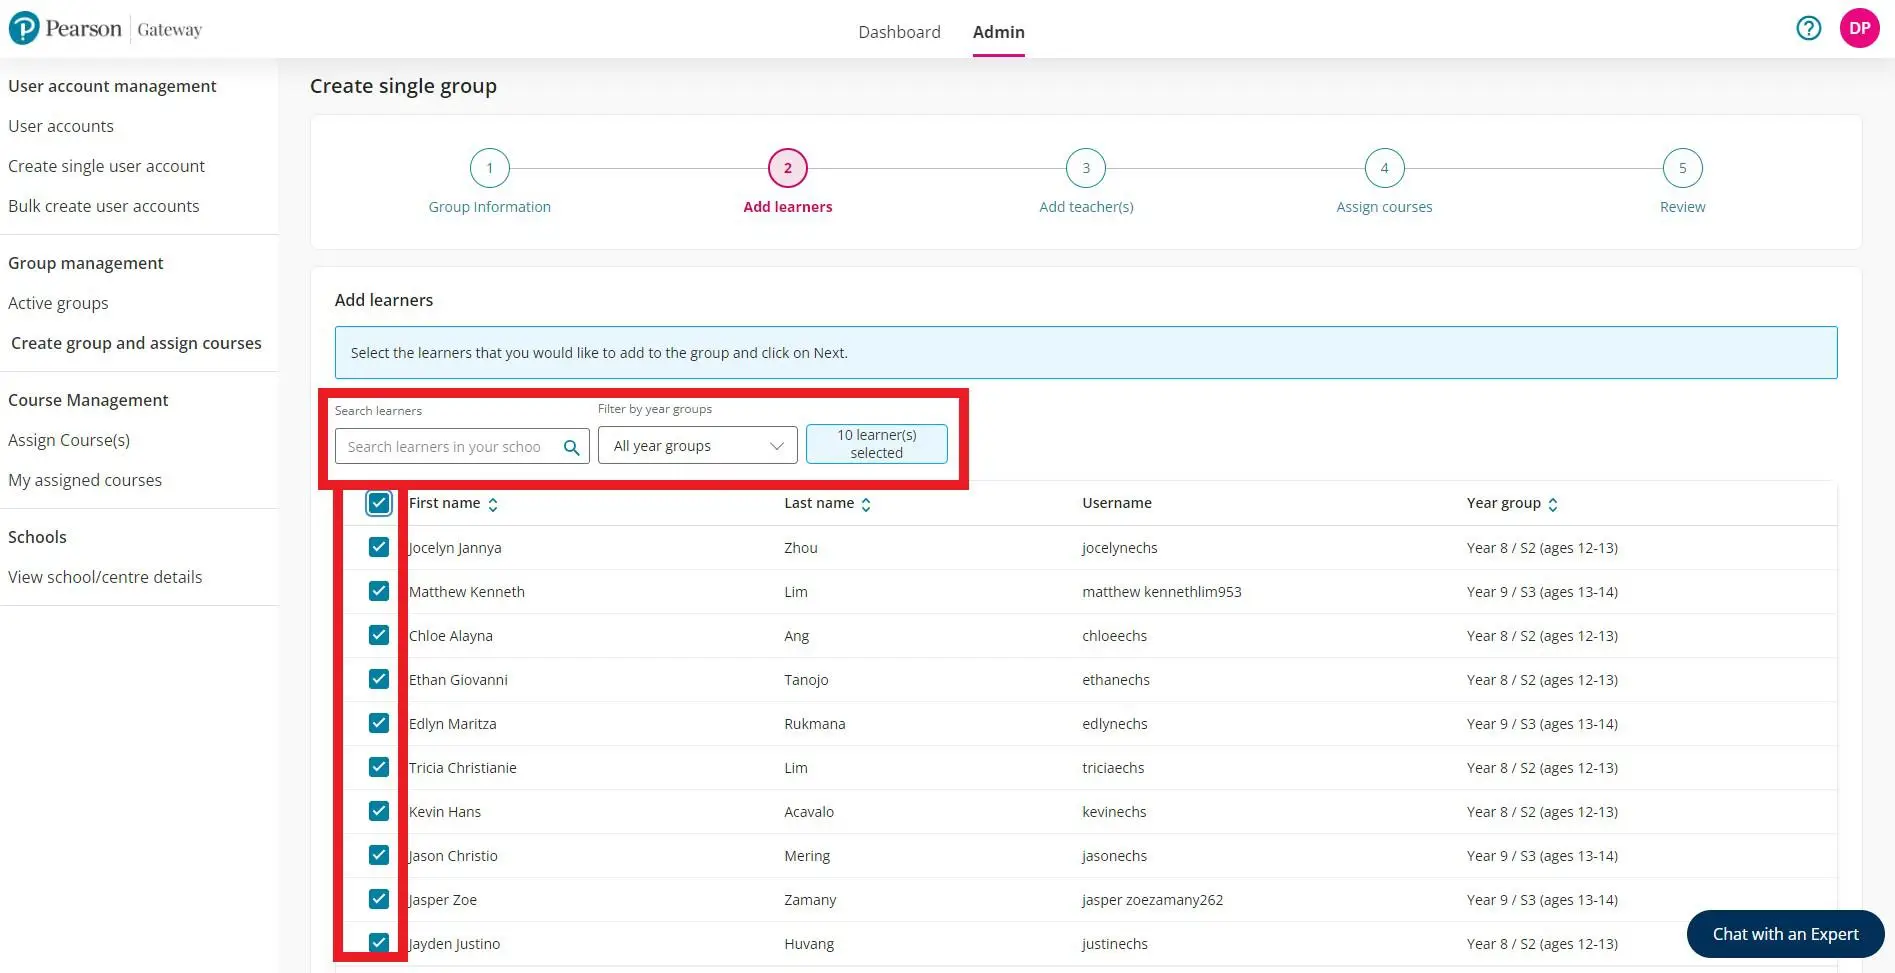
You can either search for a specific individual or select multiple users. Once you have selected the user/s you then need to select ‘Next’ at the bottom of the page
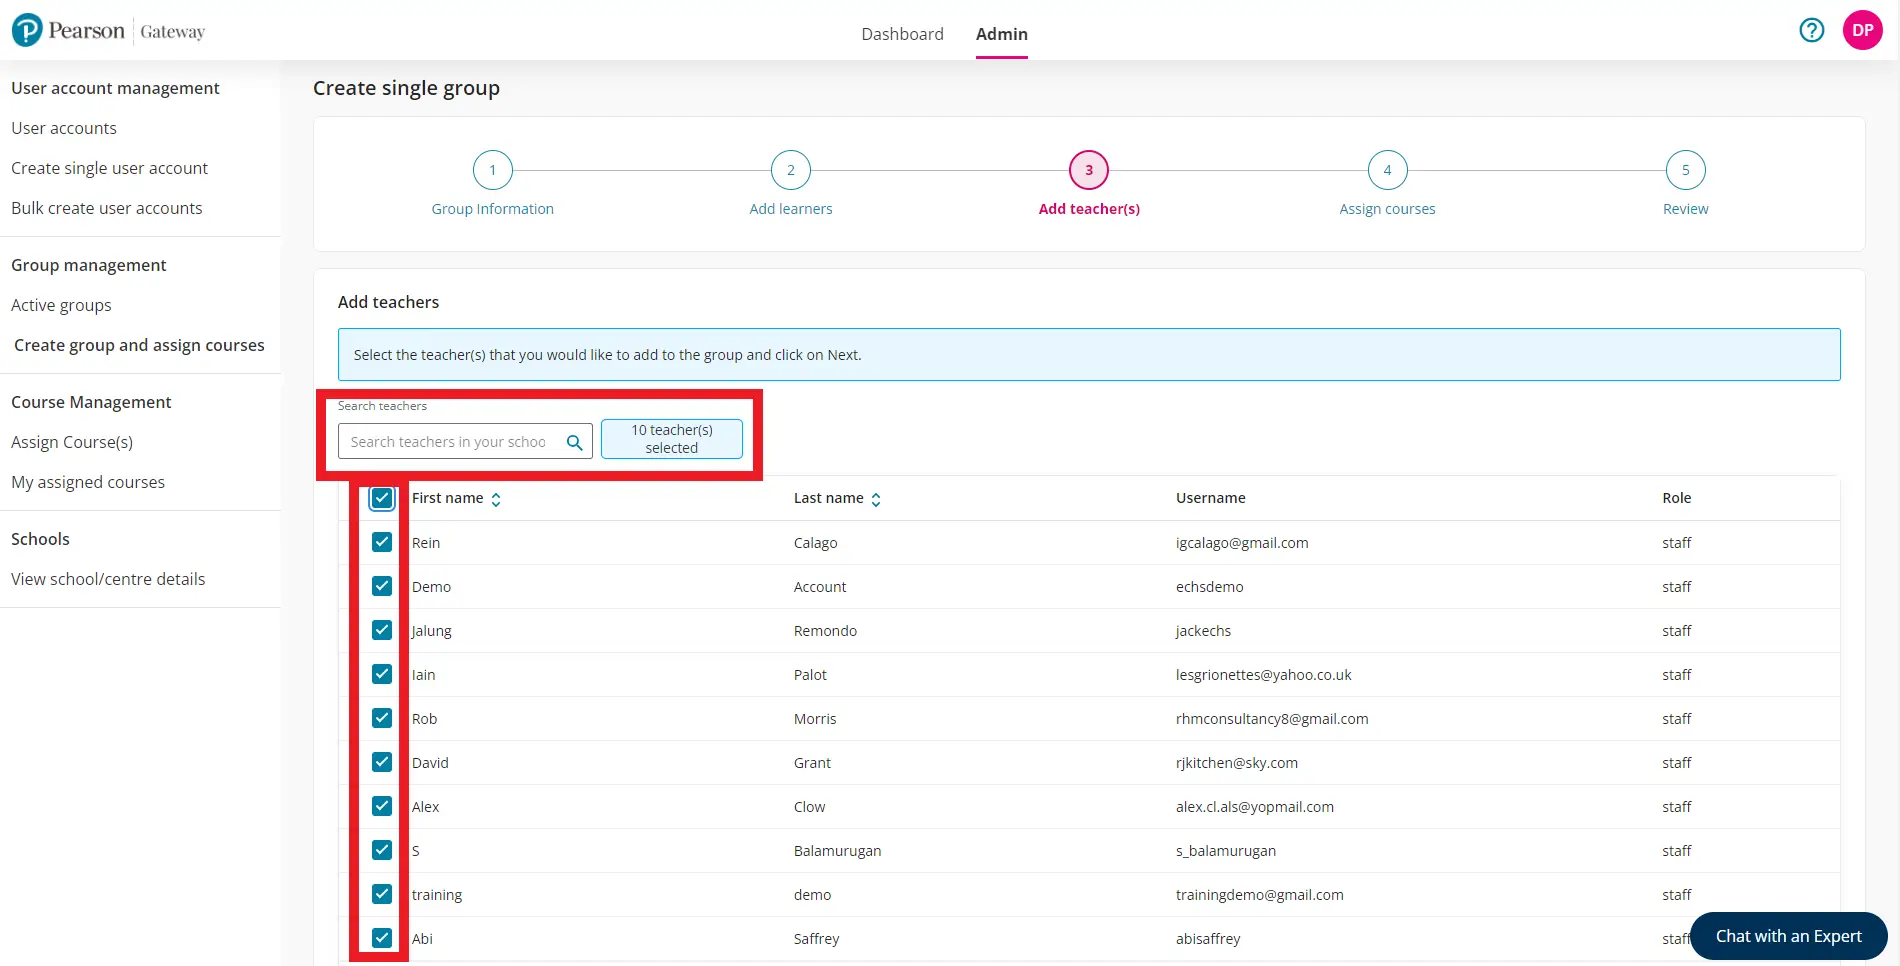
The same process occurs for adding staff accounts. Once you have selected the user/s then please select ‘Next’ at the bottom of the page
Managing User Accounts
Gateway - User Accounts
FAQ
What can I do in the ‘Manage Users’ section?
Detailed Instructions
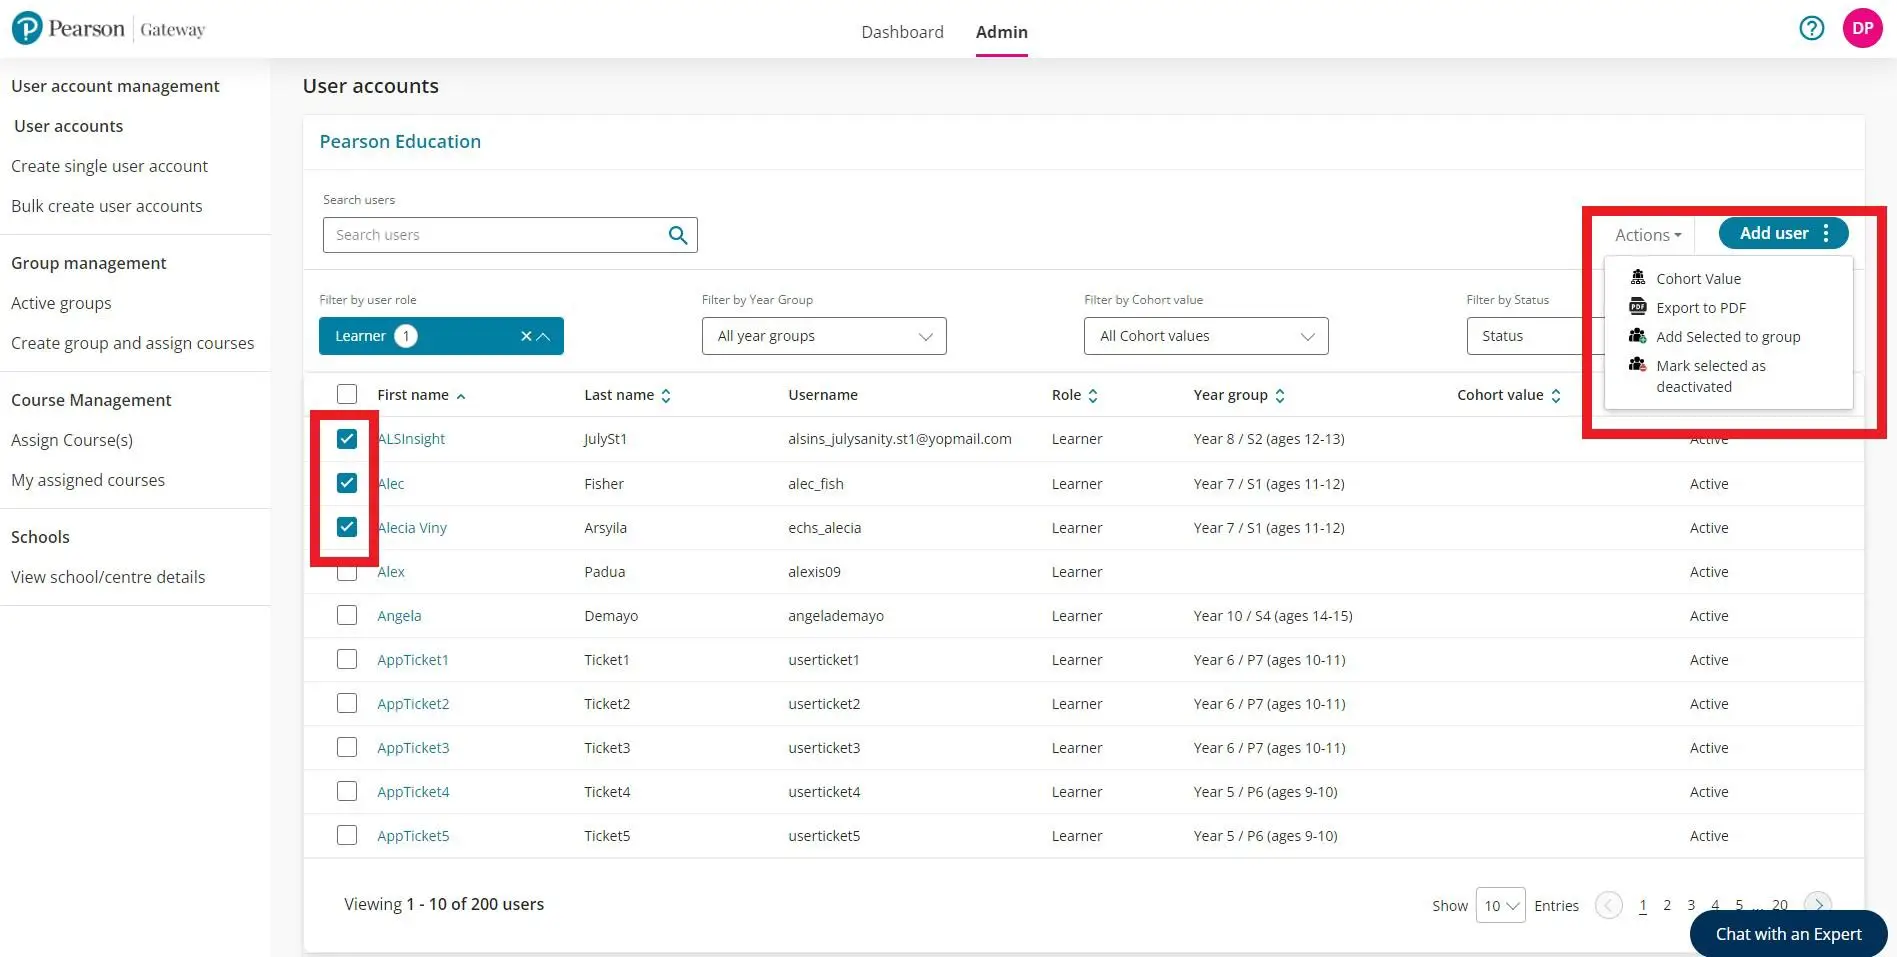
There is a plethora of activity you can accomplish in this section ranging from simply searching users via different methods (roles, year group, cohort or active/de-activated status) to creating new and editing existing user accounts
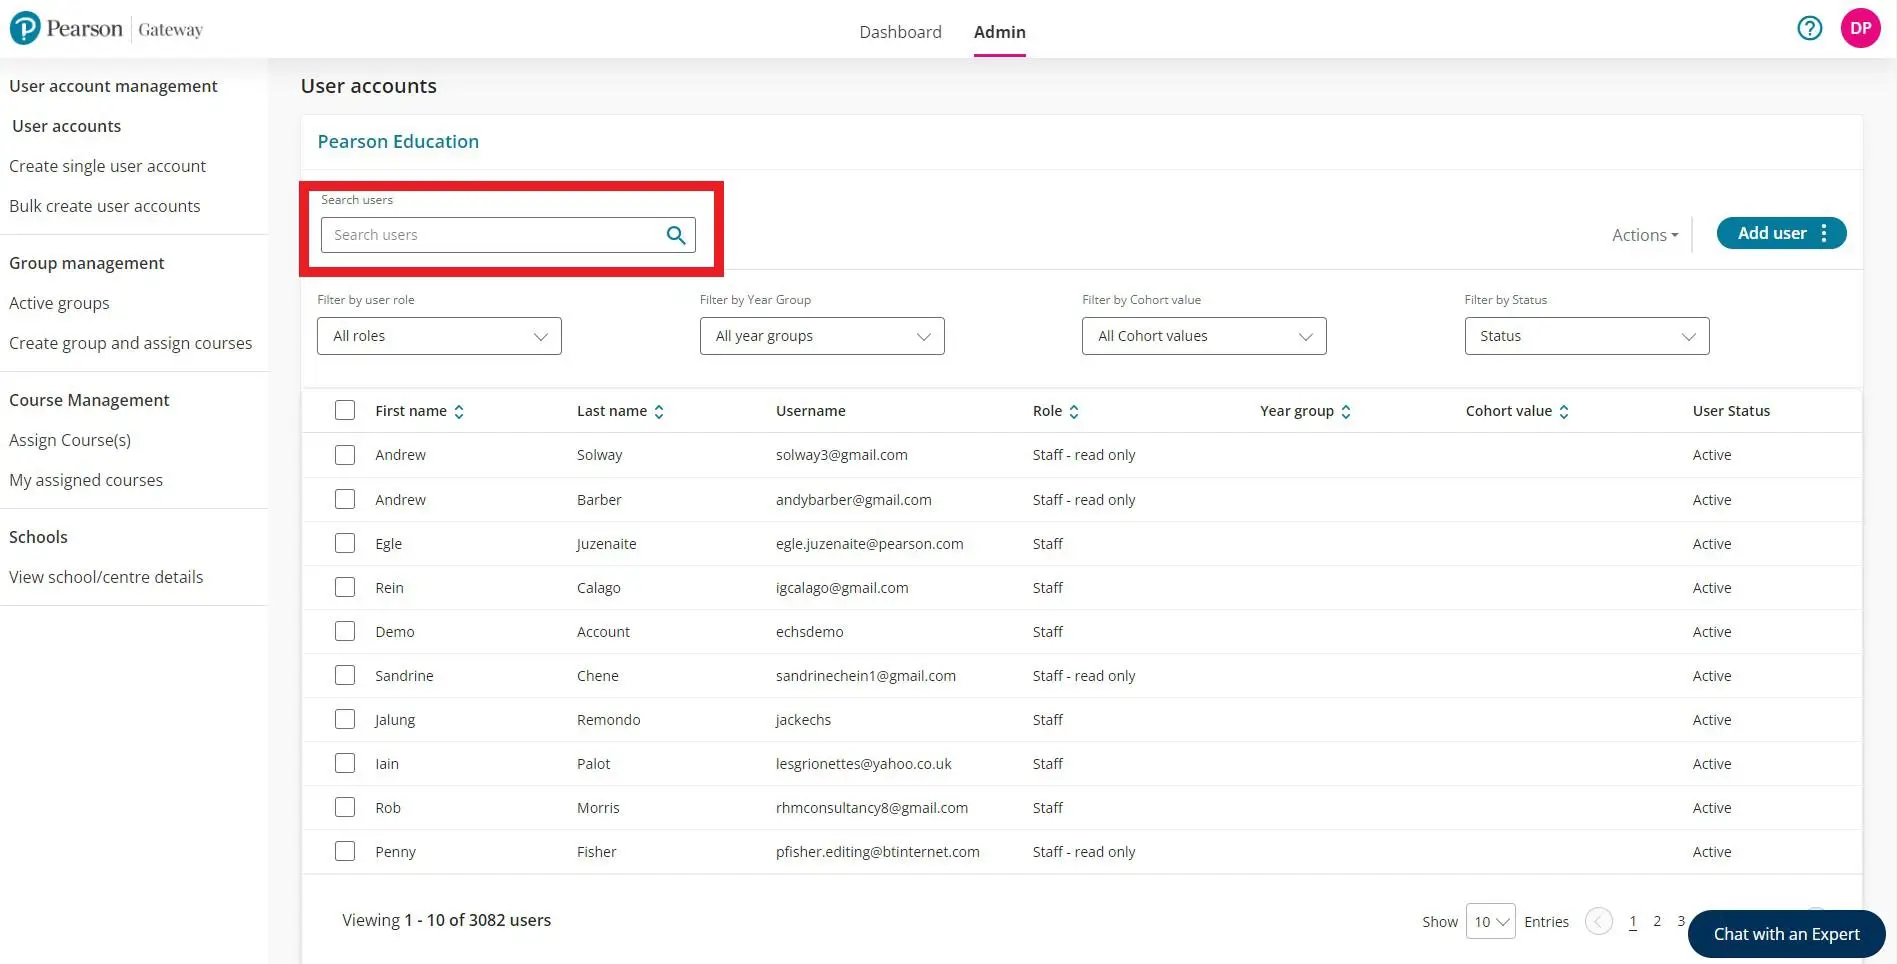
Searching users within your school:
You can search by first name, last name, email address or username using the search box. You can also search for active and de-activated users.
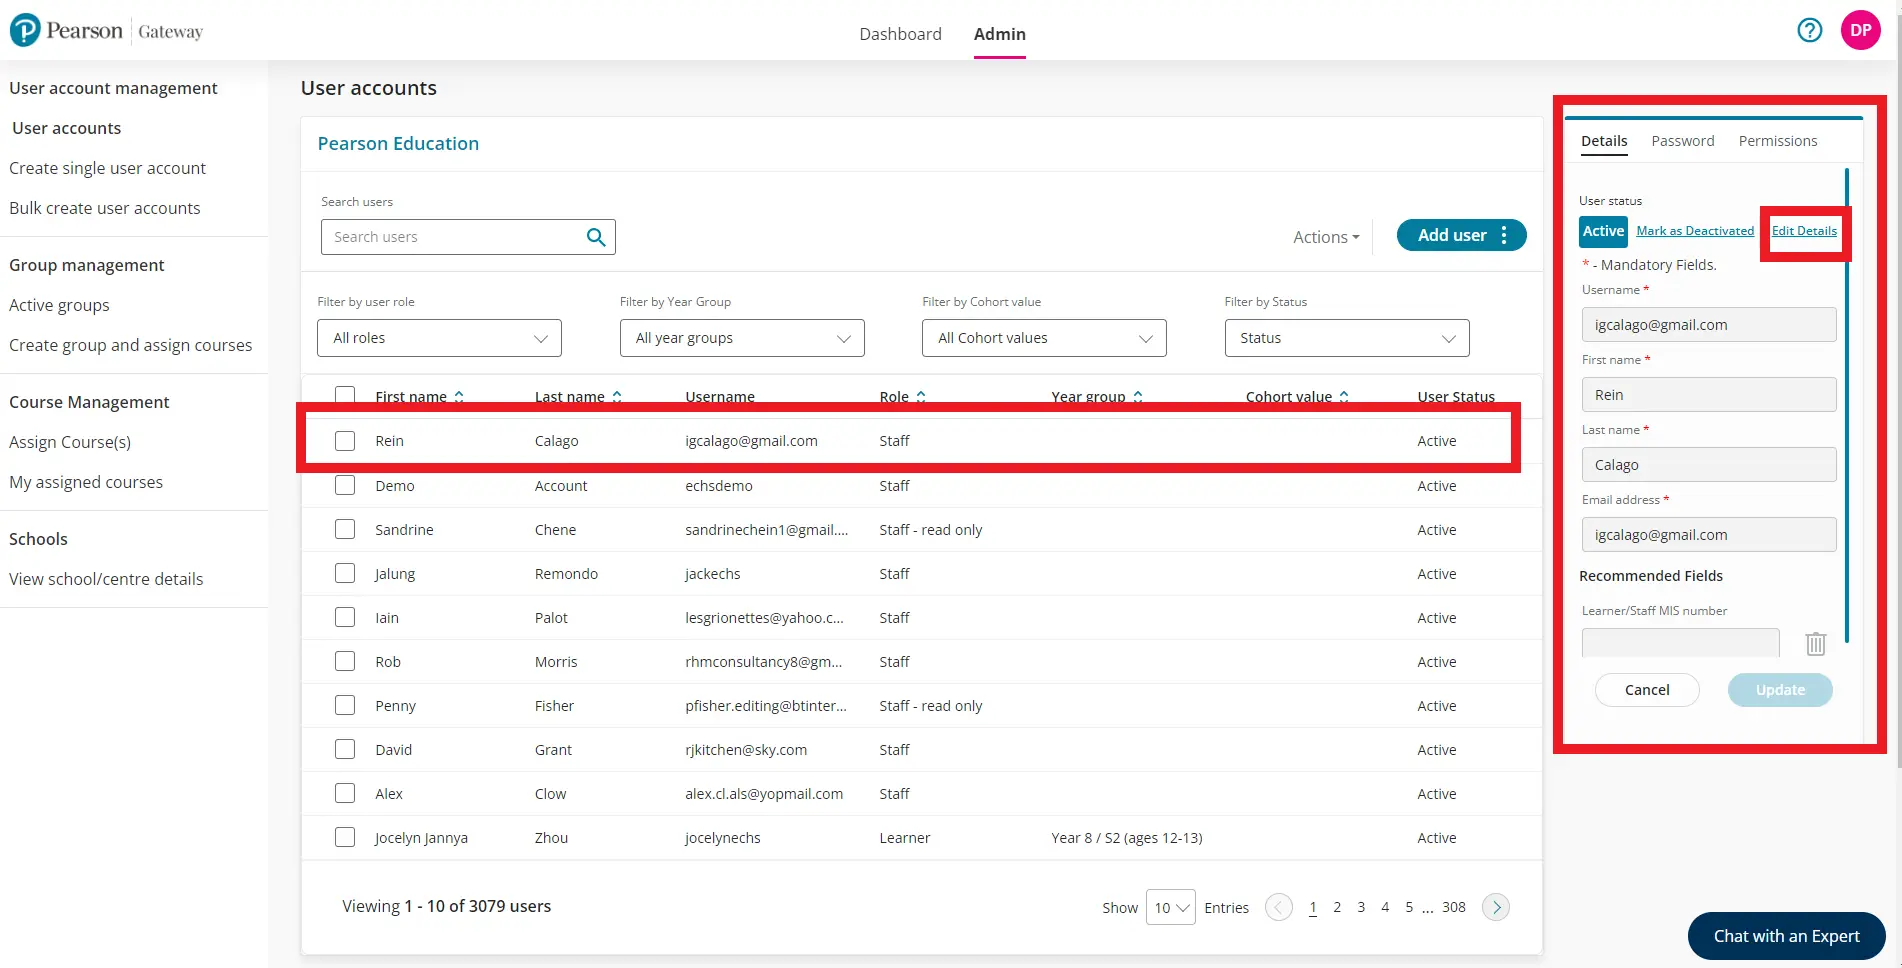
Changing user account details:
As a teacher you can edit the details of a user account and send a password reset email to any user.
Select a user by clicking on their name. A box will appear on the right-hand side of the screen > Select 'Edit details' > edit the user account > Once you have made the changes you select 'Update’ which will save the changes you have made.
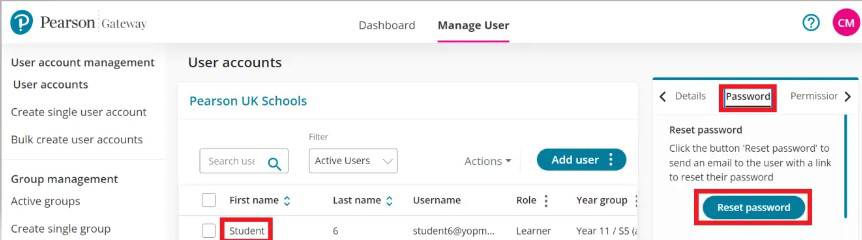
Sending a password reset email:
Select the user by clicking on their first name > Select the 'Password' heading > Select 'Reset password'. Please note: Check our junk or spam folder if this does not appear in your inbox.
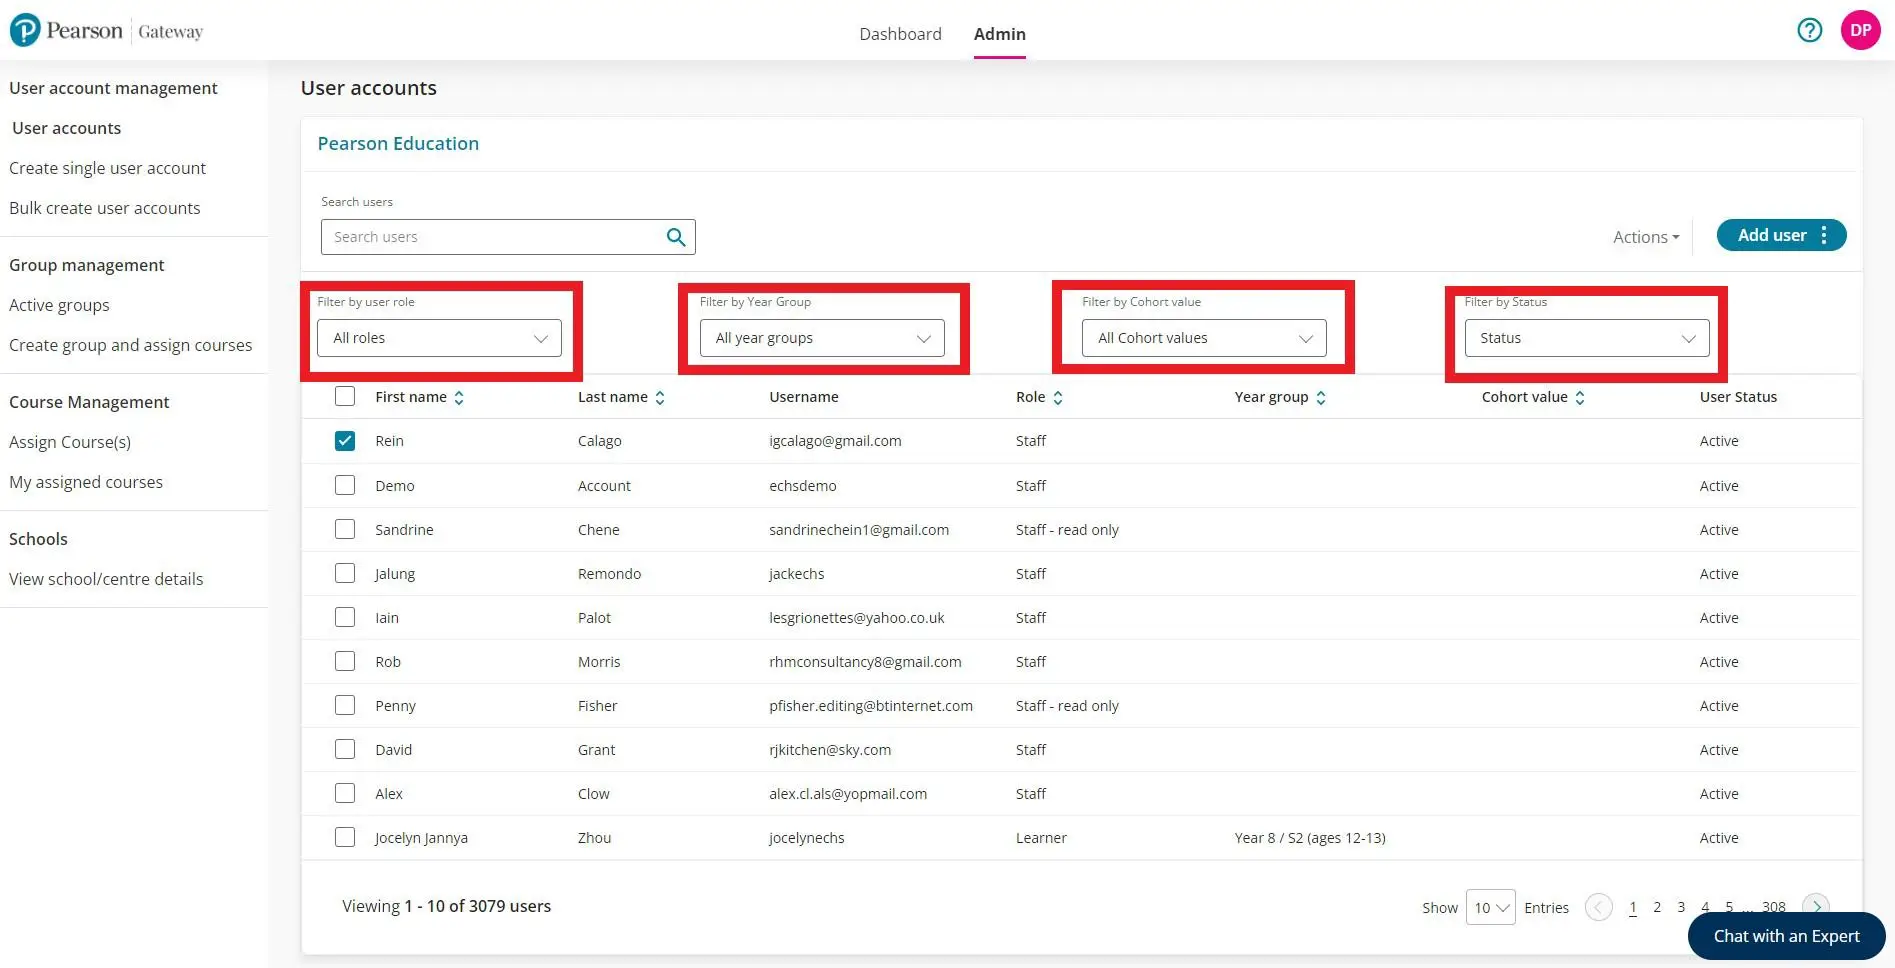
Filtering, exporting and user management:
You can filter the users by role, year group, cohort and status selecting any of the drop-down menus available.
Bulk user actions:
Firstly, select several users and select ‘Actions’. Here you can bulk edit the cohort, export details to PDF, add users to a group and mark as de-activated
Creating Single User Accounts
FAQ
How do I add a teacher (Staff) or Student (Learner) account?
Detailed Instructions
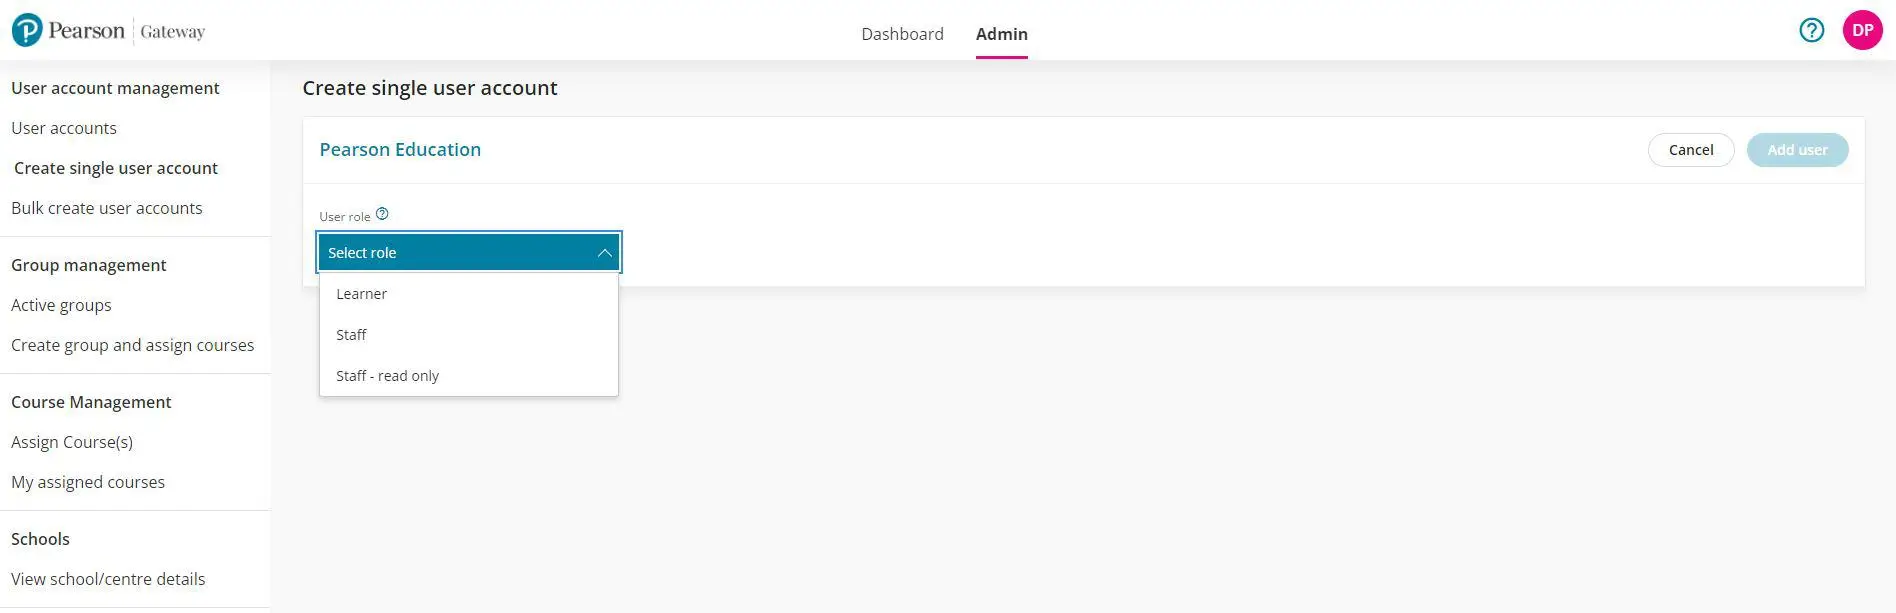
First you need to select whether you will be uploading a Learner, Staff or Staff Read Only account. Once you select this you can start entering the details of the new user.
Please Note: 'Staff Read-Only’ accounts only have access to their Dashboard; they do not have access to the 'Manage User' section.
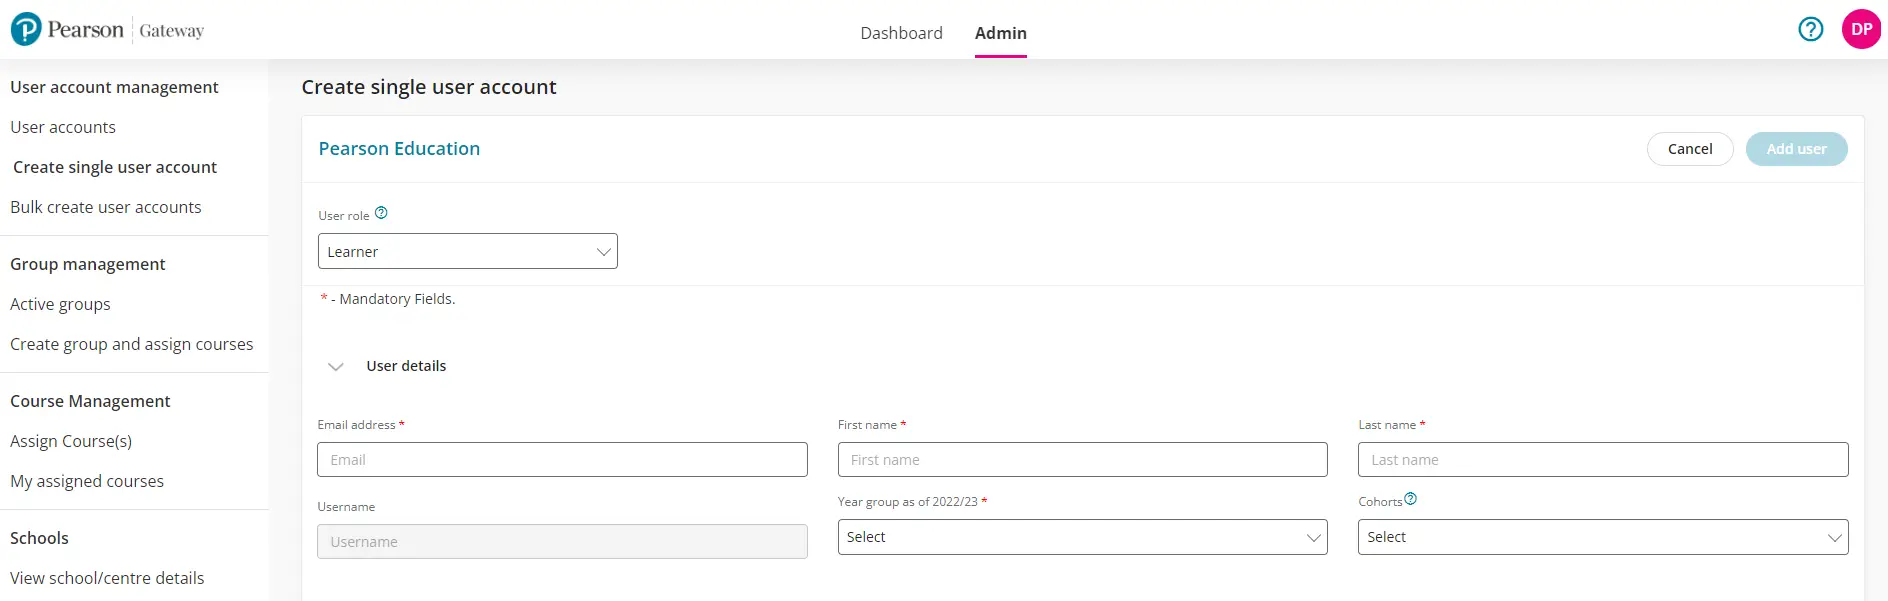
Creating a single Learner
Adding the email address of the Learner will automatically input this as the username. The first name, last name and year group are the required fields, once you have entered this information you will be able to add the user.
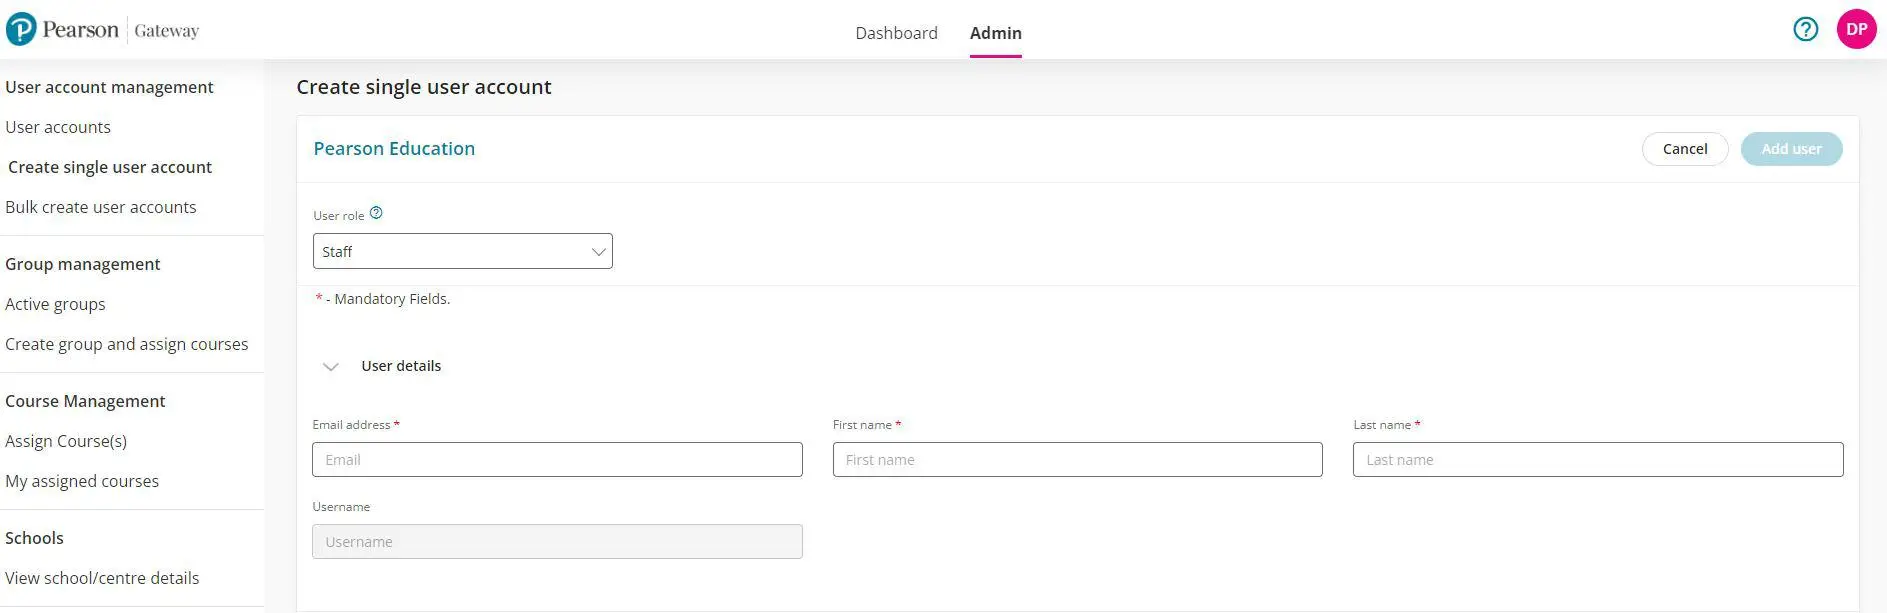
Creating a Staff account
Adding the email address of the Staff will automatically input this as the username. The first name and last name are the required fields, once you have entered this information you will be able to successfully add the user.
Managing Groups
Gateway Active Groups
Within the Active Groups section, you will be able to see and access all groups that have been created on your school's account. At a quick glance you can see the group names, course assigned to that group/s, the members within that group and what teacher created this group.
You can also make changes to the group, export the group information onto a PDF file and delete the group, please note that once the group has been deleted there is no way to re-instate this, you will need to create a brand-new group.
Detailed Instructions
Editing a group
You can only edit 1 group at a time, you can do this by selecting which group you want and clicking the edit option shown below.
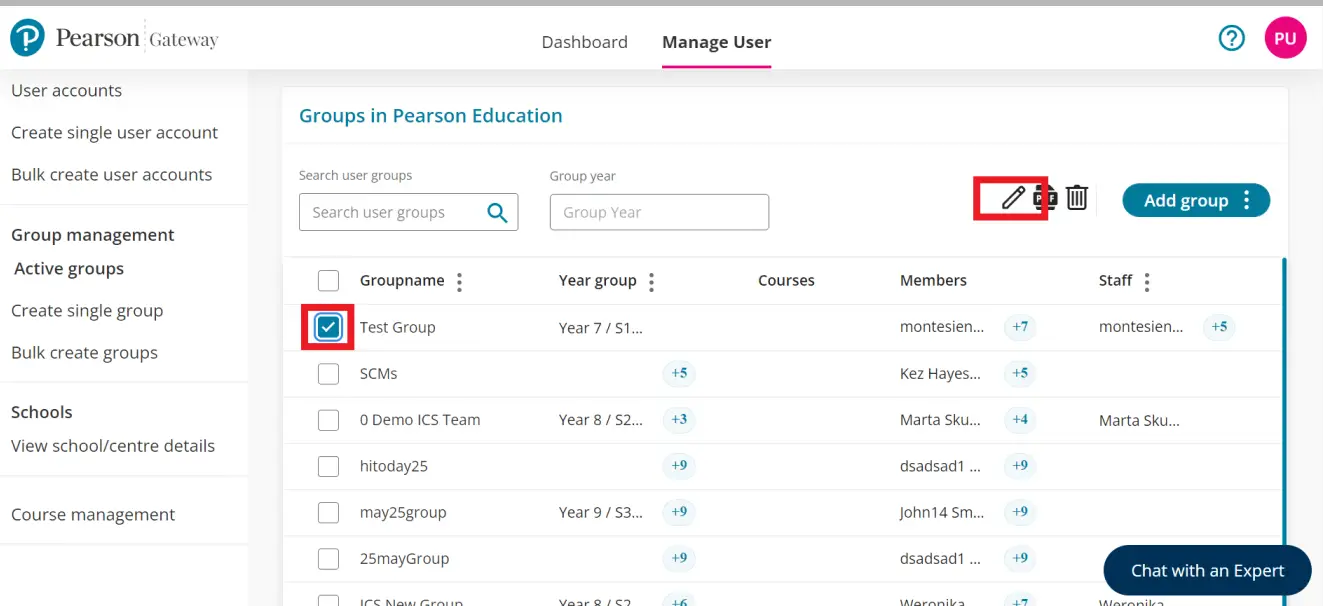
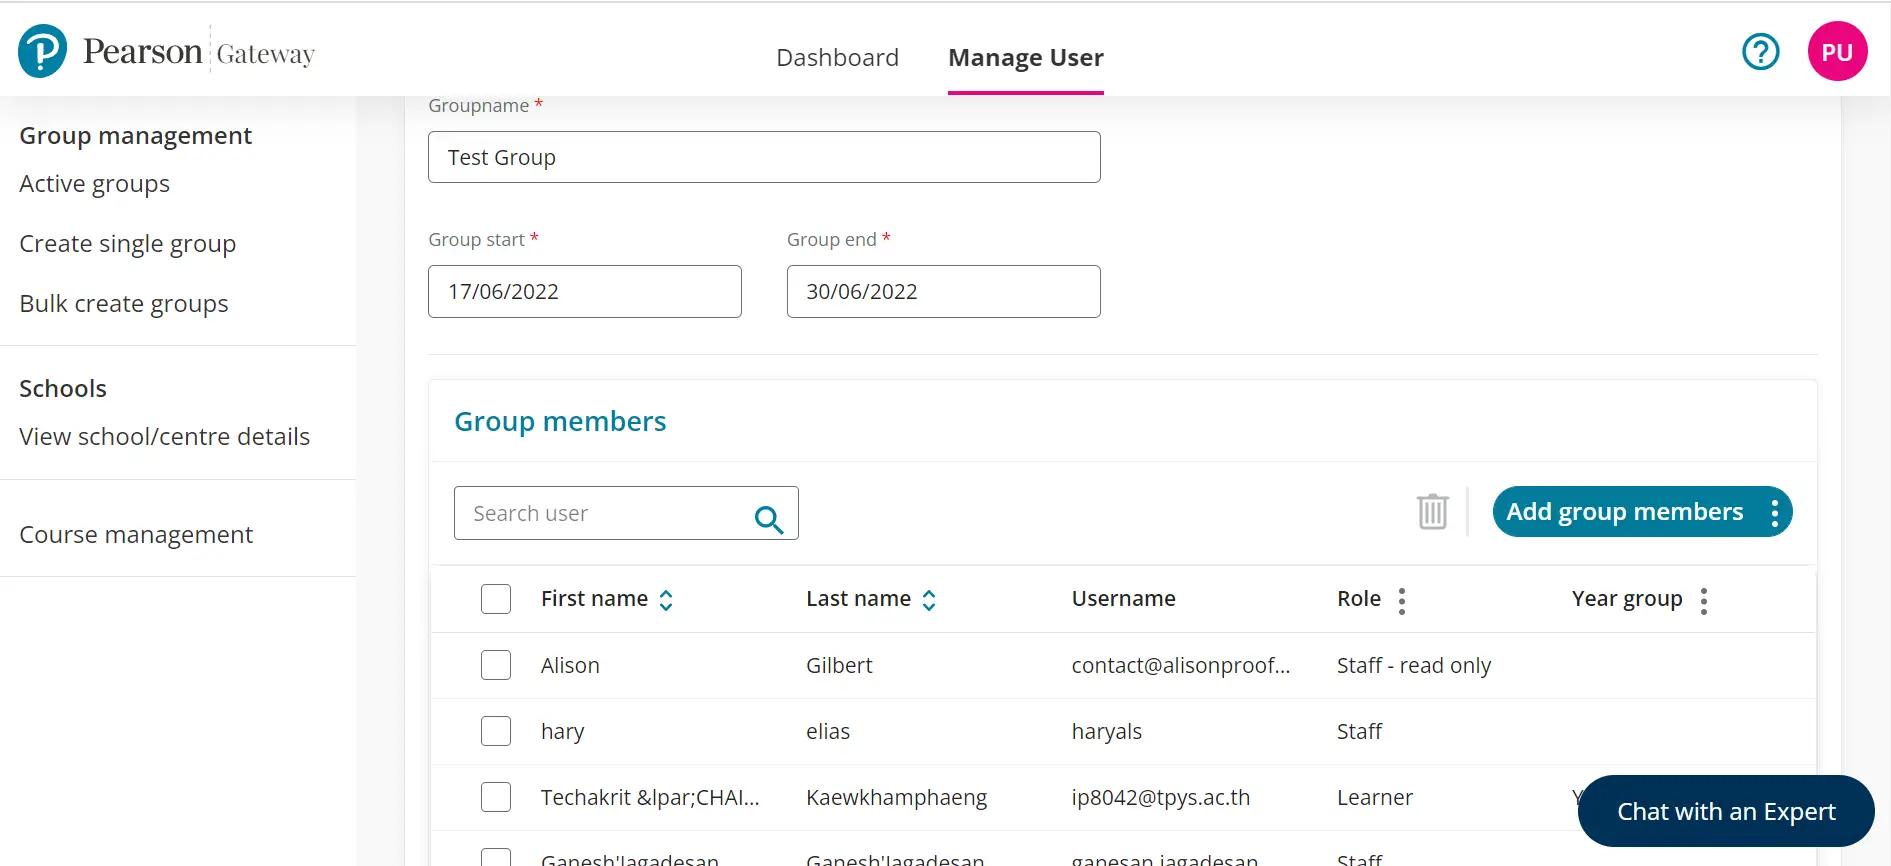
You will be taken to a screen where you can change the group name, start and end date of the group, add and remove courses and also add and remove learners.
Exporting a group/s
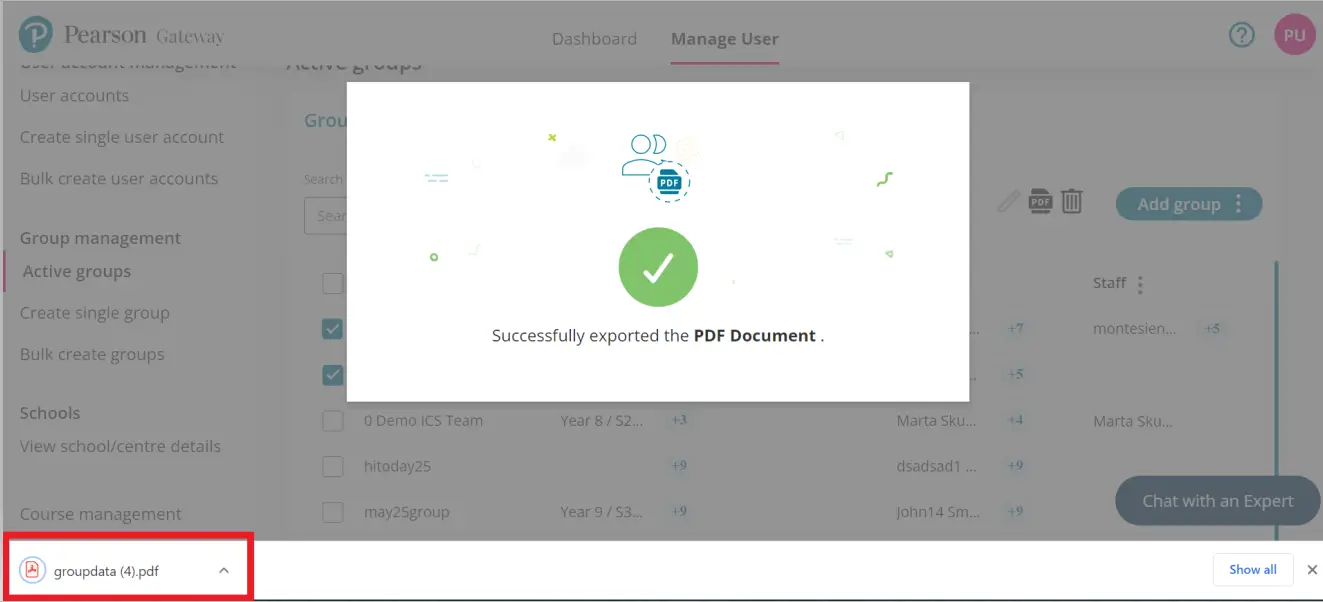
By exporting a group/s you will be able to see a PDF version of the group name, courses assigned to the group/s, group start and end date and the group members.To get this data you first need to select the group/s that you would like to export and then select the PDF icon.
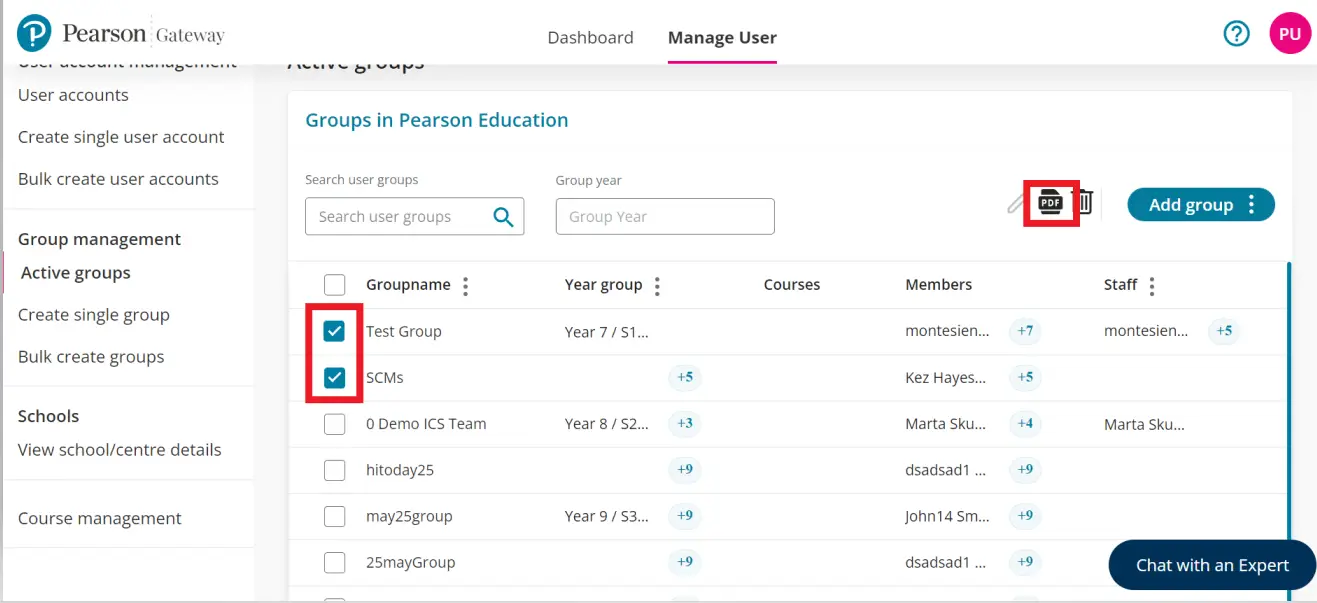
This will then download a PDF to your device where you can see the selected groups information.
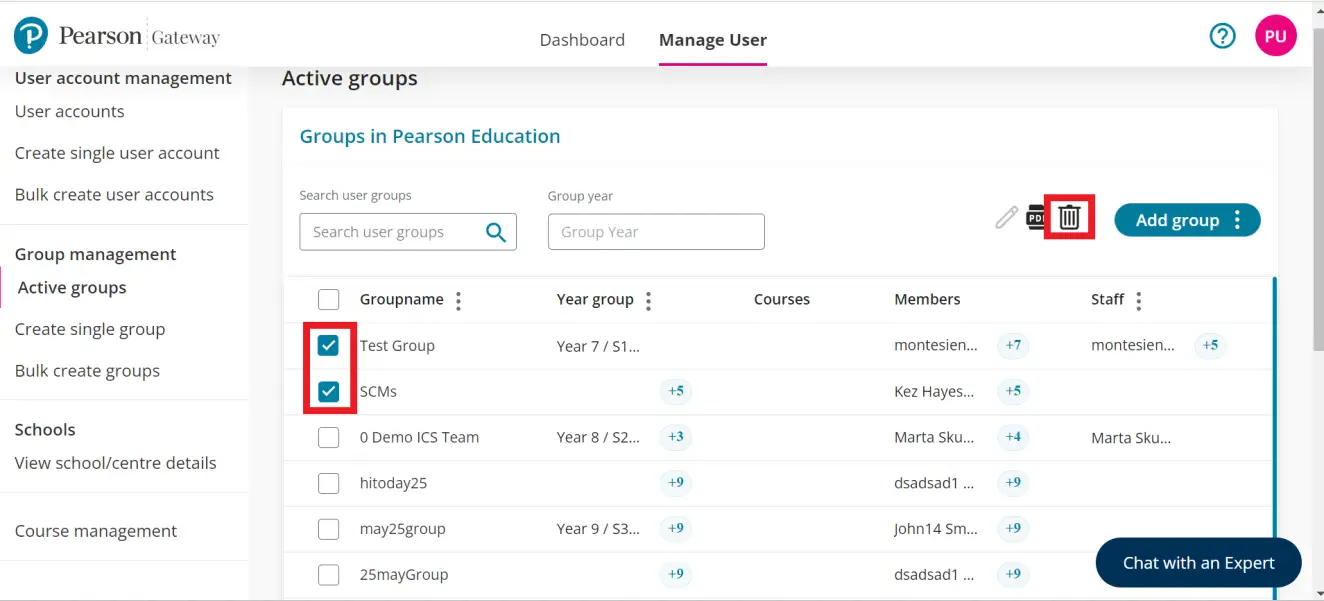
Deleting a group/s
If you wish to delete a group please consult with the member of staff who owns the group as once the group is deleted there is no way for us to re-instate the group/s.You simply need to tick the group/s and select the delete button, this will remove the groups from your schools account.
Creating Bulk User Accounts
Gateway Bulk Create User Accounts
FAQ
How do I bulk upload my users to give them access?
ActiveLearn syncing:
If you already have ActiveLearn with us, we will automatically sync your teachers and pupils which takes around two hours once you have purchased Gateway.
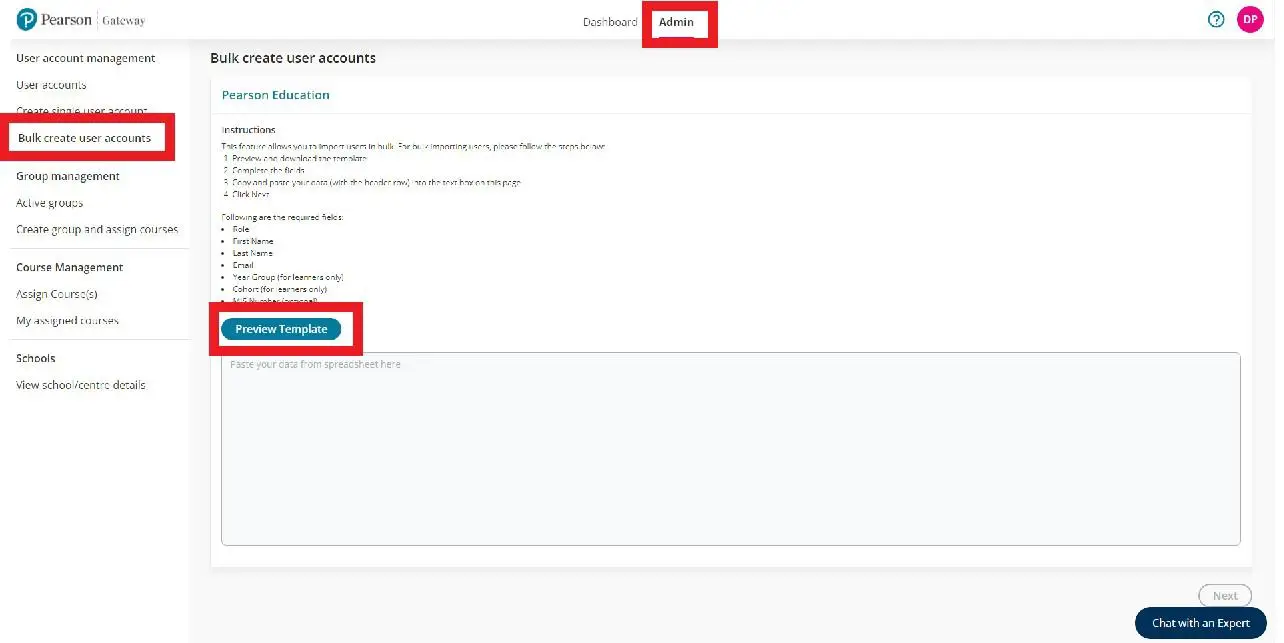
Bulk create user accounts:
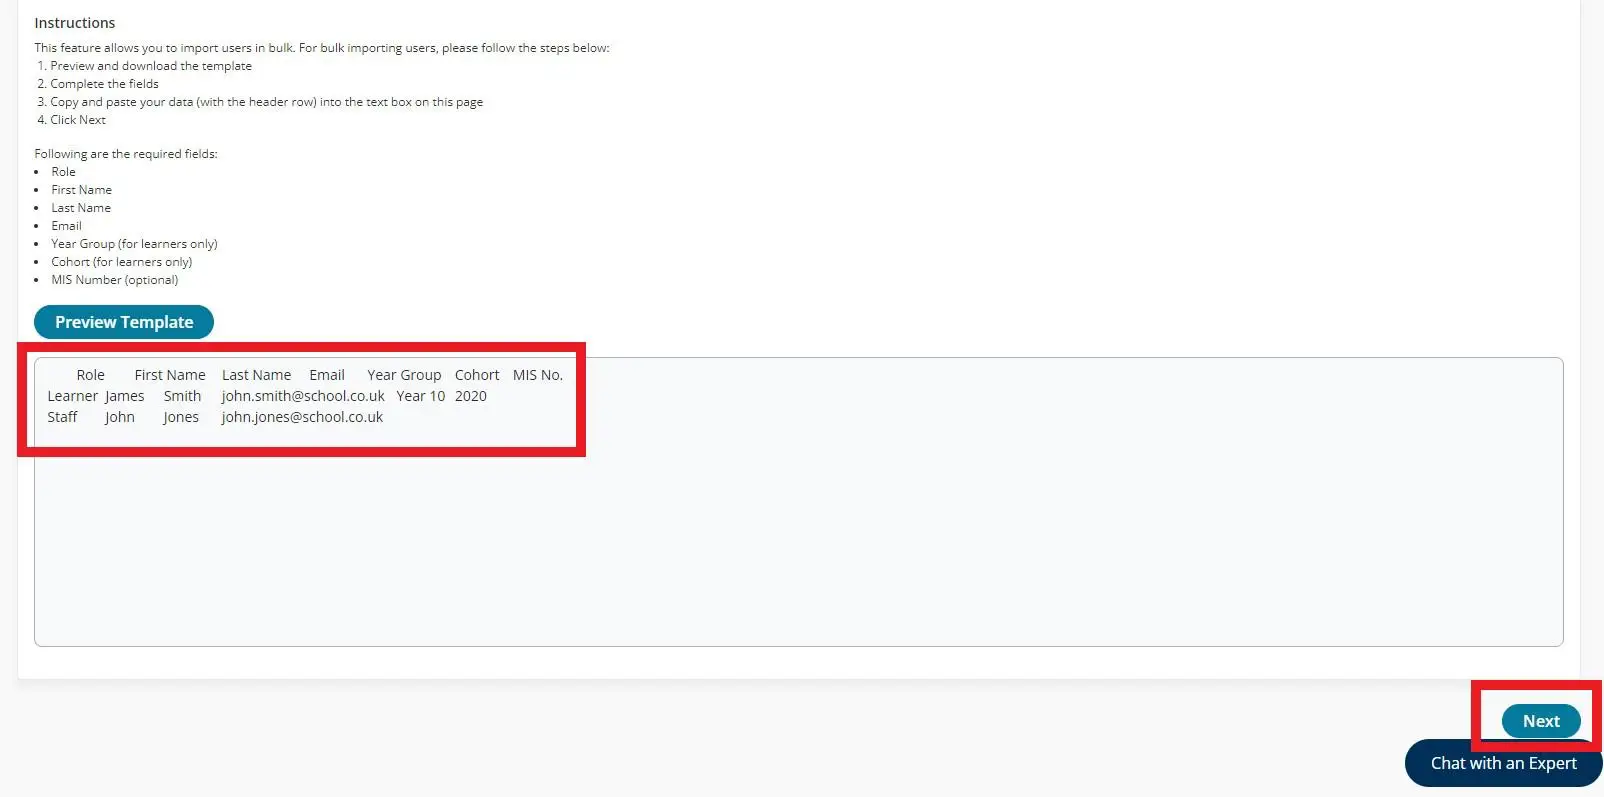
To create bulk accounts, please go to ‘Admin > Bulk create user accounts’. Here you will be presented with instructions on how to complete the process, the required fields, as well as be able to preview and download a template. Please select ‘Preview template’ to access the version to download.
Once you have filled in the template, you can copy and paste the data (including column headers) into the box provided. When the data has been added, please select ‘Next’.
The platform will then process your data and allow you to review what you are about to import. Once you are happy with the data, please select ‘Create users’.

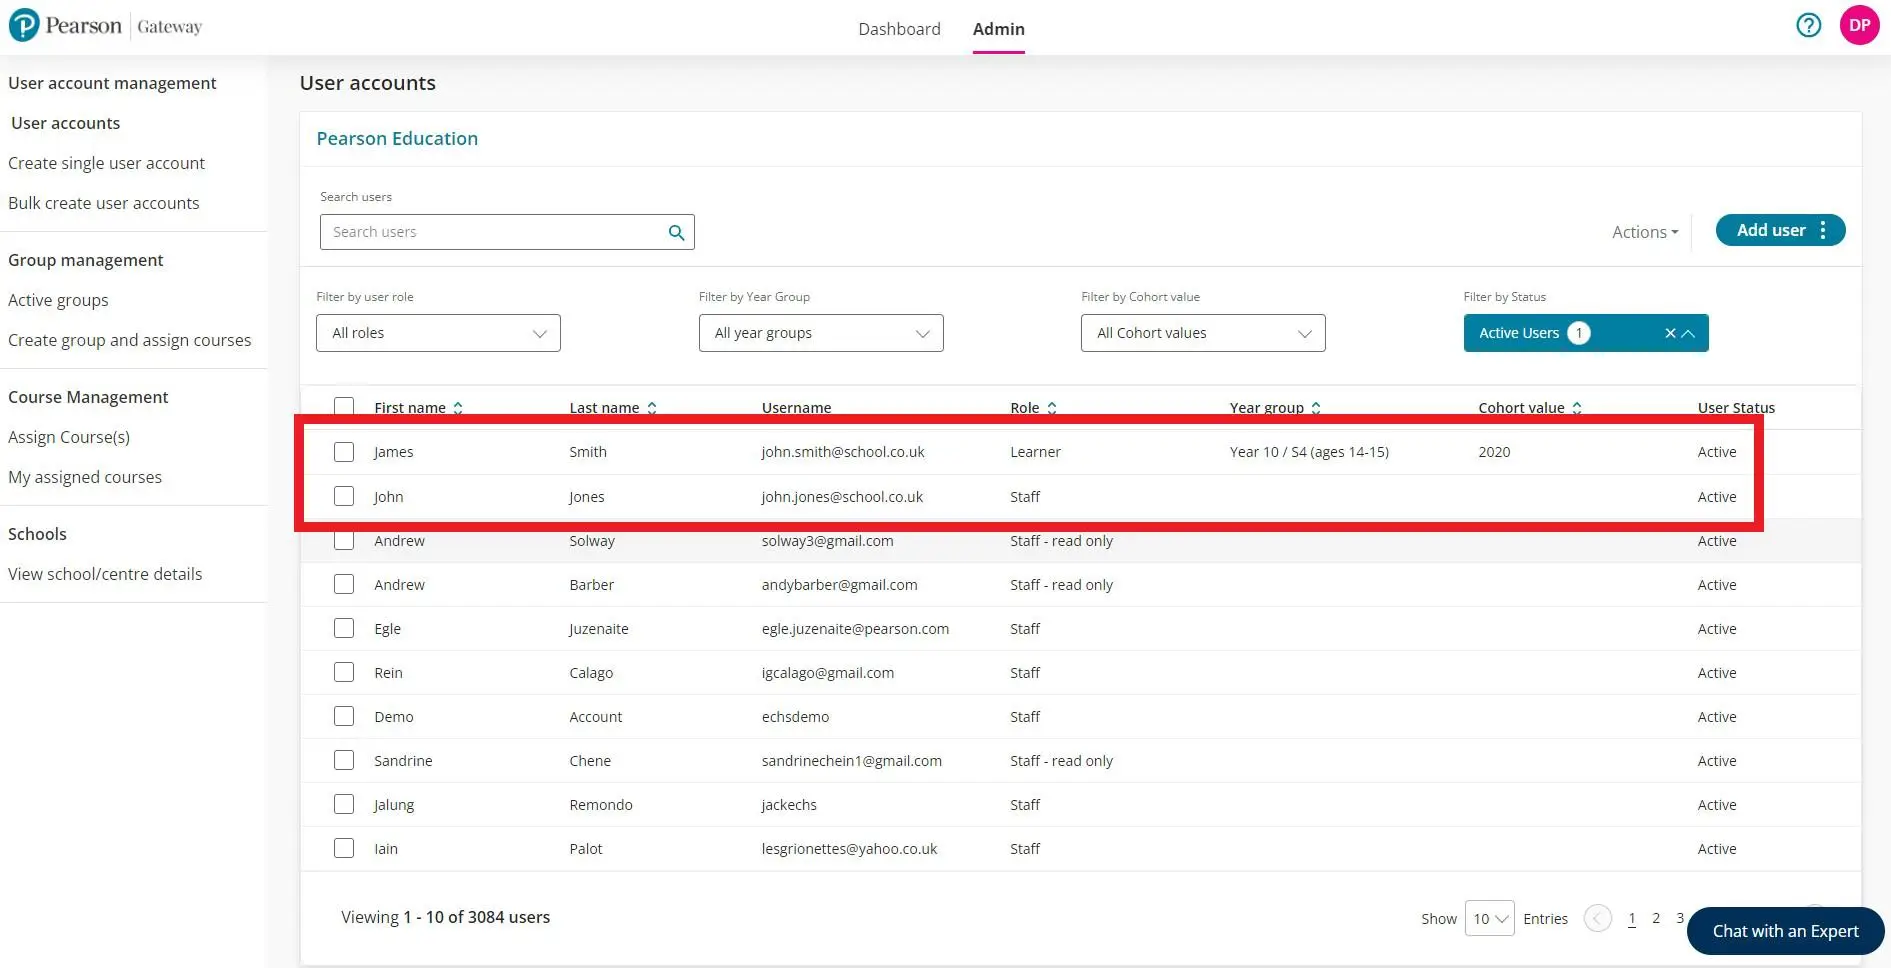
You can then proceed with creating groups and assigning learners and courses to each group
Creating several groups
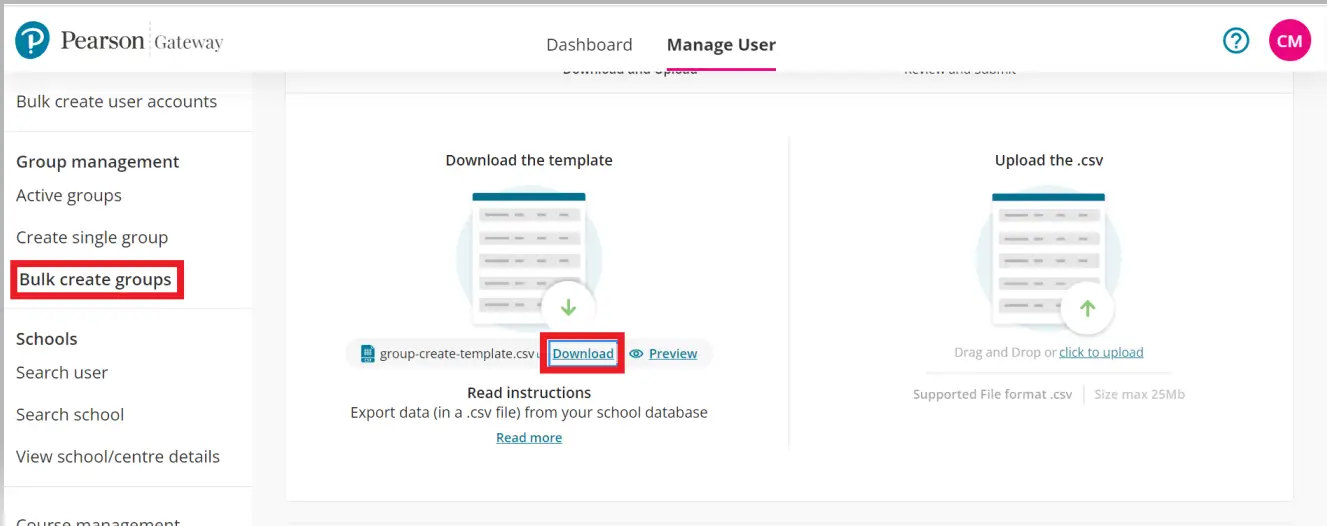
Gateway Bulk create groups
Issue
Bulk creating groups allows you to add all the names of your groups onto Gateway. Once you have added your groups you can start adding your pupils.
Detailed Instructions
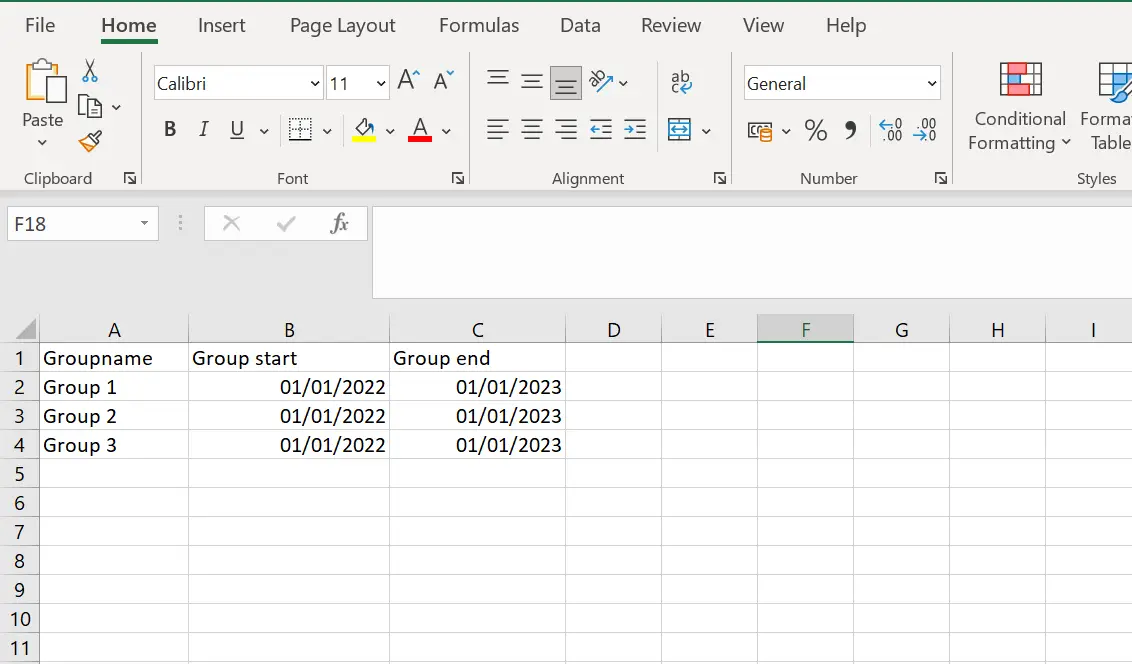
In order to upload your group names you first need to download the template
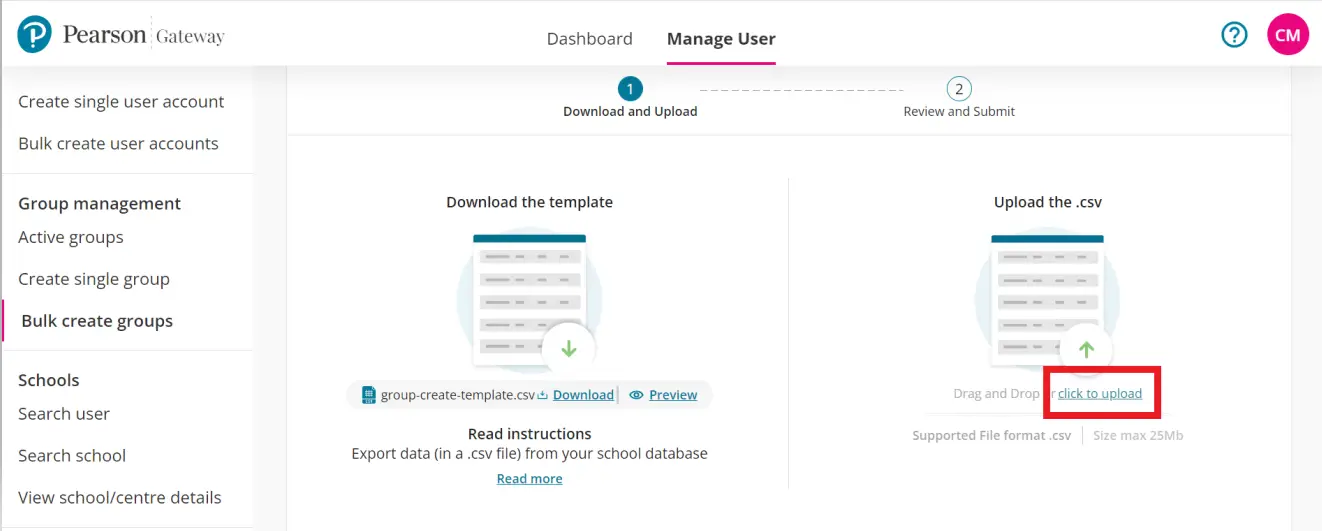
Enter the details and save the file, once you have done this select 'Click upload'
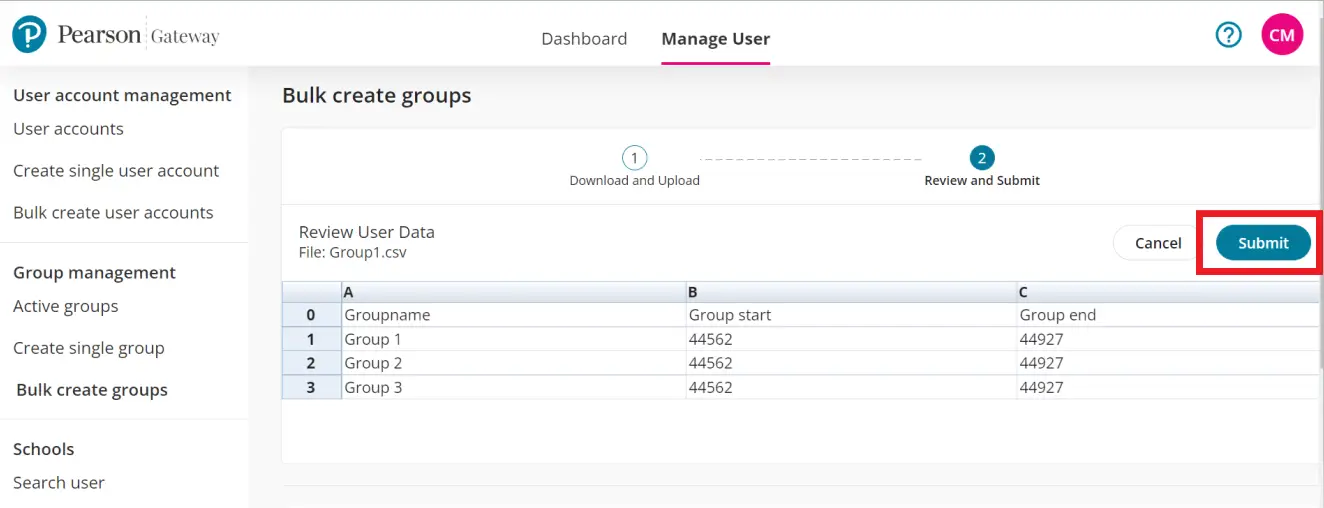
Once you have selected the file you will see a preview of the date, if you are happy with this you just need to select 'Submit'
Resources
Finding Resources

An overview.
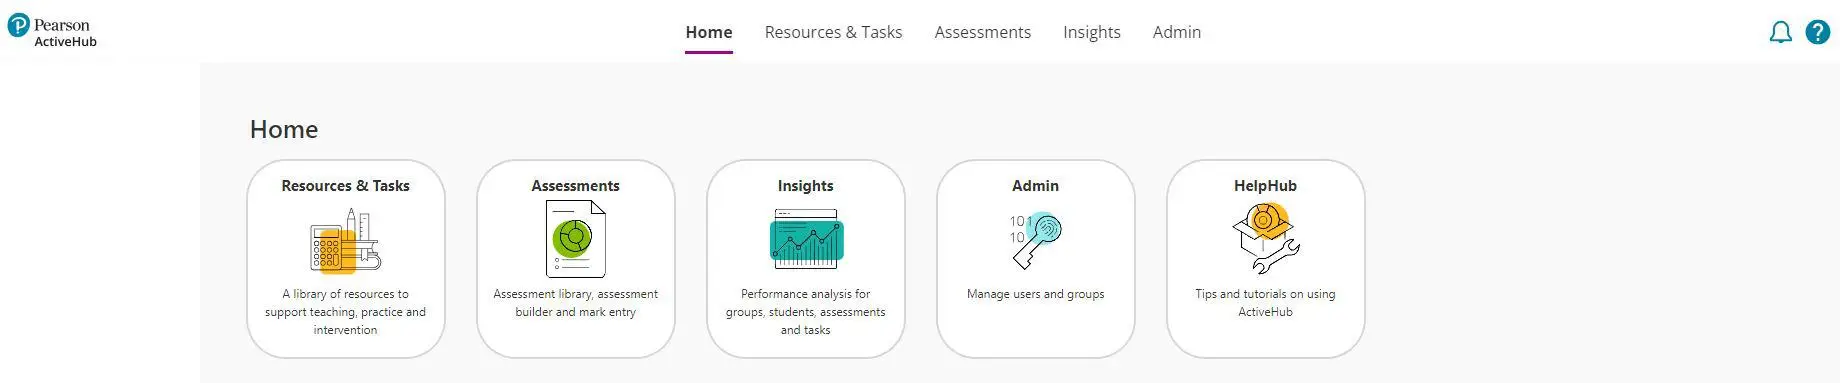
The ActiveHub Dashboard
This dashboard allows you to navigate across the platform using the tiles. Your access to these areas will depend on the level of subscription you have purchased. All will have access to the HelpHub.

An overview.
This area contains a library of resources to support your subject and course delivery.
Depending on your subscription you will have access to resources to support both practice and intervention through assignable tasks, as well as downloadable materials to support teaching and learning.
Courses page and selecting a course
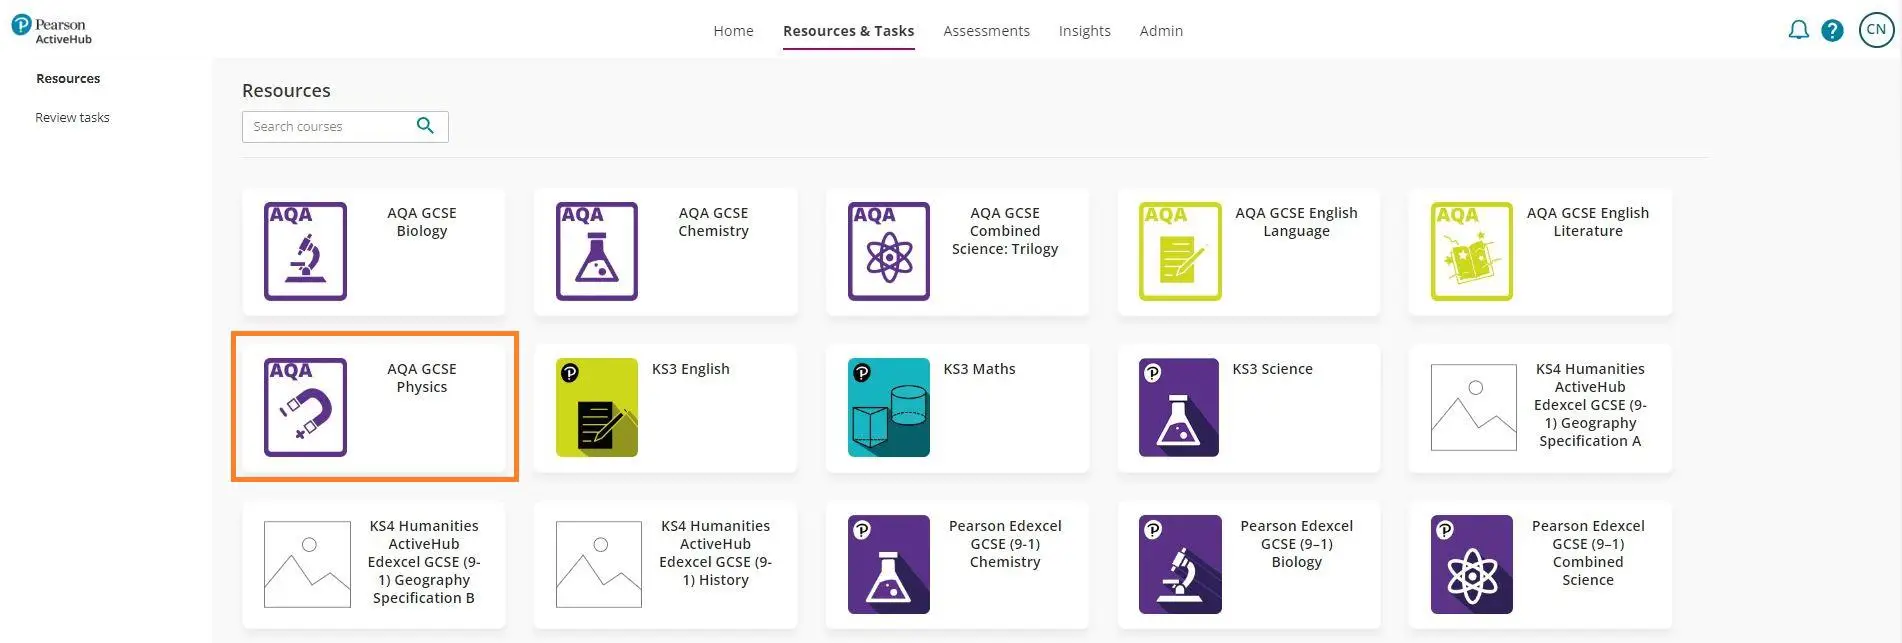
When you land on the Resources and Tasks page in ActiveHub you will be presented with a series of tiles that represent the subject and course content you have access to.
To access course content simply click on the appropriate tile.
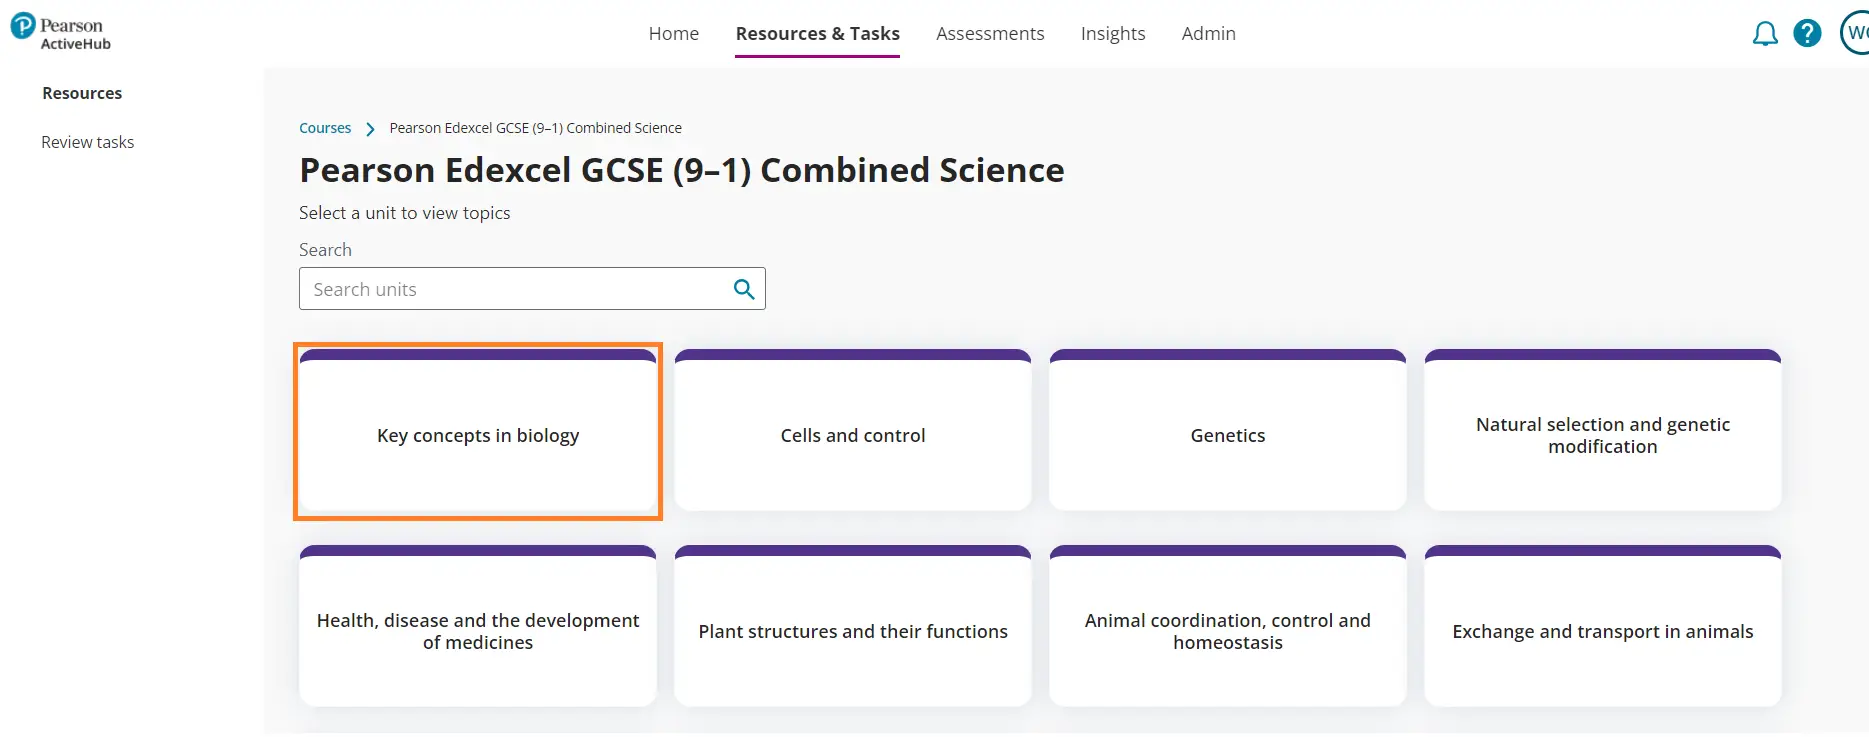
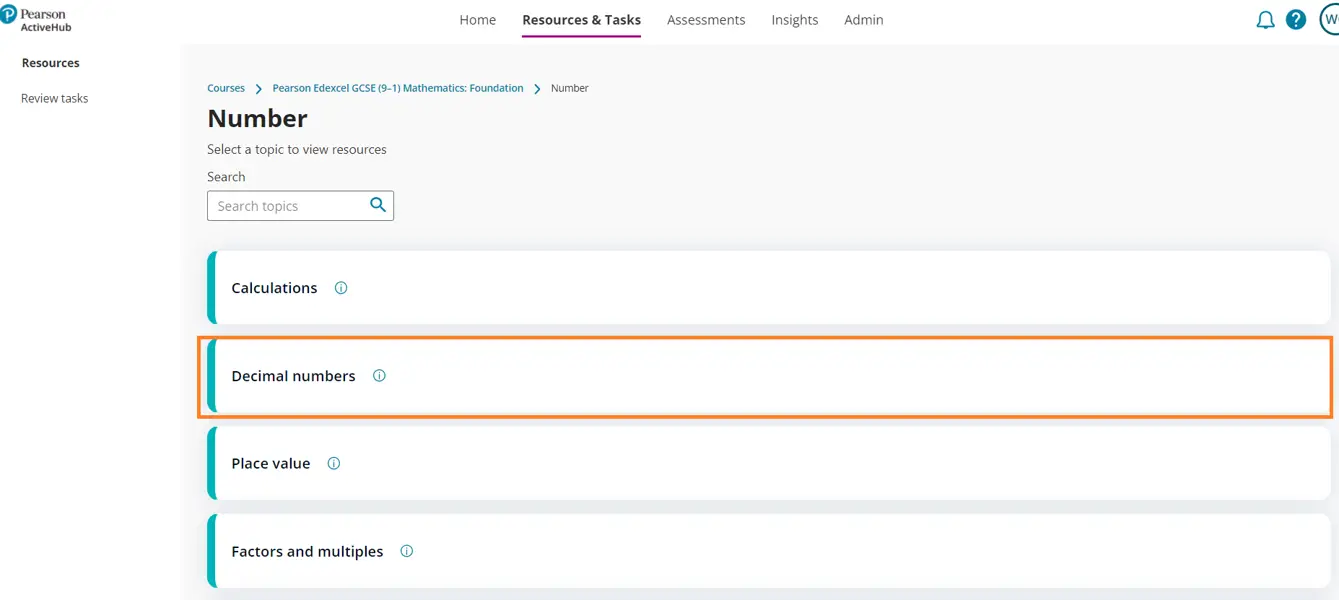
Course Topics and Sub Topics
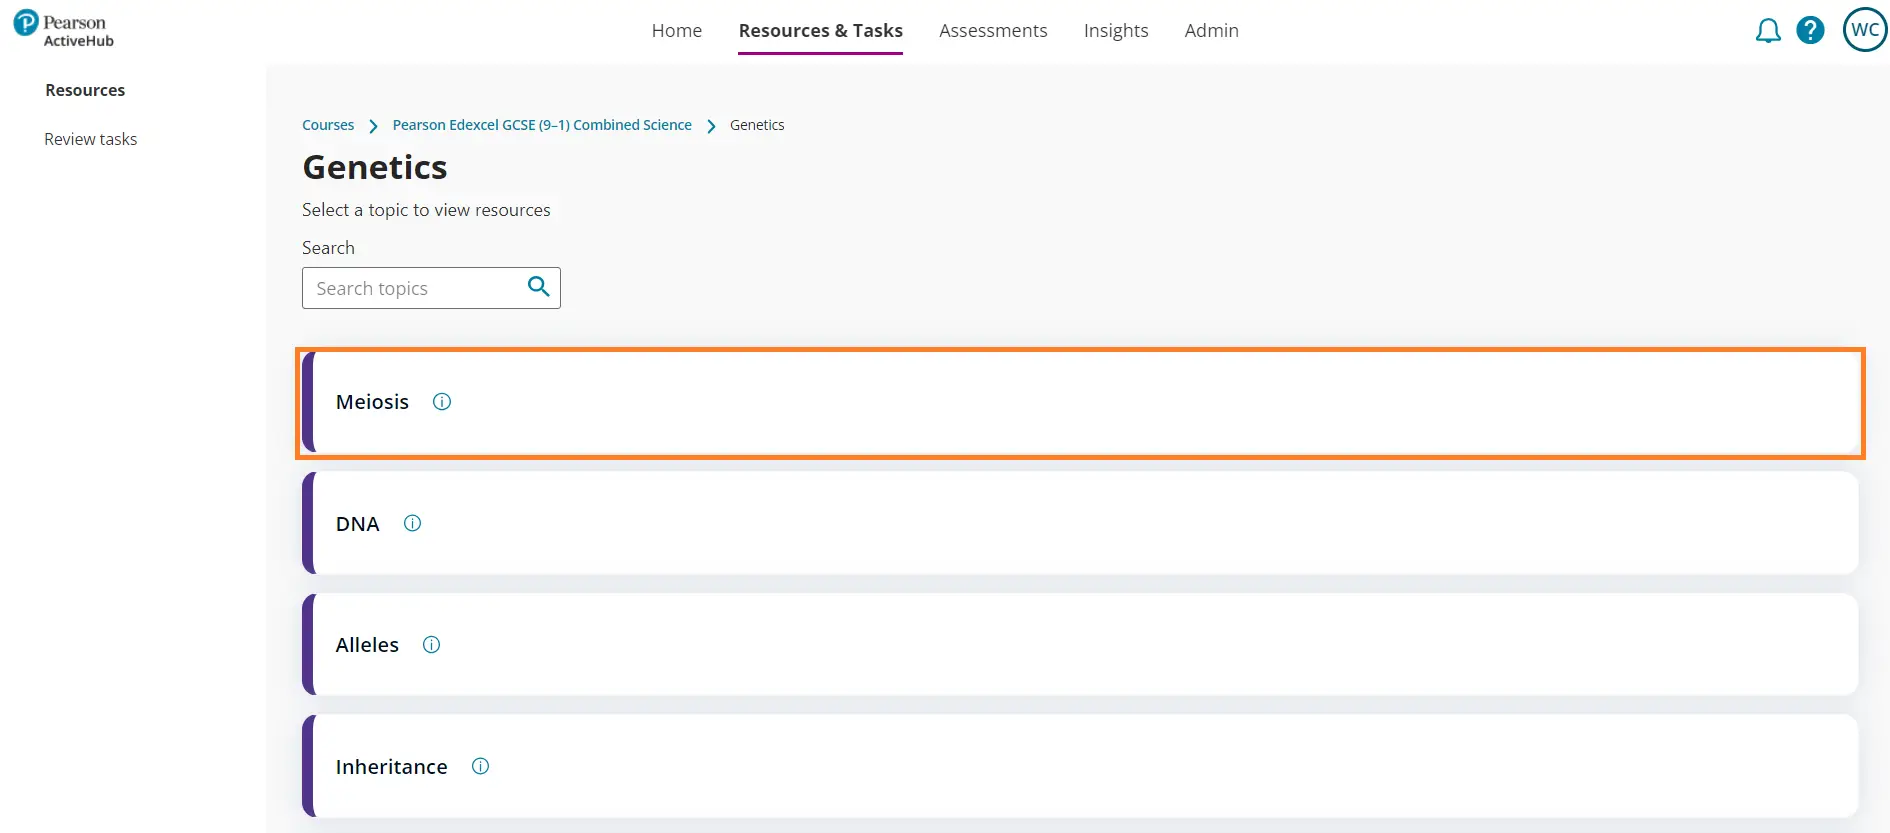
Once you have chosen your course you will be presented with a list of topics associated with that course. Clicking on a topic will take you to a list of relevant subtopics
You can then choose between the relevant subtopics to drill down to the level of content and resource you need.
Creating a Task
Working with different types of tasks.
Selecting resources and creating a Task
From your course resource library you are able to create tasks which you can assign to groups and individual learners.
Currently you are not able to assign resources of a different type, however this will be available soon. You can however assign multiple of the same type of resource within a single task.
Having chosen your course, topic and subtopic you will be presented with your library of resources.
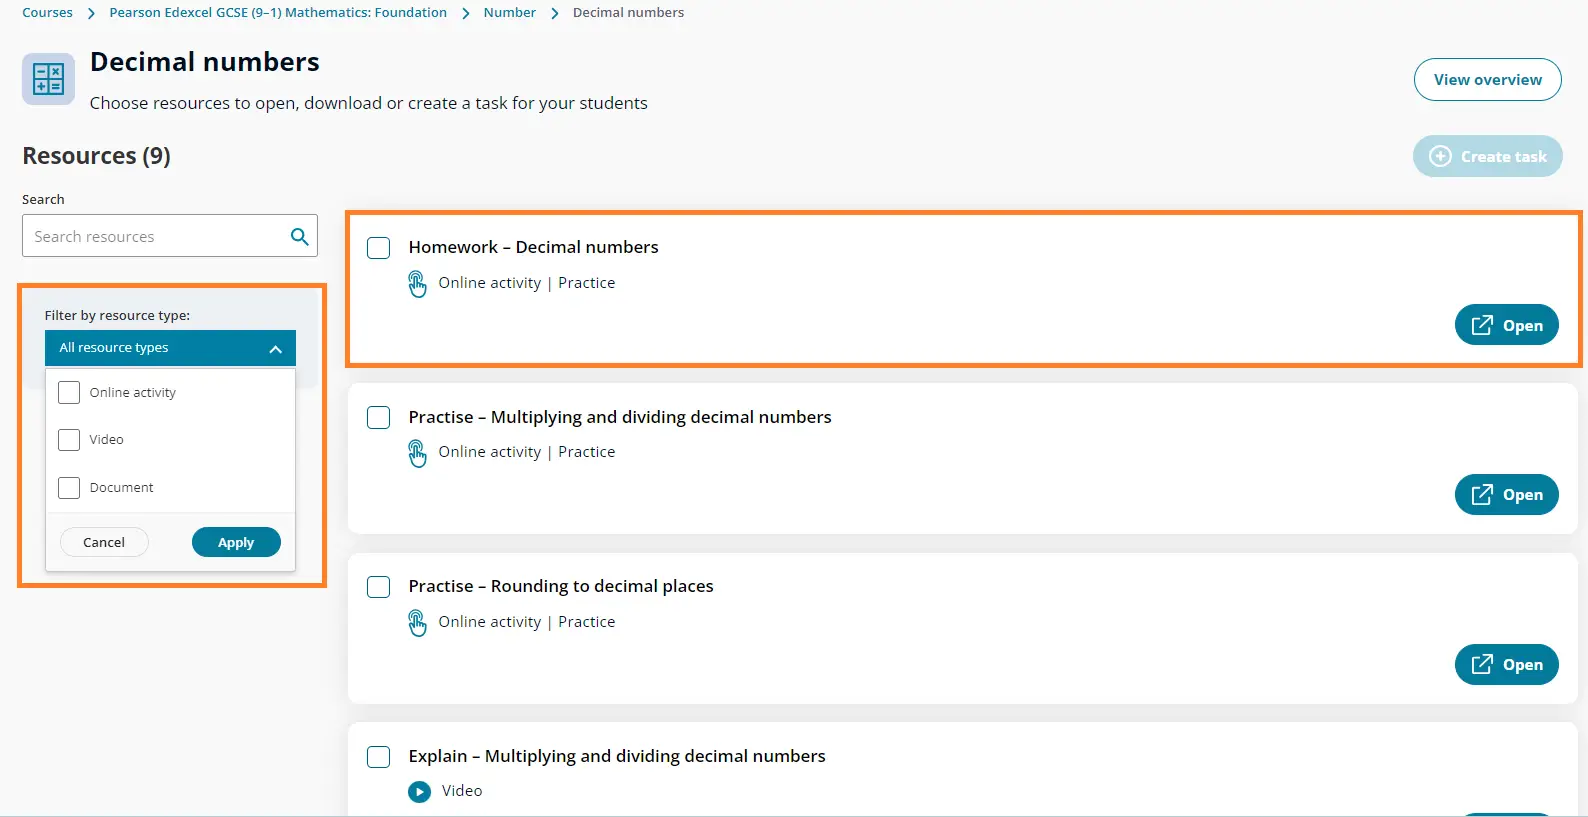
To create a task you can simply click on the tick box to the left of the chosen resource and select the ‘Assign button at the top.
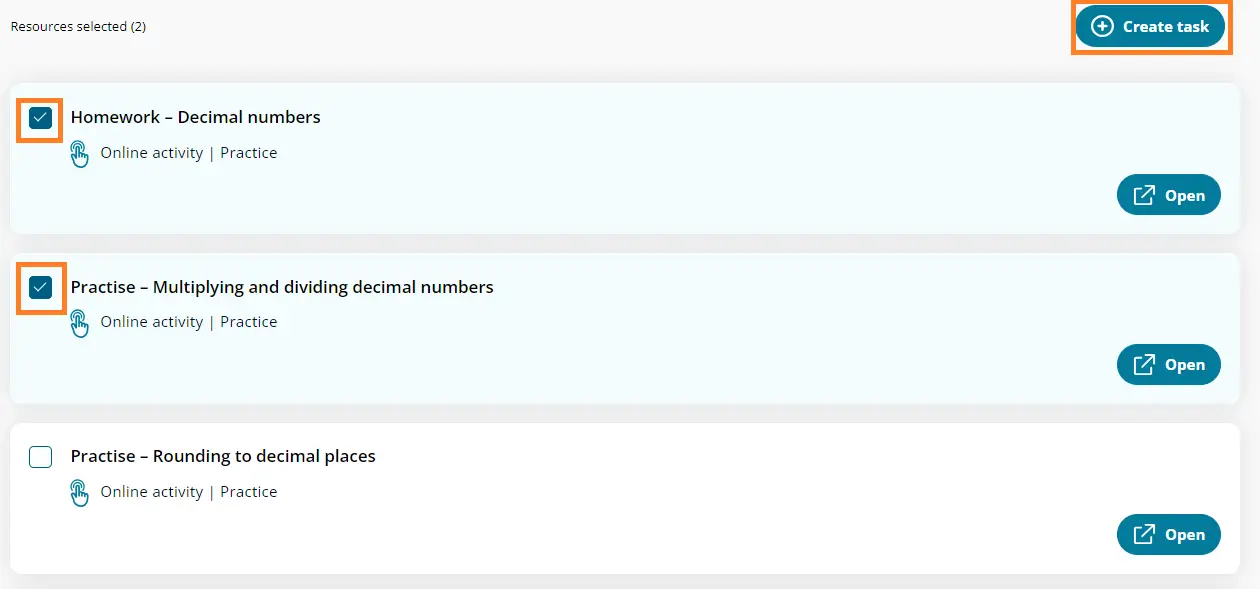
You will be taken to the task creation page.

Notes
You can amend the order and remove and unwanted resources or activities in your task, using the arrows and buttons highlighted above.
You can then apply the appropriate task information, names, date and instructions as well as choosing the group or learners you would like to assign to.
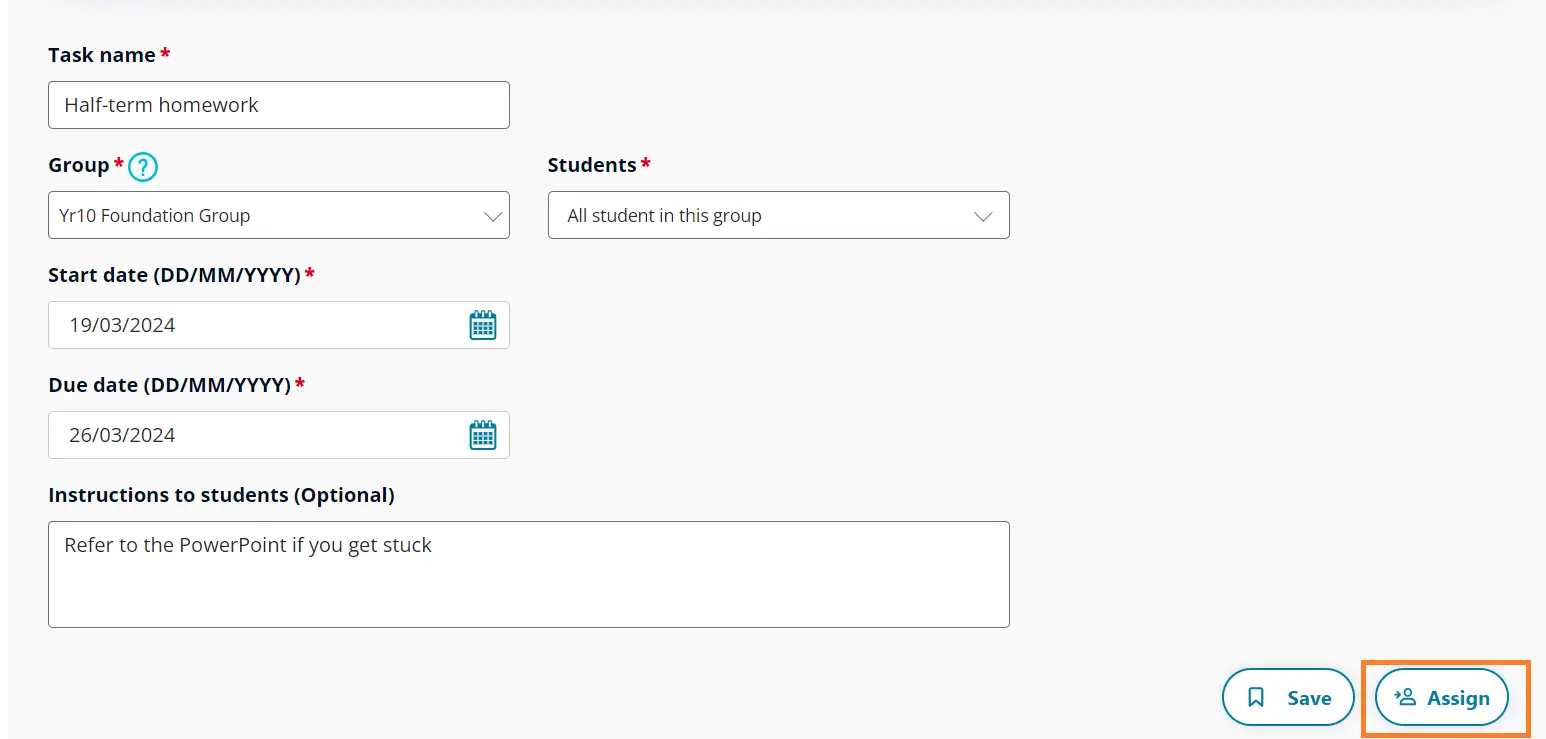
You can click ‘Assign’ and the task will be sent to the students ‘My tasks’. Or save and assign or amend at a later date.
Review Tasks

View your task results
View your task results
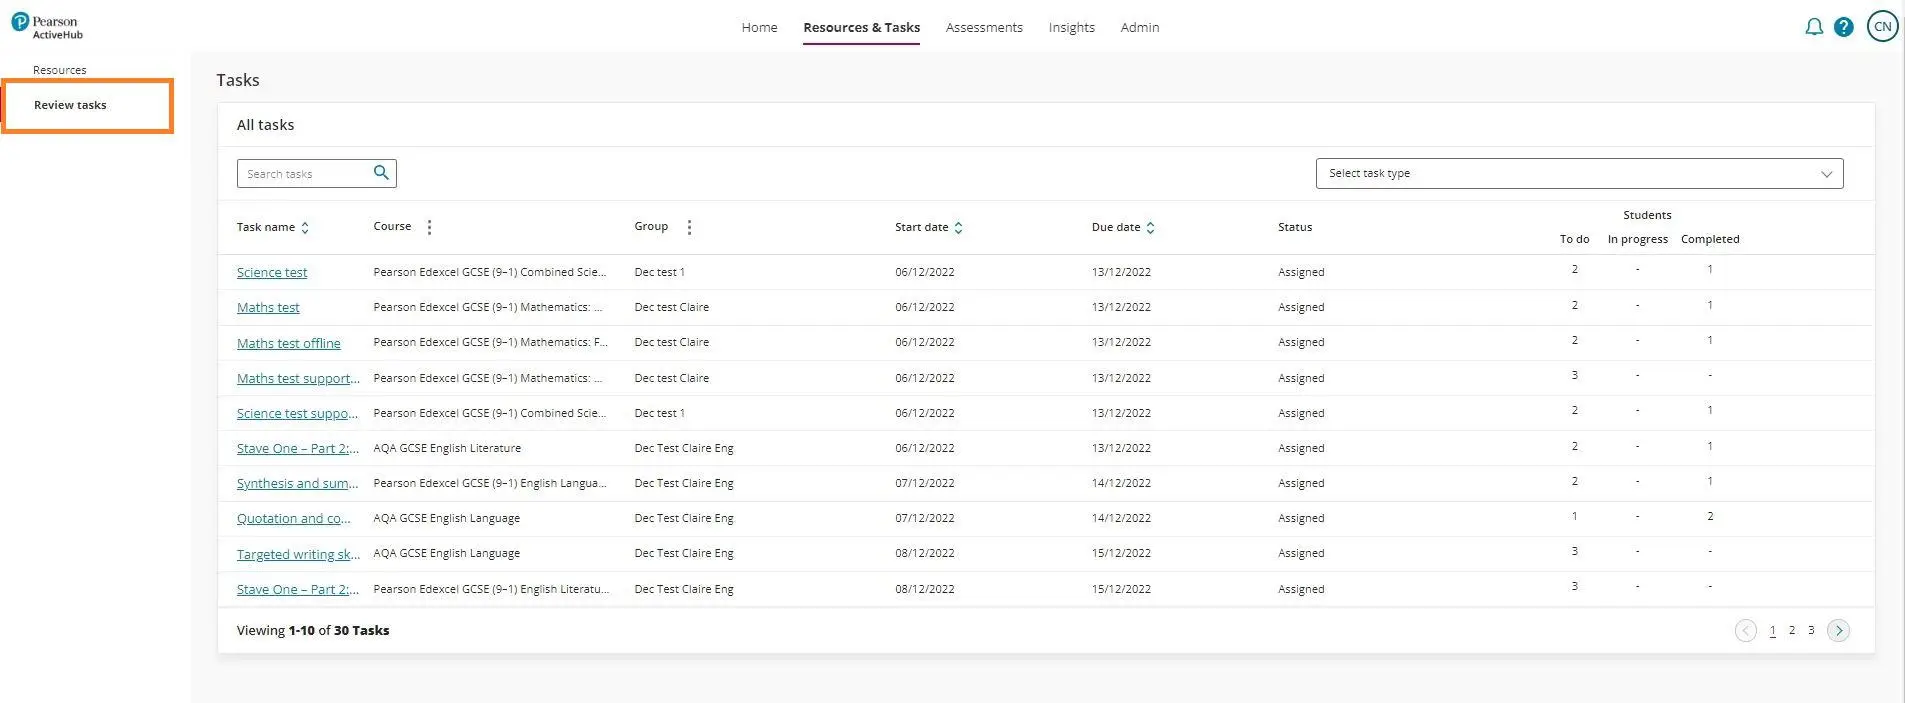
You can access and review tasks you have created and assigned in the ‘Review tasks tab to the left of your page.
This will provide an overview of the task details as well as some indication of their progress and completion.
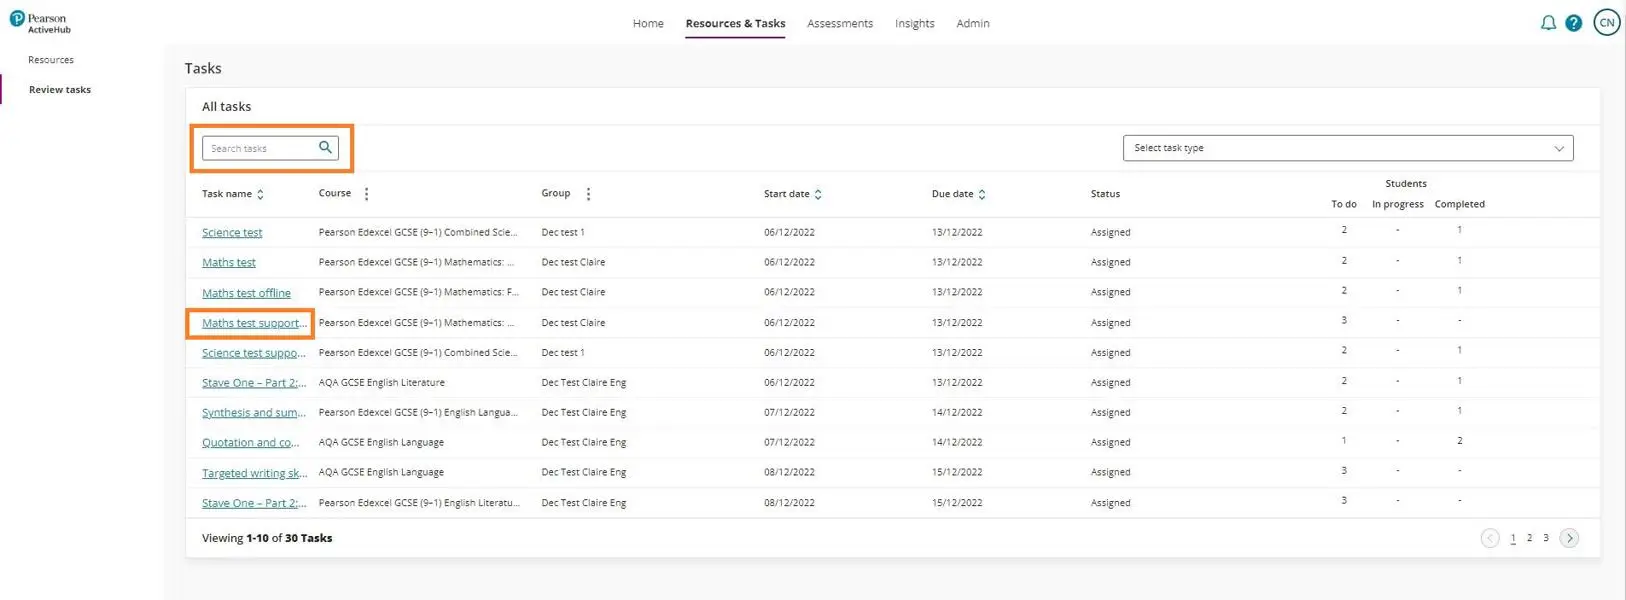
Search and view results
You can search for a task using the search box and view the details by clicking on the hyperlink name for your chosen task
View the task results
Having selected the task you with to view you will be presented with a screen outlining:
The details of your task
A list of the students who have been assigned
Links to view the assigned resources.
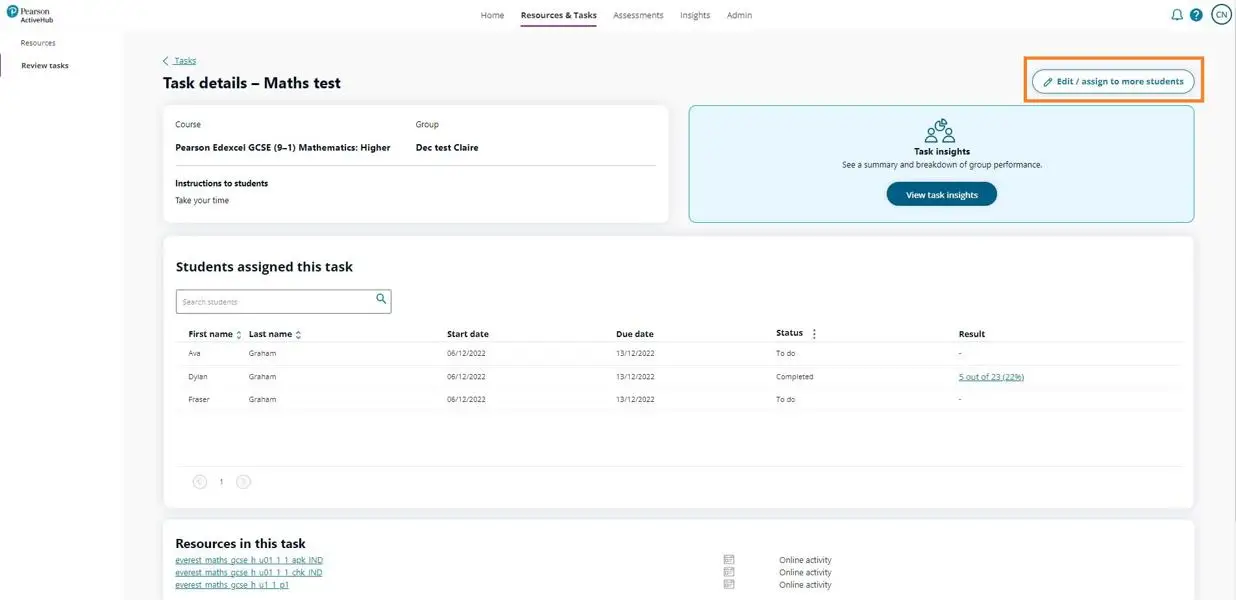
You can also edit a task and if appropriate add more learners
View the task results
To view the task results of an individual learner select the ‘Results’ hyperlink next to you chosen learner
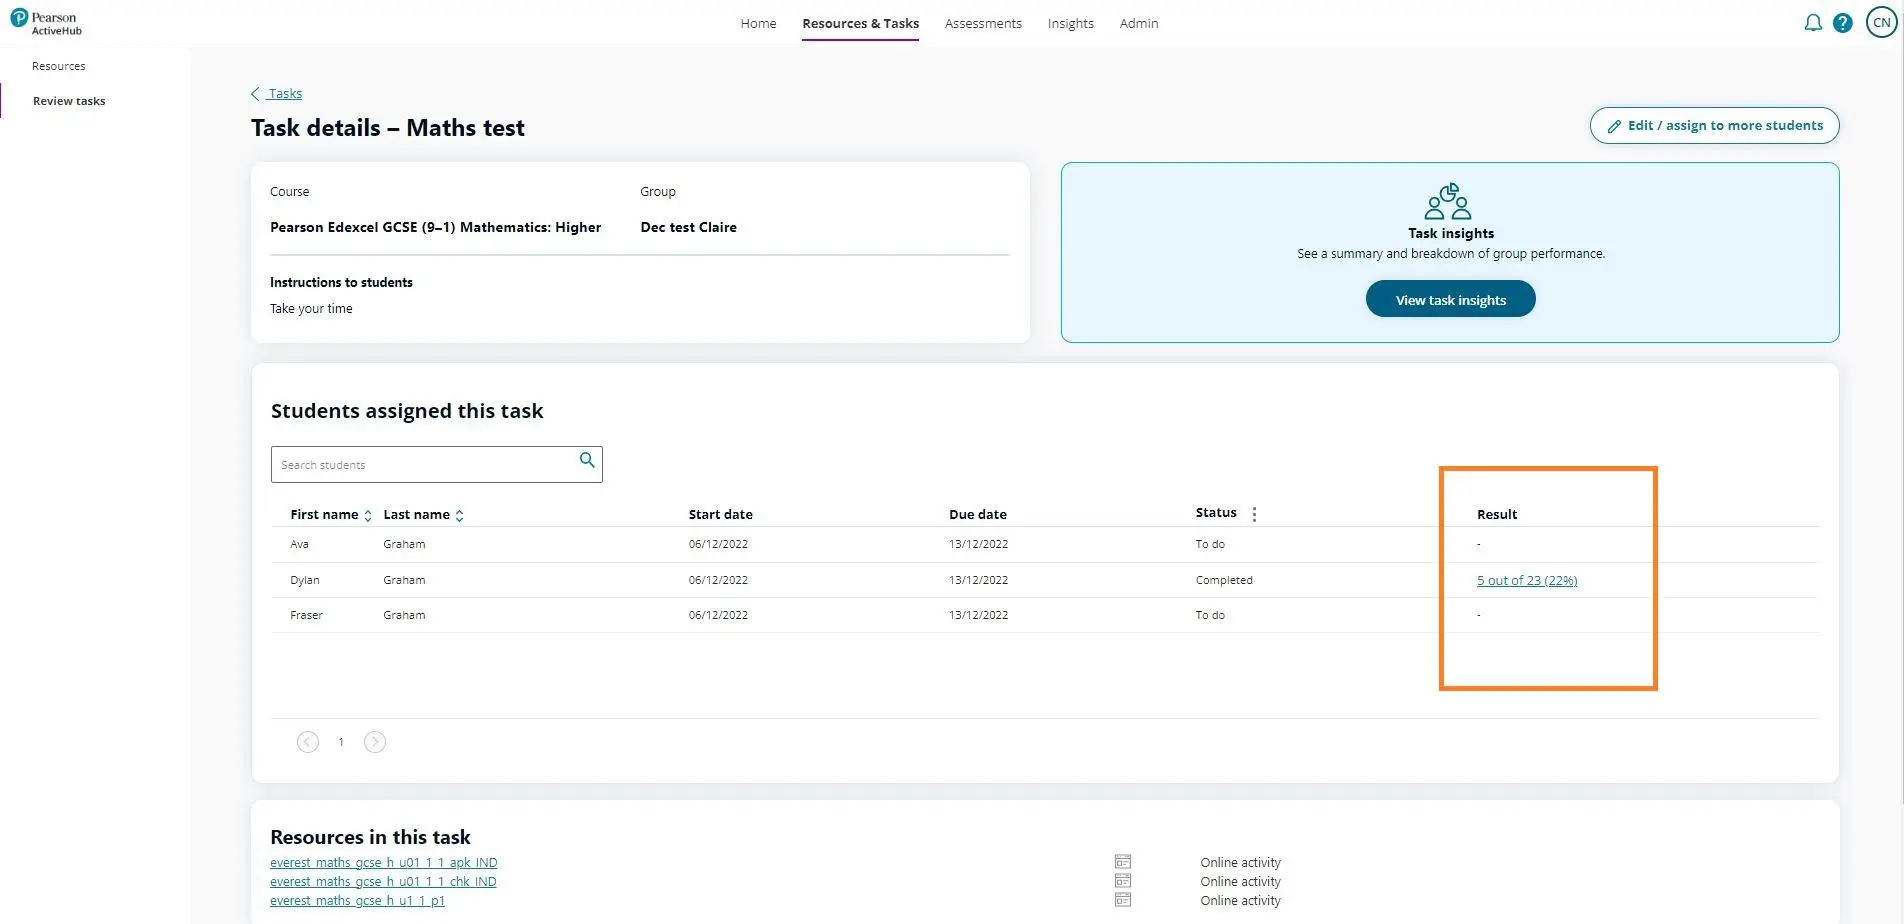
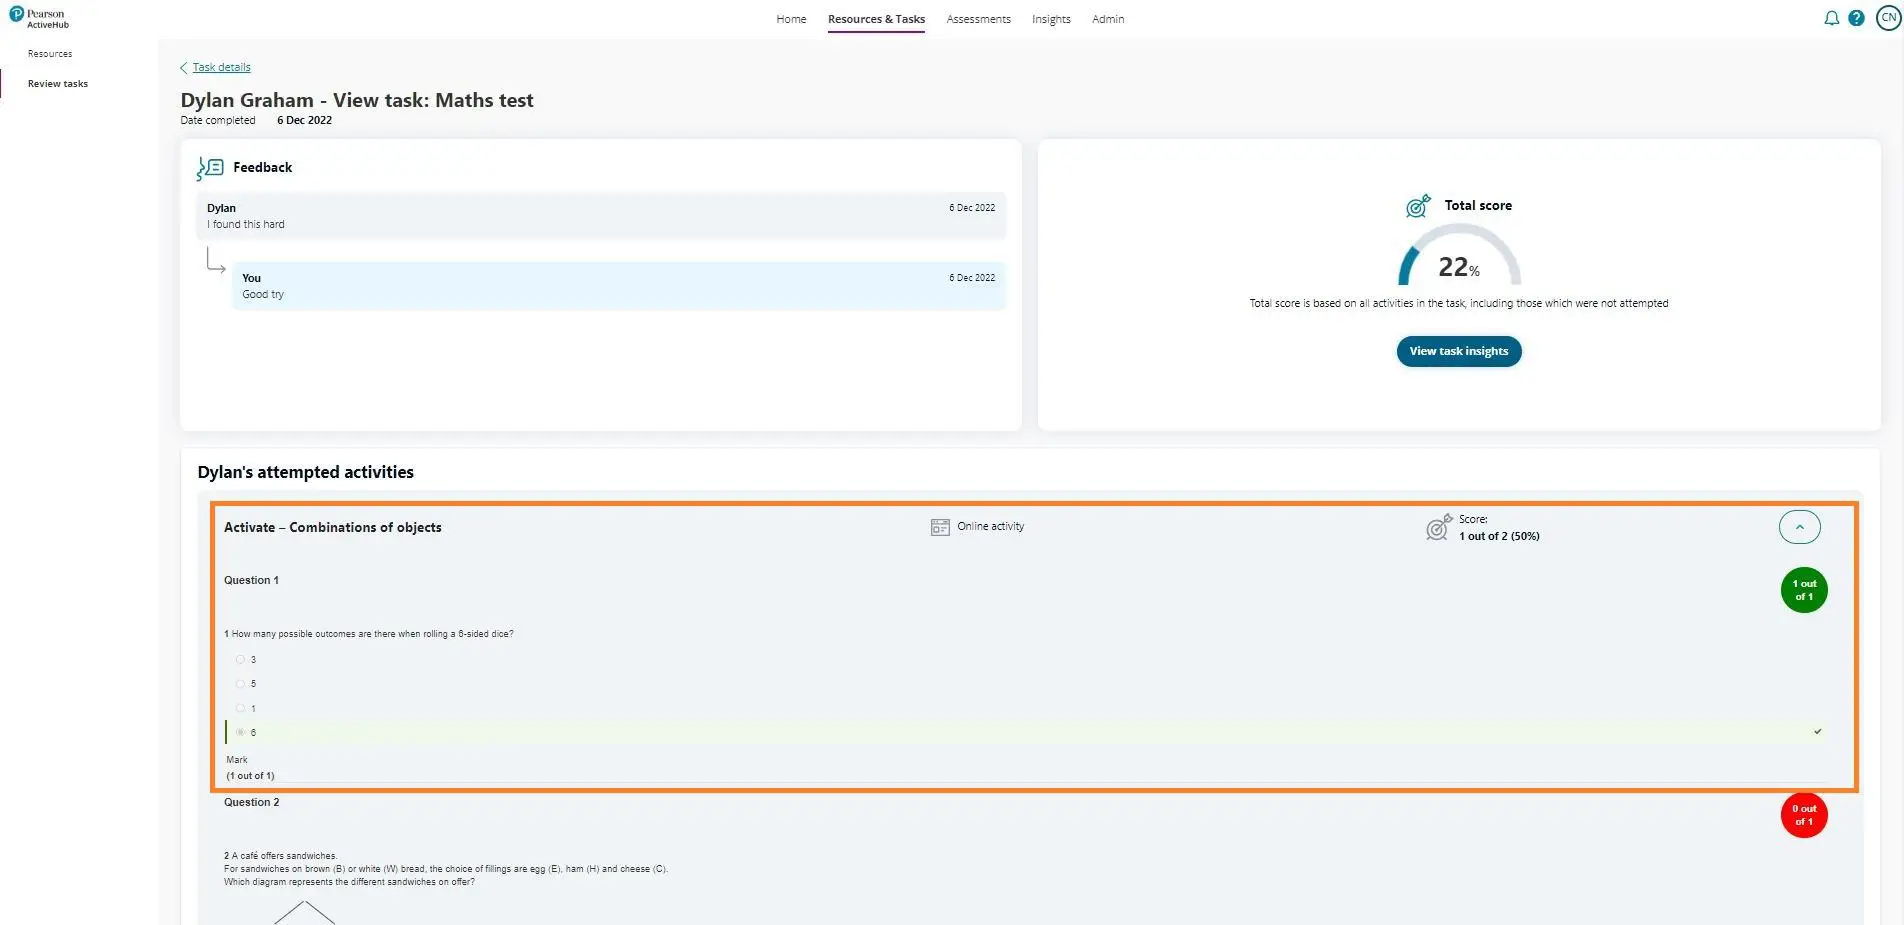
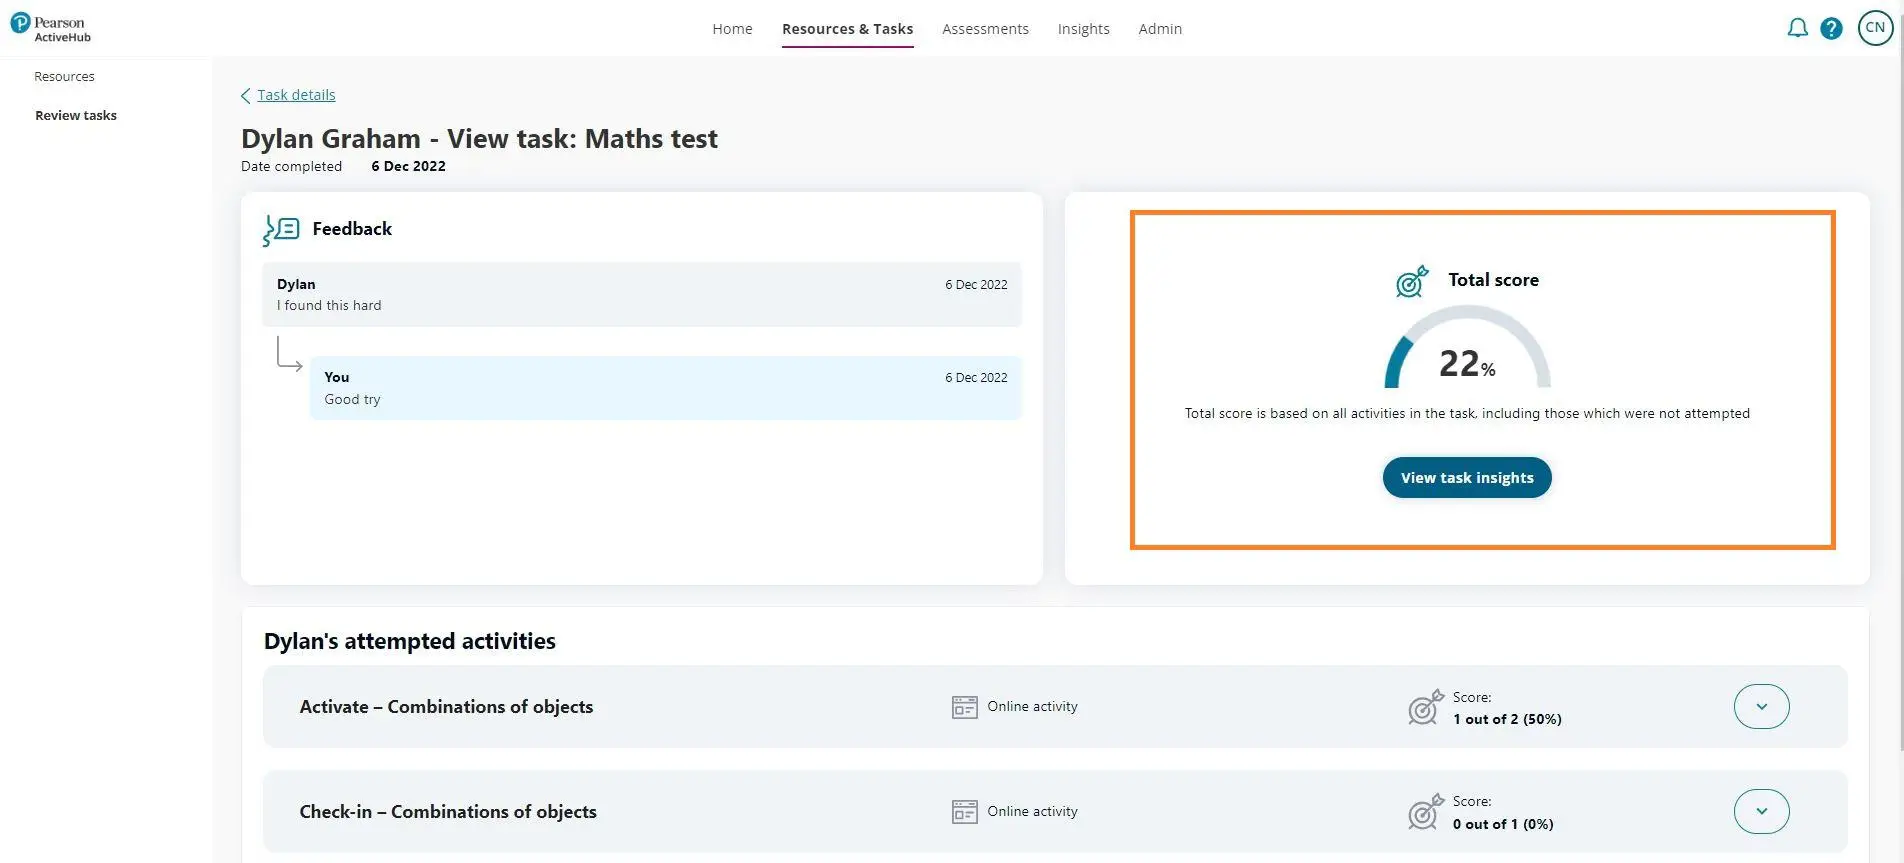
Once you have clicked the link for learner results you will be able to access the details of your learners task performance at a question and resource level.
This will present the total score as a percentage including any un-attempted questions, as well as visibility of what learner answers were and which questions they got right and wrong.

View Task insights
You can also view the group and learner performance in the task within the insights dashboard. You can access this buy simply selecting the ‘View insights’ button at the top.
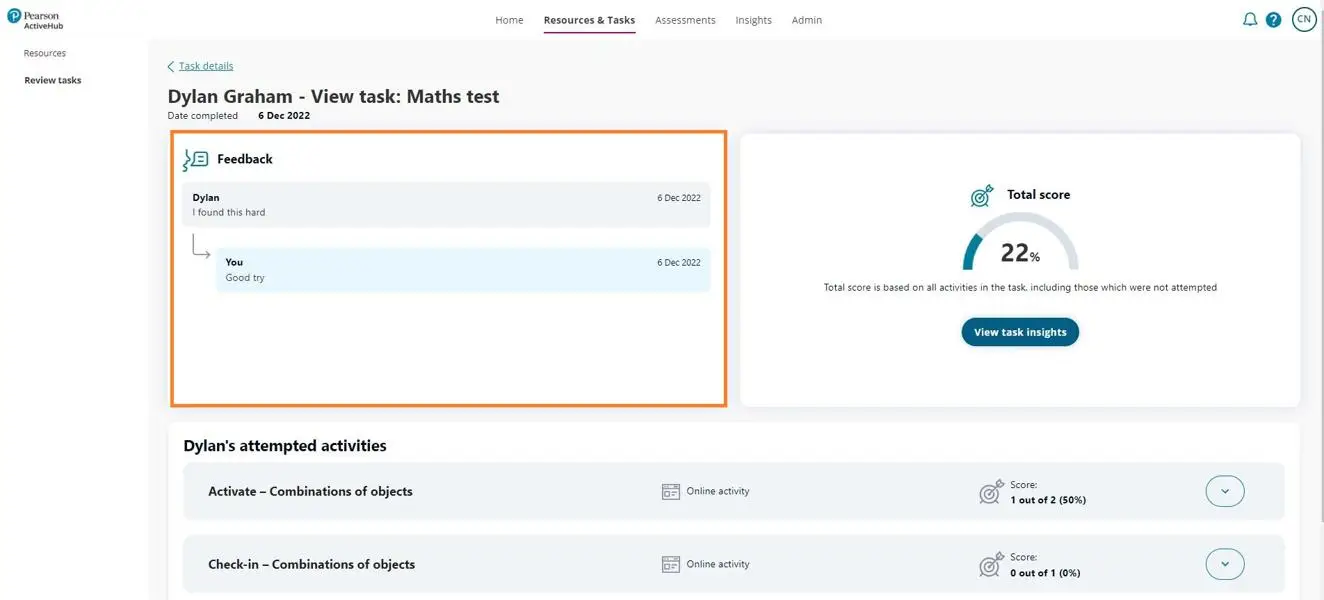
Task Feedback

Helping your learners.
After reviewing a student’s answers and adding marks where necessary, you can send the final marks to the students:
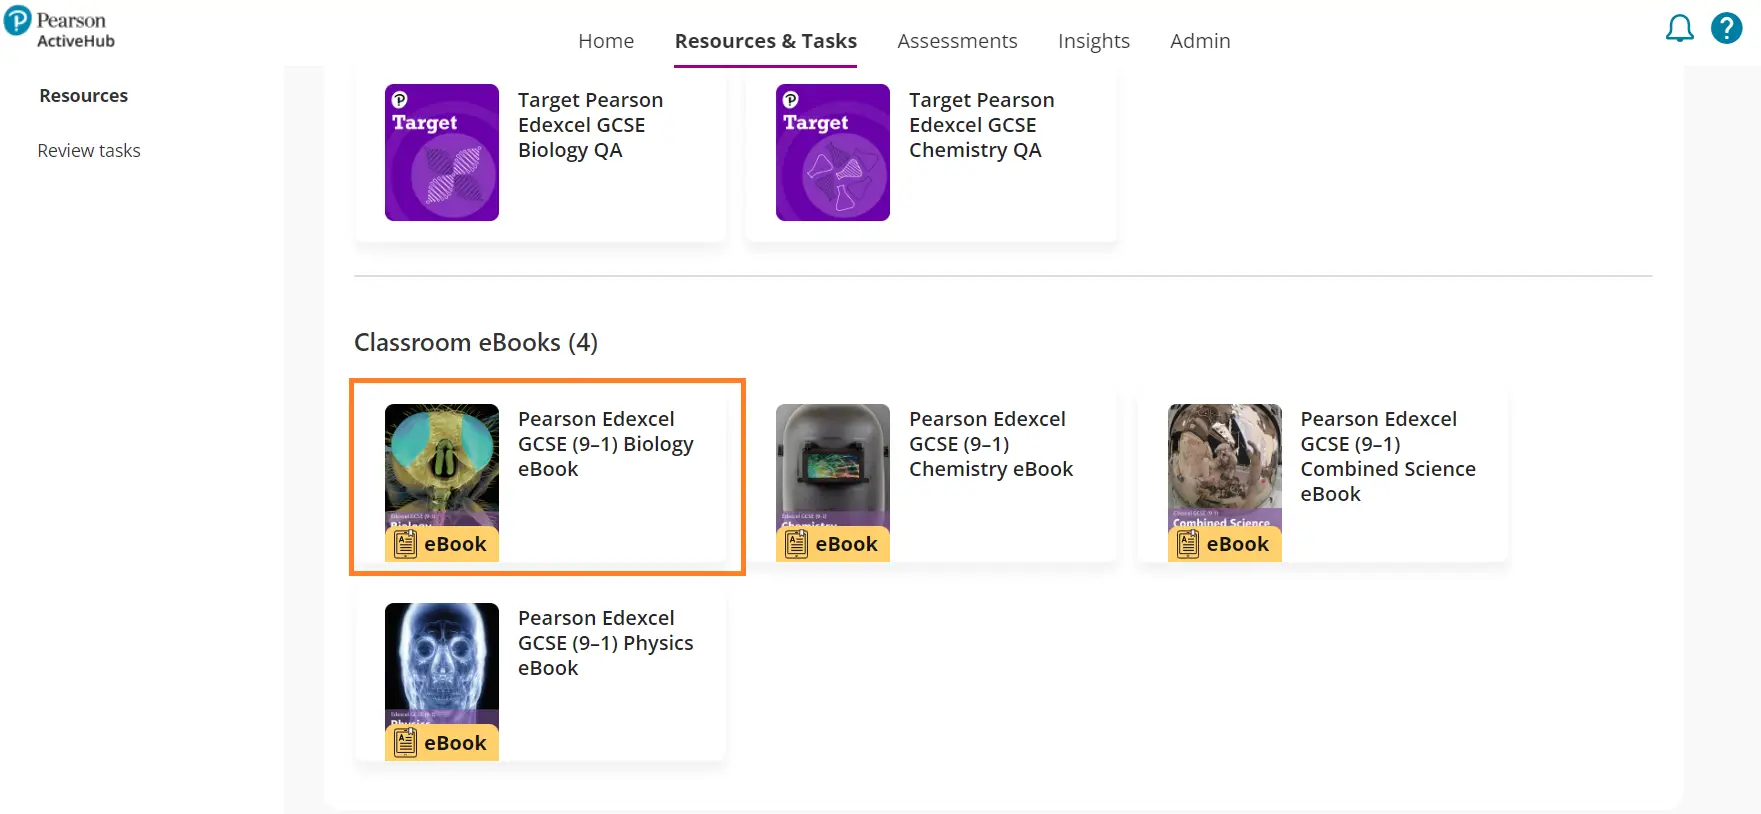
Finding an eBook
In the 'Resources & Tasks' area, underneath your courses, you will see your classroom eBooks.
You can select one of these to open up your eBook.
You will then be taken to the first page of the eBook. To learn more about navigating through eBooks and using the associated resources, go to the next article.

Using eBooks

Navigating through an eBook
There are a few ways to navigate through your chosen eBook. They are:
- Directional buttons
- Page numbers
- Contents
To find out more about each of these methods, keep reading!
Directional buttons
You can turn the pages of the eBook by clicking on the left and right arrows. This will move the pages forward or backwards, one at a time.
Page numbers
If you know which page you want, you can just type the page number directly into the box at the bottom left of the screen. Once you have typed the number you want, push the enter button on your keyboard, and the right page will come up.
Contents
Another way of finding the page you want, is to click on the contents button. You will then see a list of all the different chapters of the book, which you can select. Once you select an option, the right pages will display.
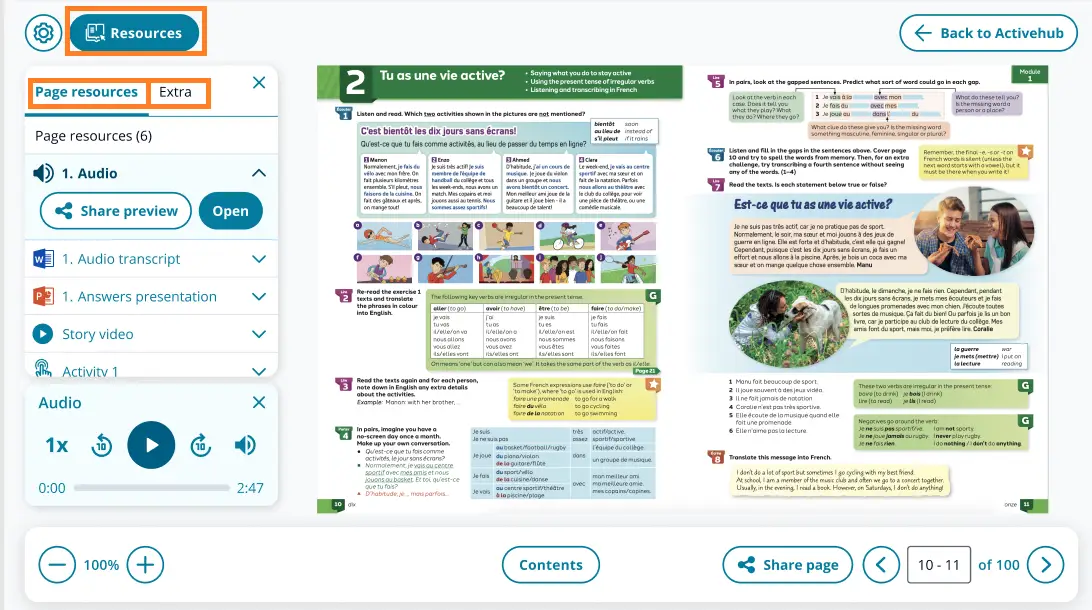
eBook Resources
Using the resource list
When there are resources available on a certain page, you can find them in the resource list.
Click the 'resources' button in the top left. You will see two tabs - 'Page resources' and 'extra'
The page resources are all the resources associated with that particular page. For example, an audio file needed for an exercise on the page.
The extra resources are any resources that, while still useful, are not specific to the page itself. These might include a PDF or Word document that provides some extra information or context.
Assessments
Dashboard

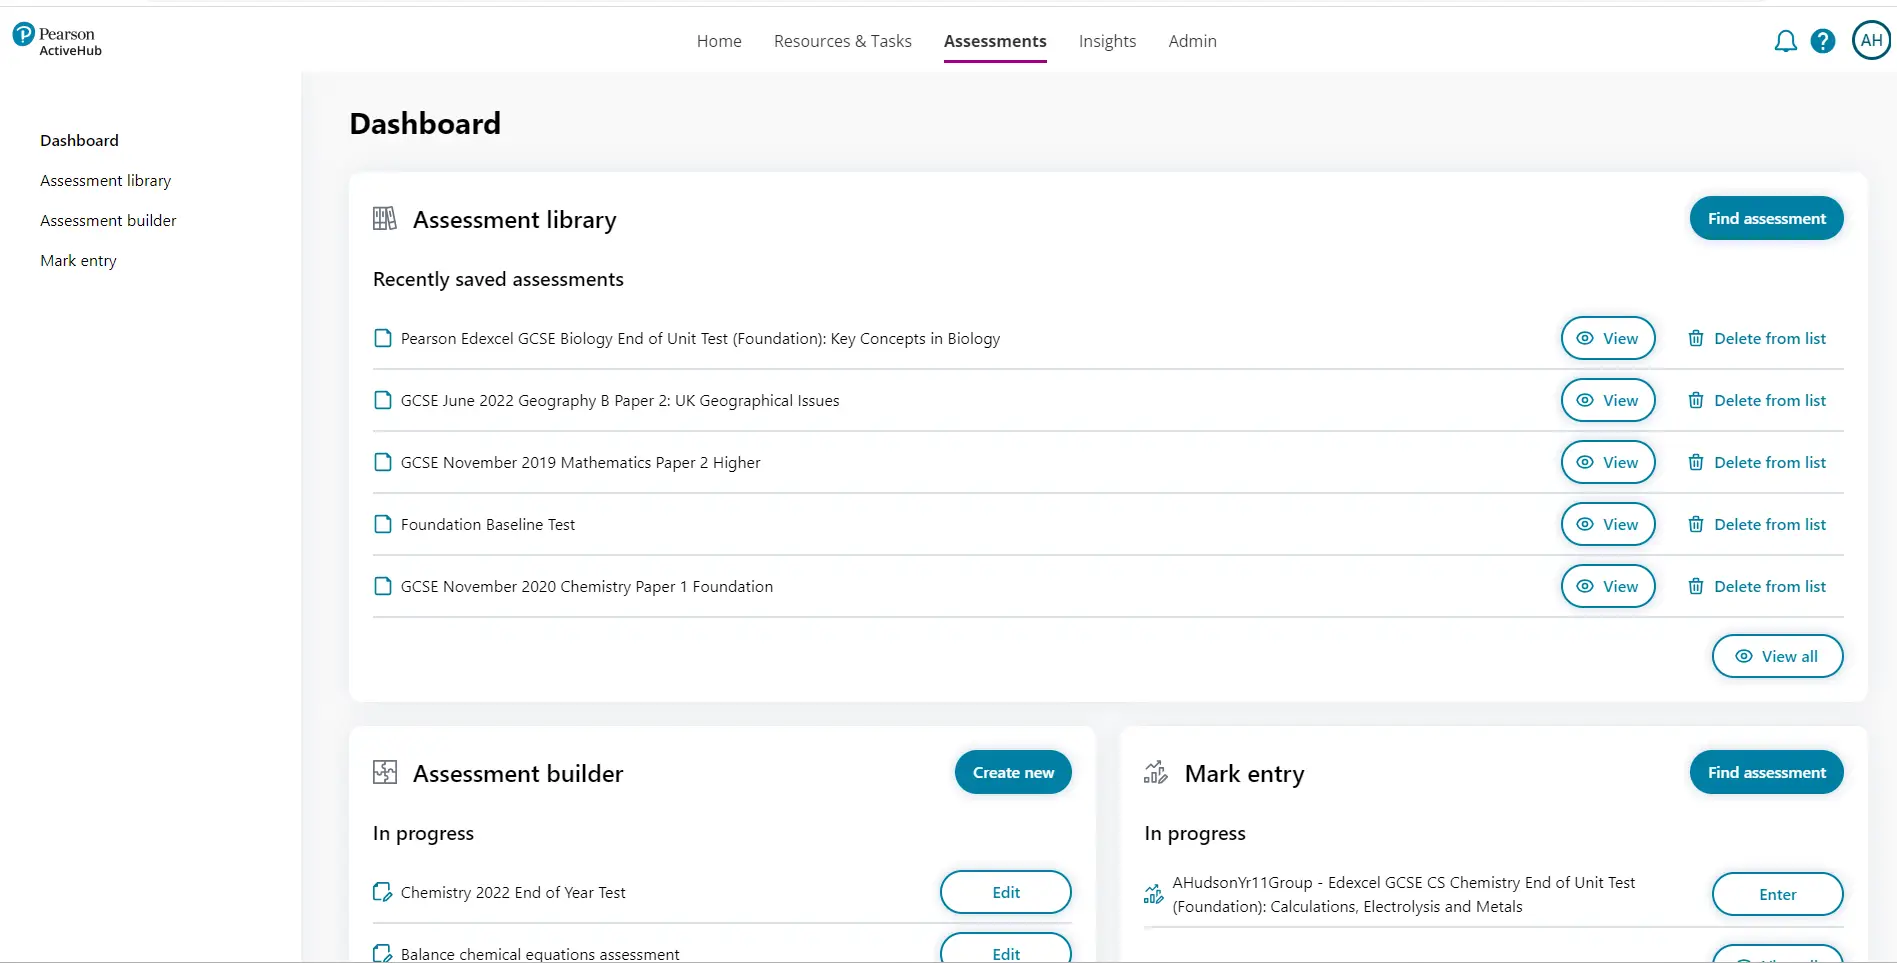
Your personalised dashboard of assessment content.
The Assessment dashboard is personalised to you, showing the assessments you have saved in your own library. It provides a quick and easy way to access the assessment library, assessment builder and the mark entry.
Assessment Library

Assessment papers, mark schemes and examiner reports.
In this video we will show you all the steps on how to use the Assessment Builder in ActiveHub.
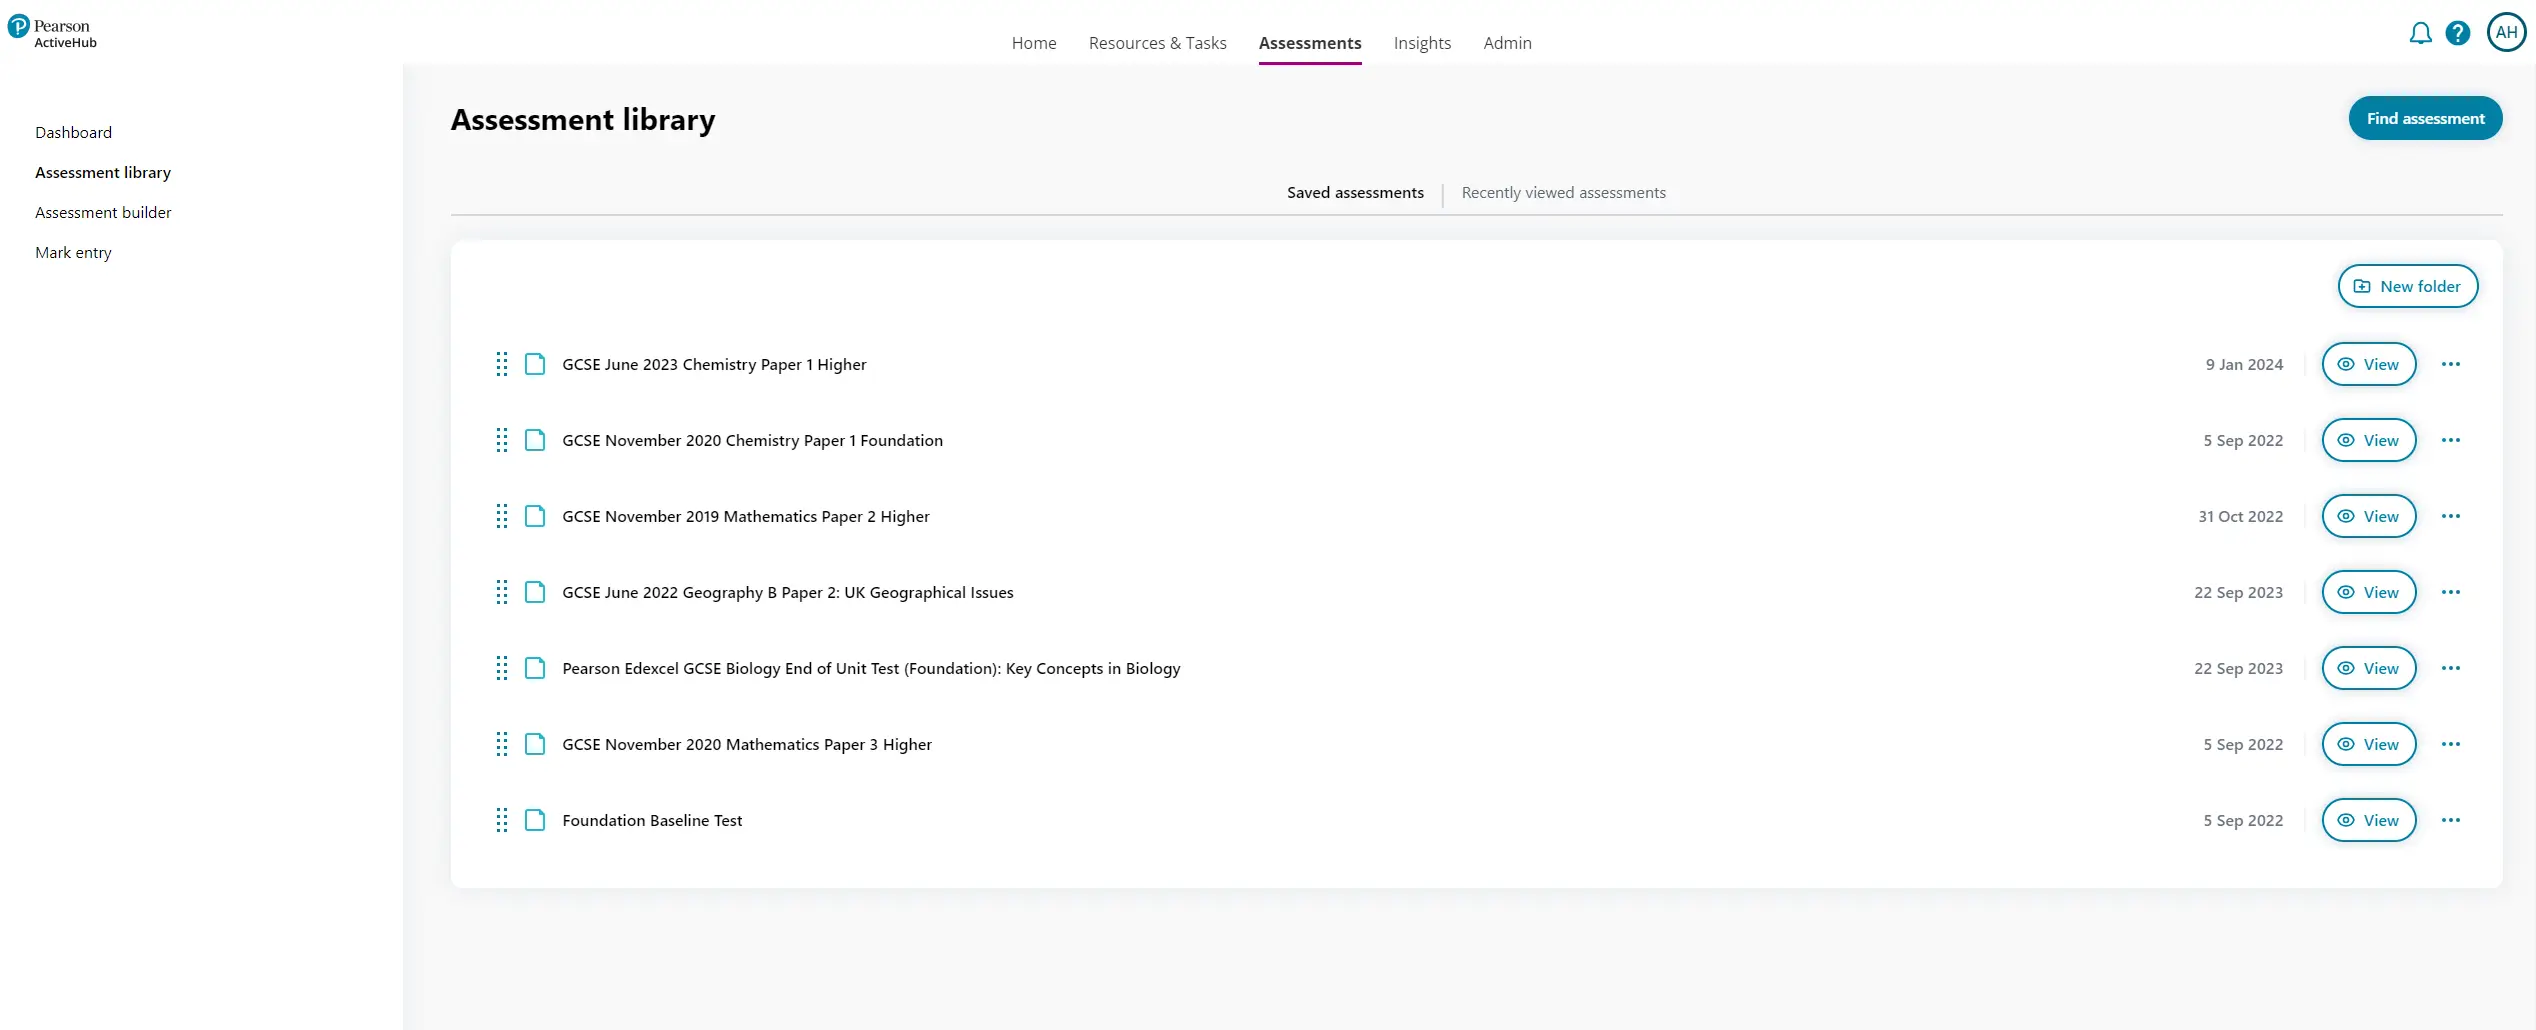
The assessment library holds all the assessment papers, mark schemes and examiner reports. The assessments shown will differ depending on your subscription or trial. To provide easy access to your favourite assessments from the large selection available, you can save them into your Saved Assessment Folder.
Organise your assessments into your own named folders and drag-and-drop to move them around.
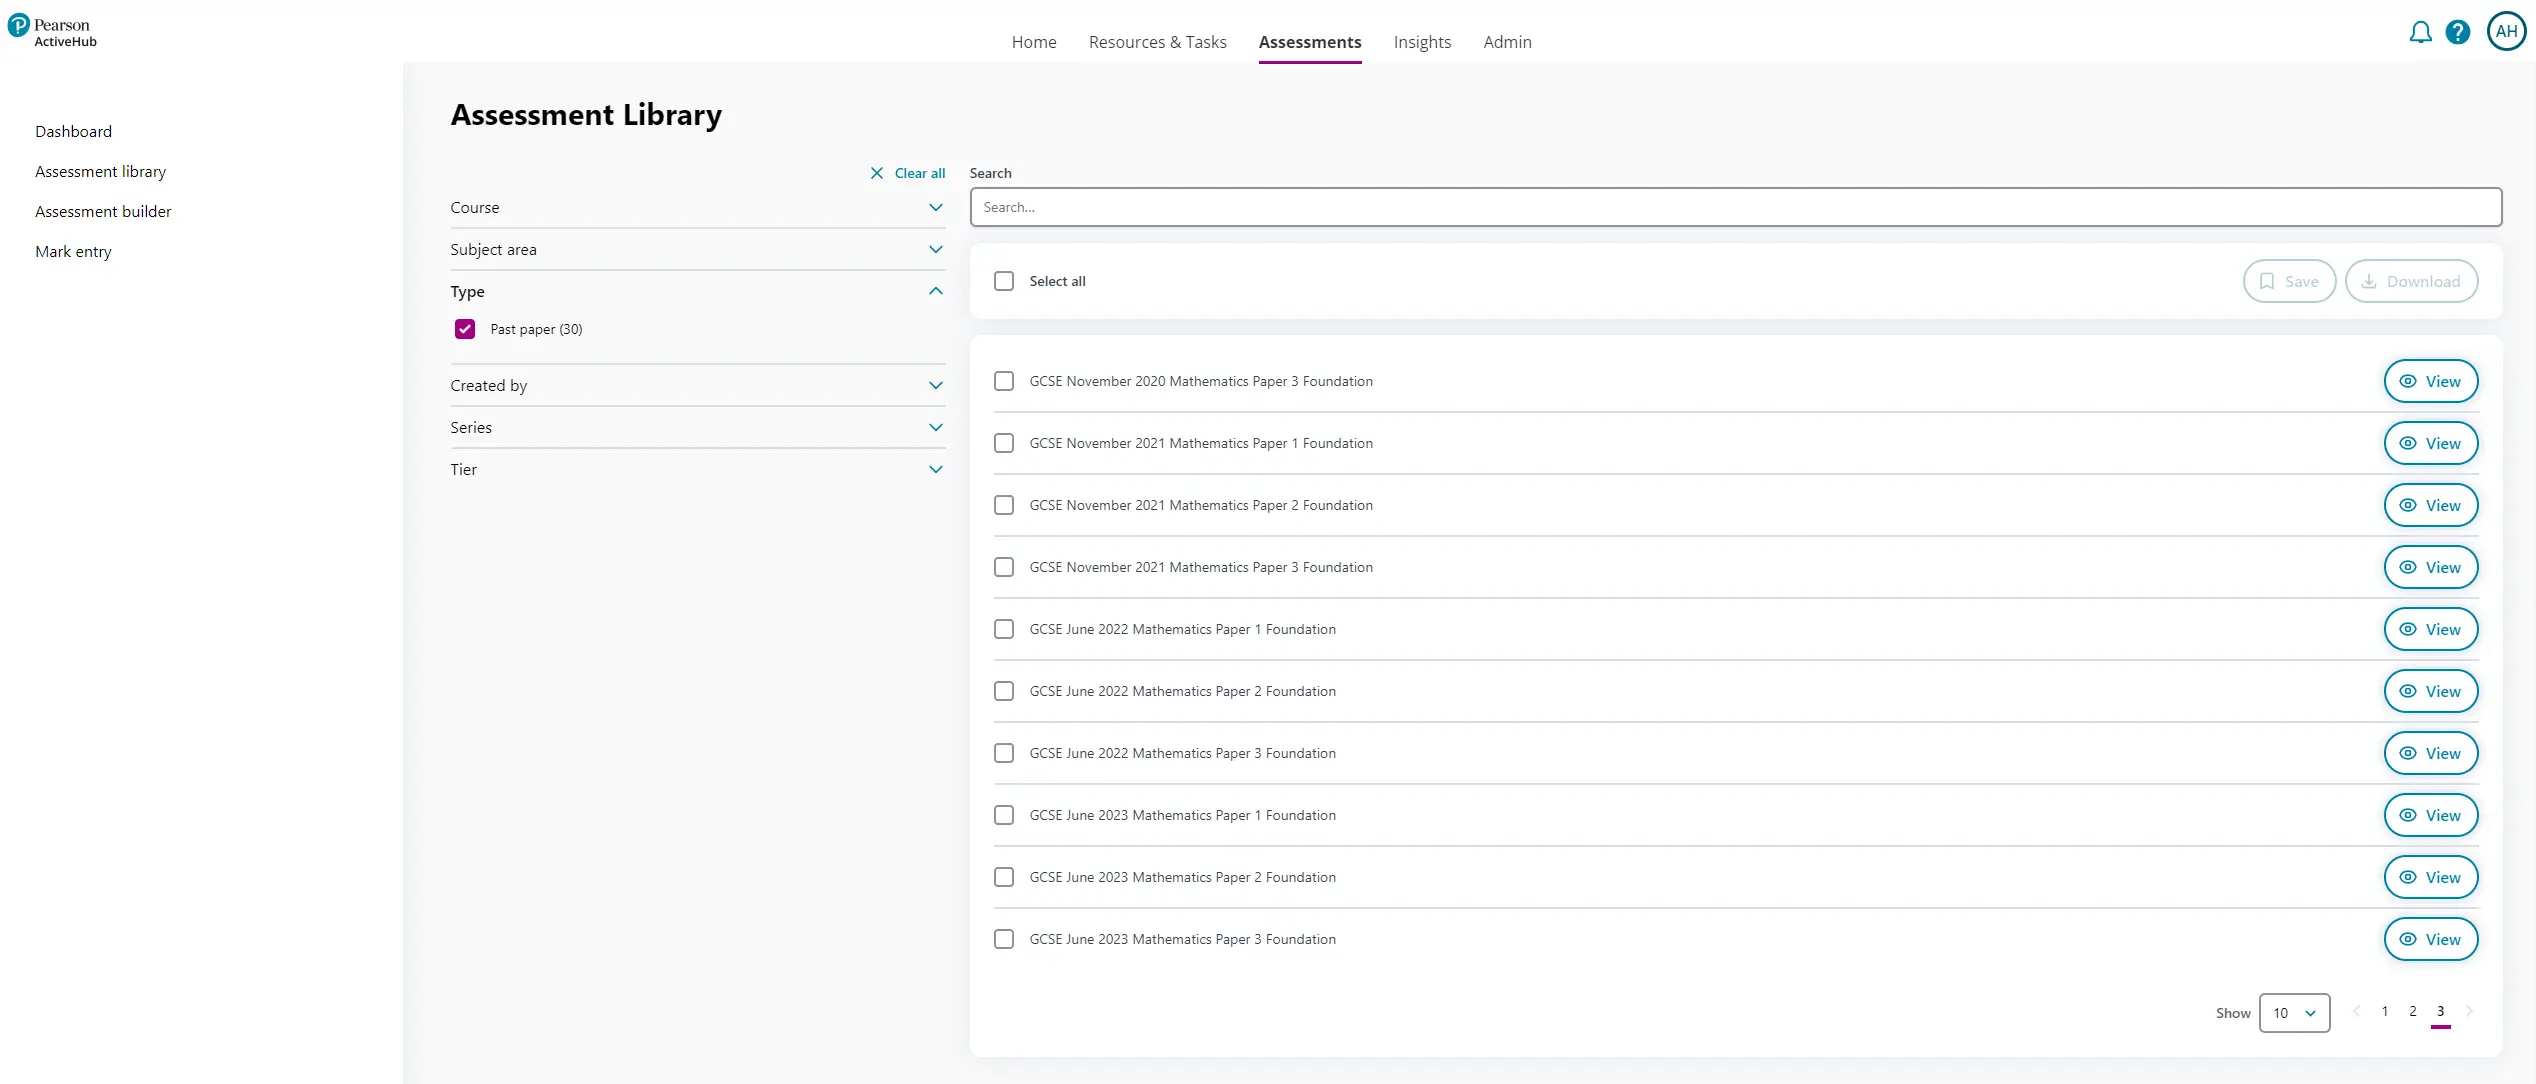
To find assessments, use the filters on the left to narrow down the list of assessments displayed or search for a specific assessment using a title in the search field. Refine your search by using the following filters:
| Assessment type | Select by ticking the type of assessment. The types vary by subject but may typically include GCSE past papers, baseline tests, end of unit tests, end of term tests and end of year tests. |
| Created by | Select whether the assessment was created by Pearson Edexcel, created for an AQA user or created by a user in your school using Assessment builder. |
| Series | For past GCSE papers only, select the series when the paper was originally set, e.g. "June 2023". |
| Tier | Select Foundation or Higher (for KS4 Maths and Science only). |
In the Search box, use any part of the assessment title, for example Paper 1, Calculator or Macbeth.
Once some assessments have been found, you are now able to:
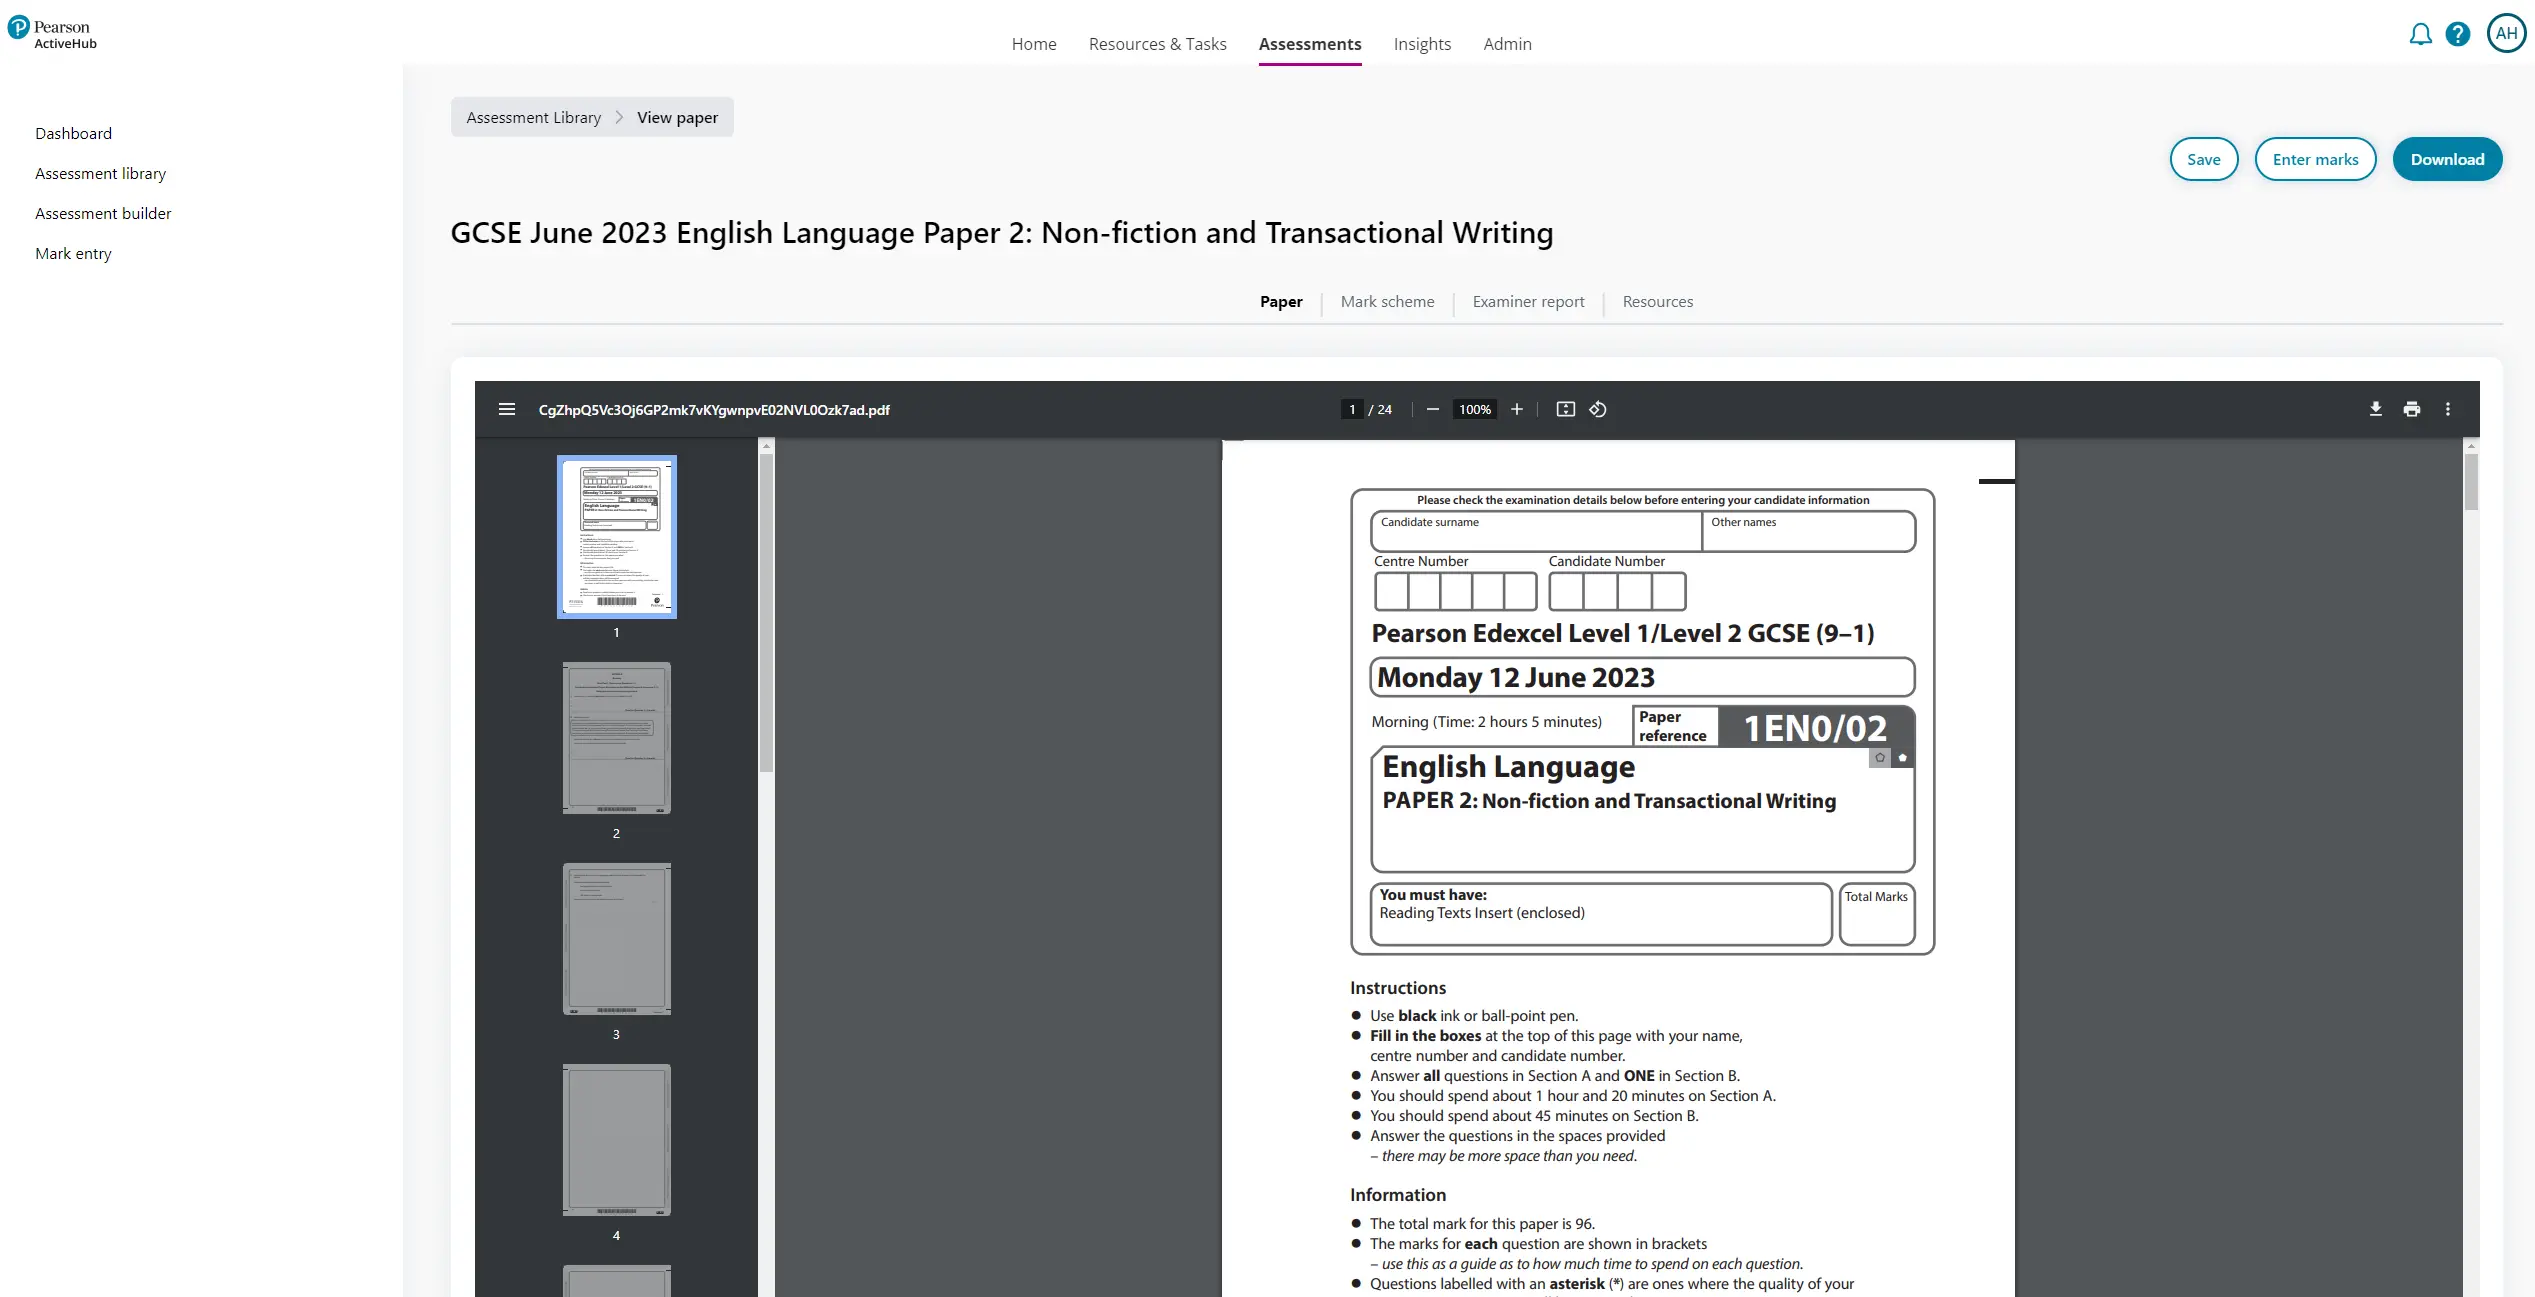
- View an assessment to see a pdf of the paper, the mark scheme, the examiner's report and any associated resources (if relevant).
- Download the documents into a zipped file of the pdfs so they can be printed and given to students.
- Save them to your Saved assessments folder for easy access next time. From here, you can also start entering marks after students have sat the assessment, using the Enter marks button.
Assessment Builder

Build your own assessment from a bank of questions.
In this video we will show you all the steps on how to use the Assessment Builder in ActiveHub.
Assessment builder holds a large bank of individual questions and takes you through a four-step process to build your own assessment. The bank of questions includes questions from Edexcel past papers as well as from other Pearson assessments.
The step-by-step process helps you design an assessment to suit your students' needs, using questions covering specific topics and certain grade ranges. It creates the bespoke assessment paper, mark scheme and examiner report to be downloaded in word or pdf format. The assessment can be saved and shared with colleagues.
The following guidance takes you through the four-step process:
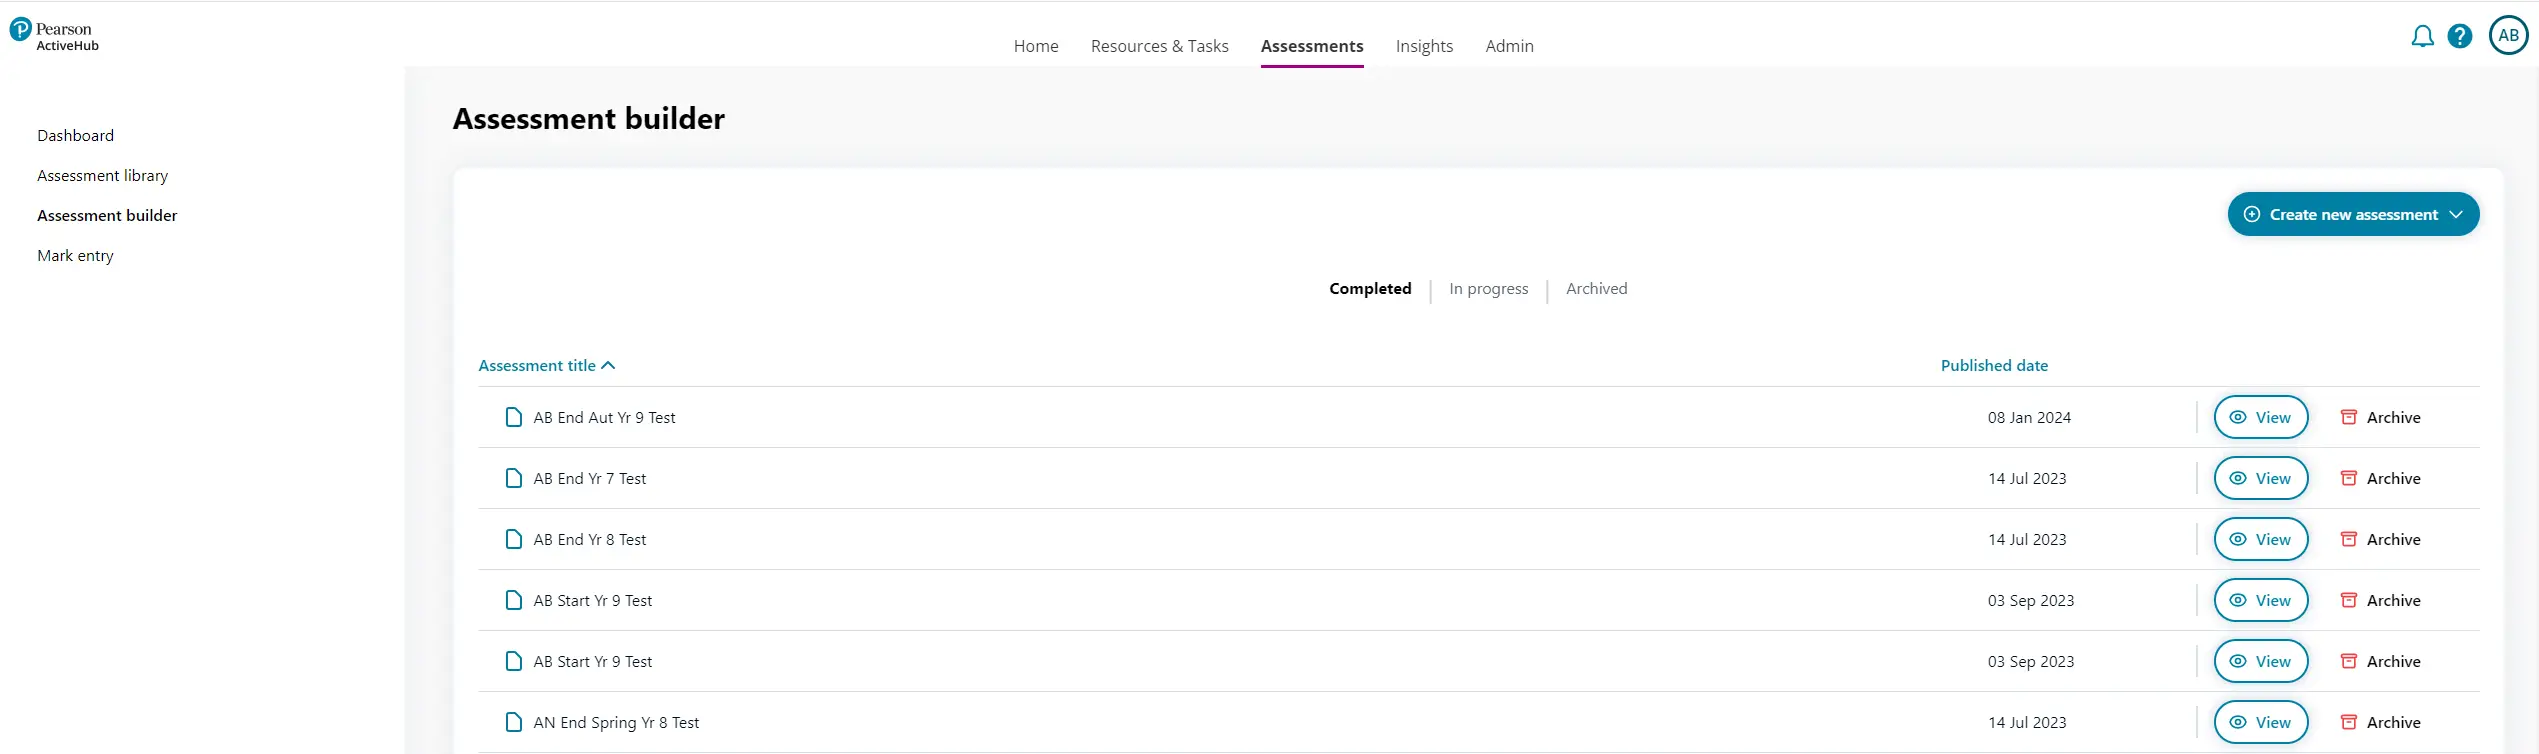
A date can be set to when your Assessments are made available to the rest of the school so you can build your assessments ahead of time without sharing if needed.
Start by seeing a list of completed assessments that can be saved into your own folder. Select Create new assessment to start building your own assessment
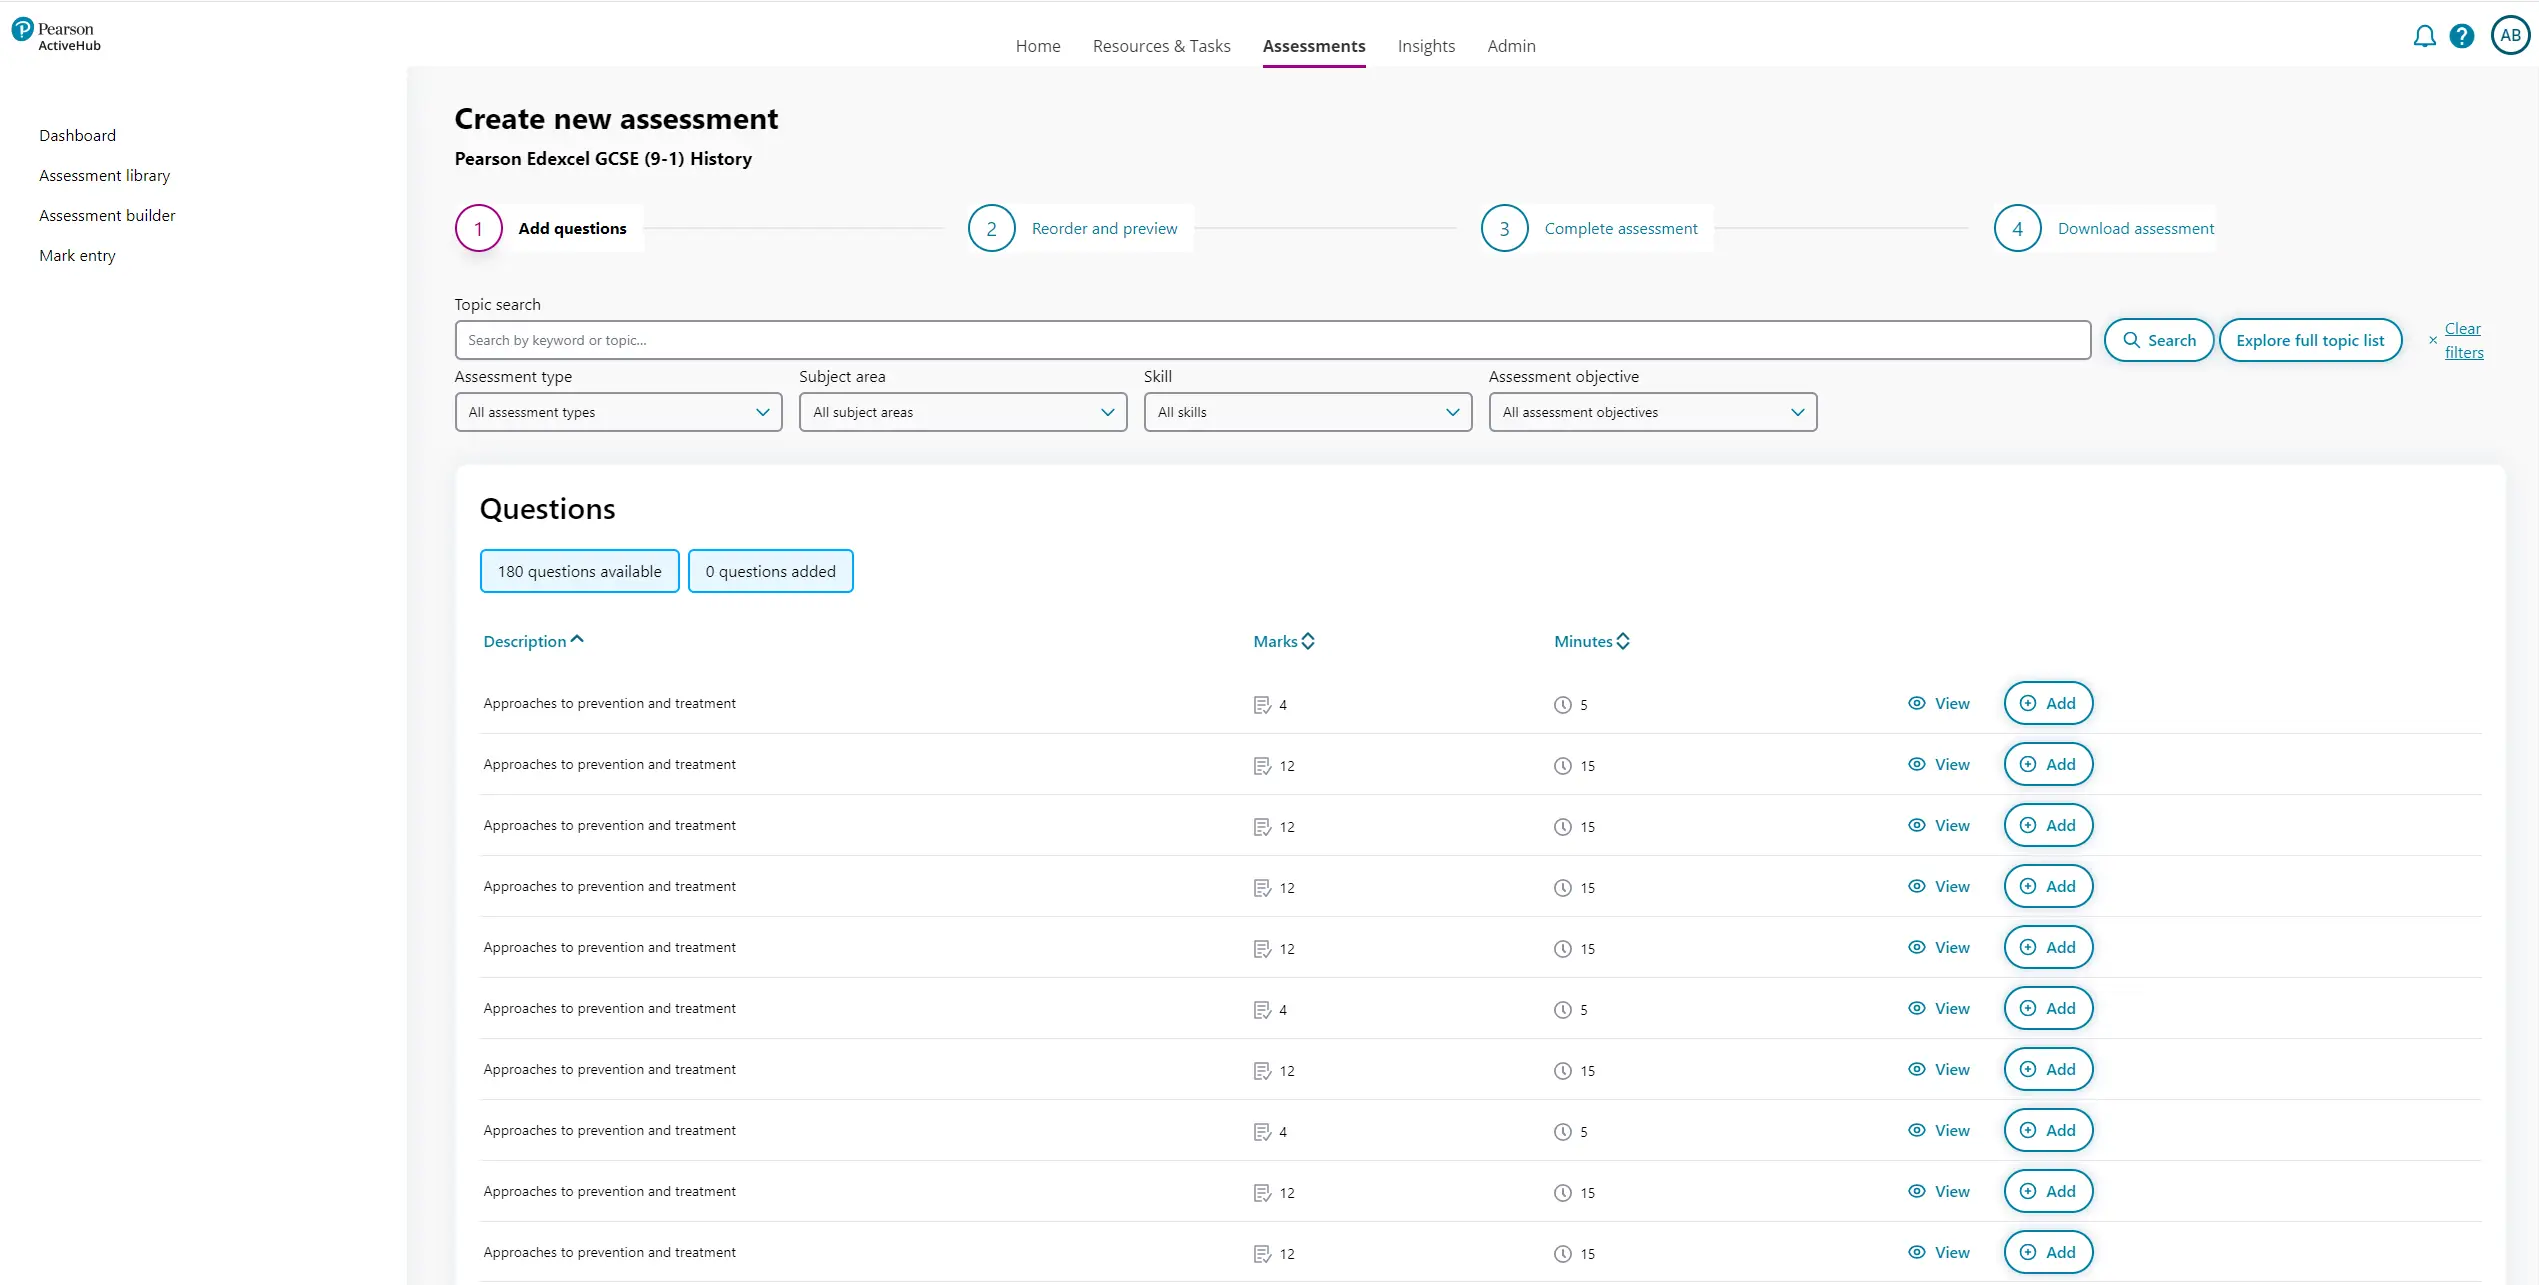
First, add questions
To change the order of the questions on the assessment, use the ‘Order questions by...’ drop down or click and drag each question individually. For example, if you want your assessment to go from easy to hard, use the ‘Order questions by grade (lowest to highest).

The following filters are available (note that some can be dependent on the subject):
| Assessment type | Select questions from the type of paper they were originally used in. For example, tick 'Past paper' if you only want to use Edexcel past paper questions. |
| Unit / Paper | For sciences, select the relevant subject and paper, e.g. B1. For maths select either calculator or non-calculator questions. |
| Grade | Use the grade filter to select the level of difficulty for the questions. To select a range of grades, tick the grades within your range, e.g. 4, 5, 6. |
| Tier | Choose questions from the Foundation or Higher tier. |
| Assessment objective | Select one or more assessment objective(s). |
To start again with the topic search and filters, select Clear filters.
The questions are listed in the table below. Each question description shows what the question is testing. The grade, mark and minutes are shown to help you decide whether to include the question. Simply select View to look at the question and select Add to add the question to your assessment. If a question has been added, it can be removed by selecting Remove. Use the arrows next to the titles to sort the questions. Note: any questions with sub-questions will always be shown according to the grade which has the most marks from all the sub-questions.
Next, re-order and preview
You can also set each question to be ordered by number of marks available or minutes it will take to complete.
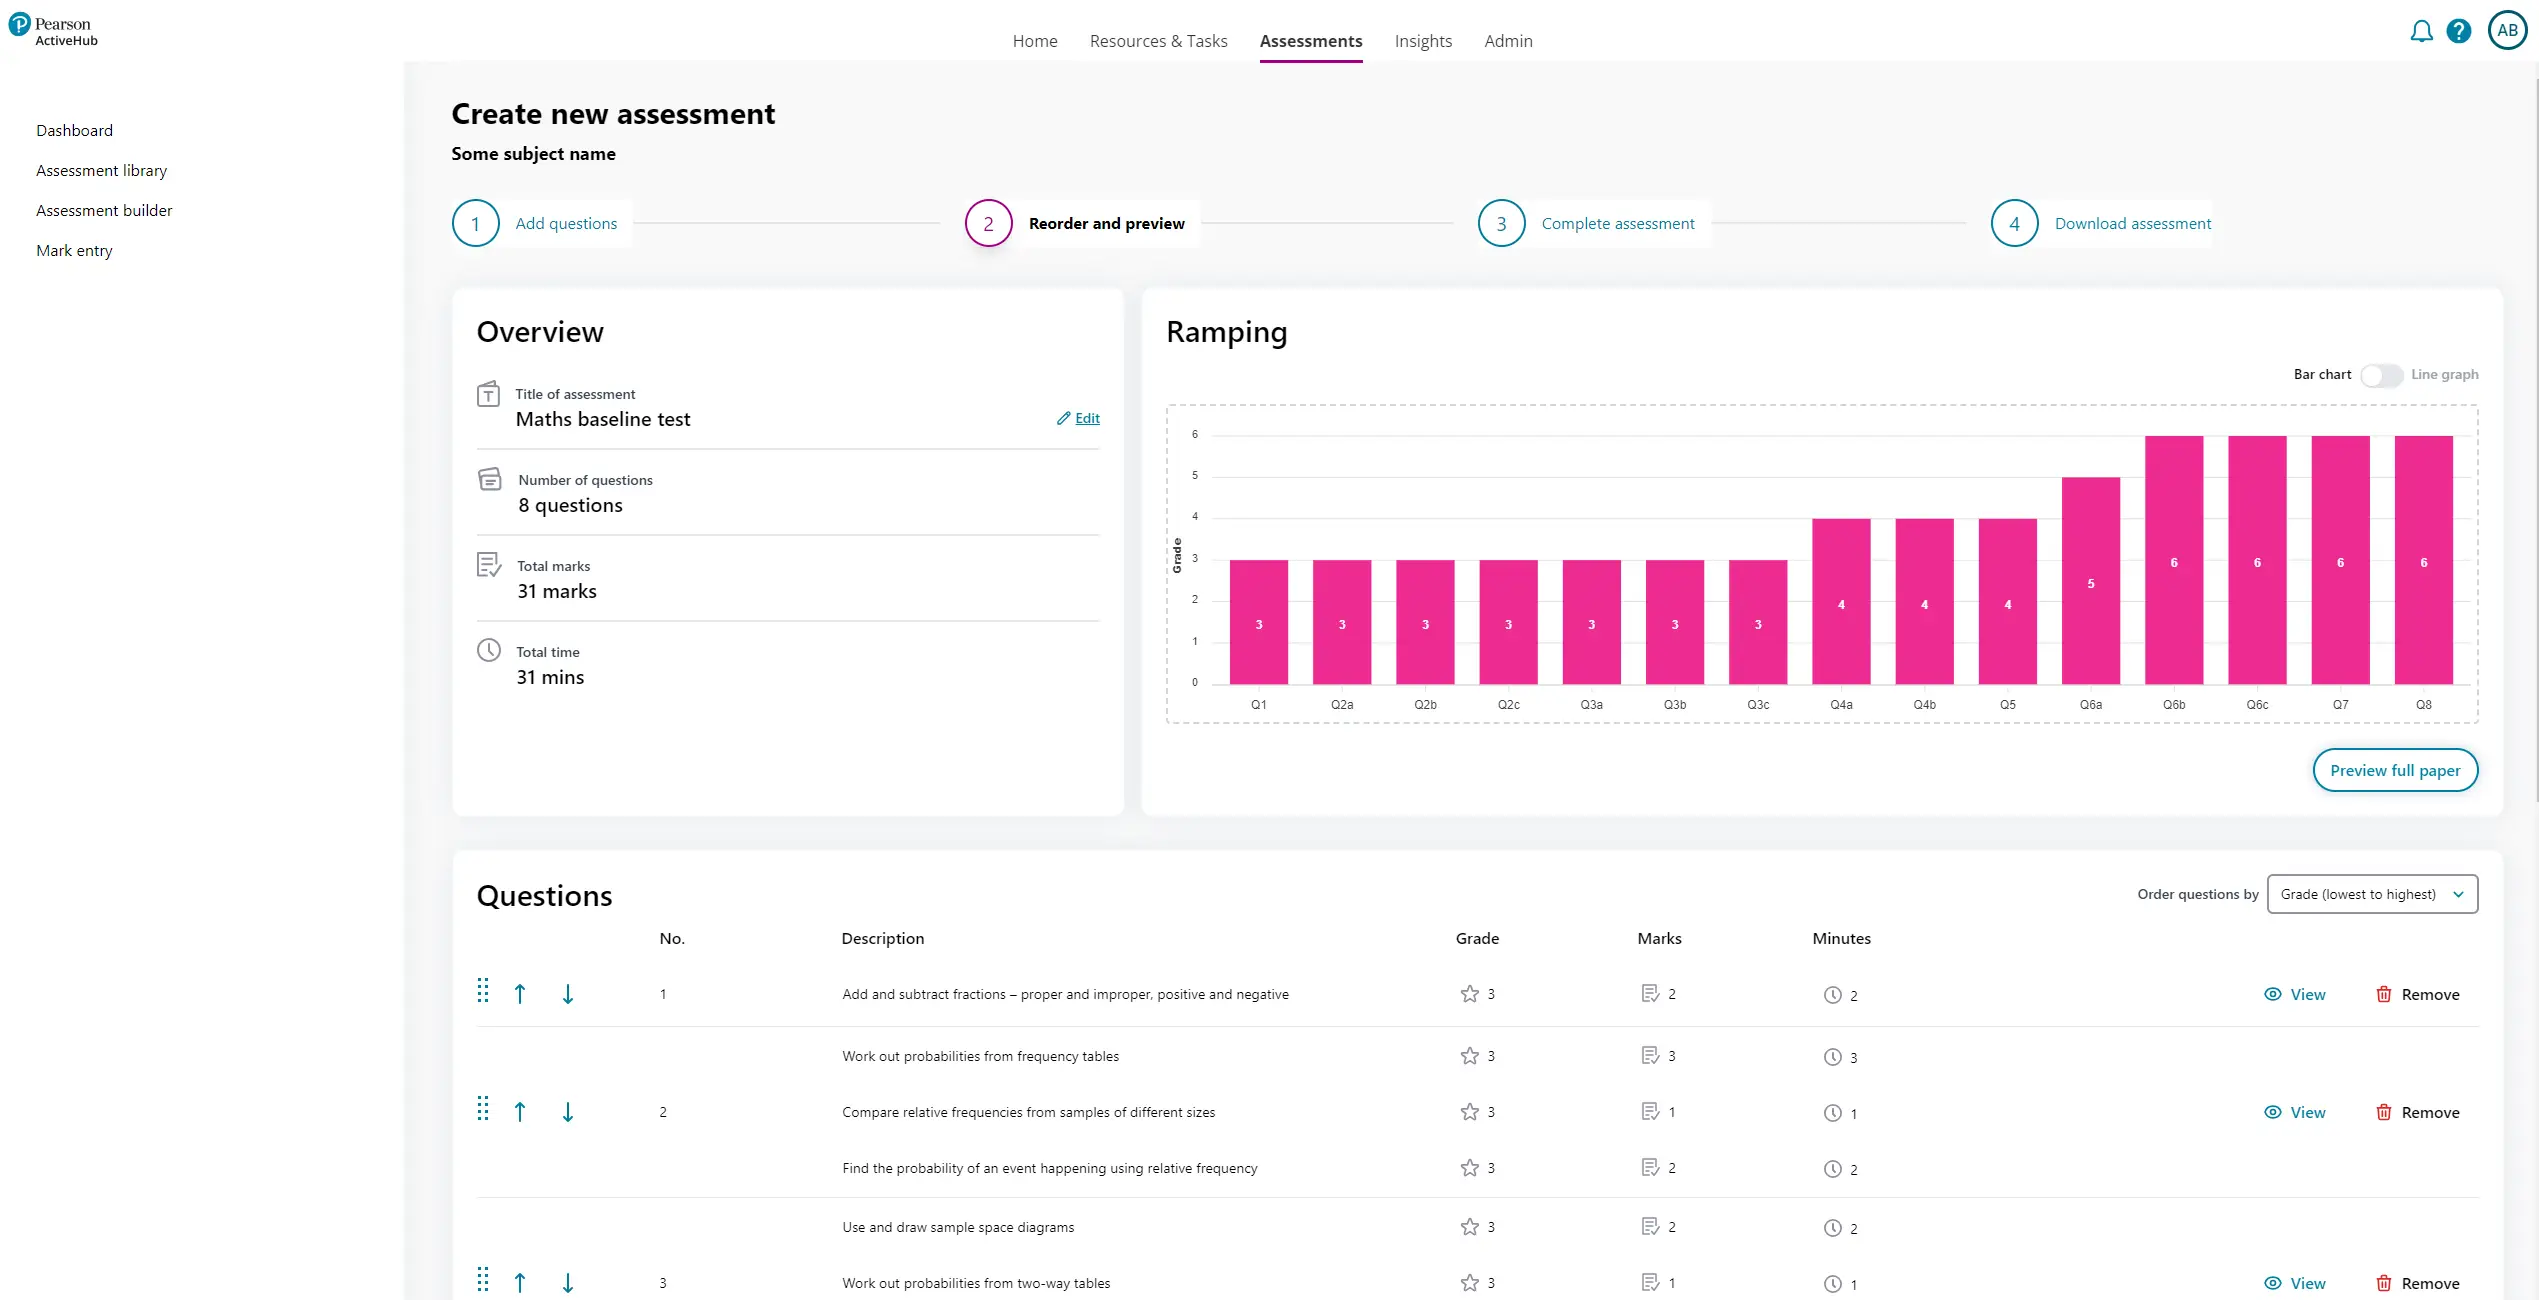
To change the order of the questions on the assessment, use the 'Order questions by...' drop down or click and drag each question individually. For example, if you want your assessment to go from easy to hard, use 'Order questions by grade (lowest to highest)'.

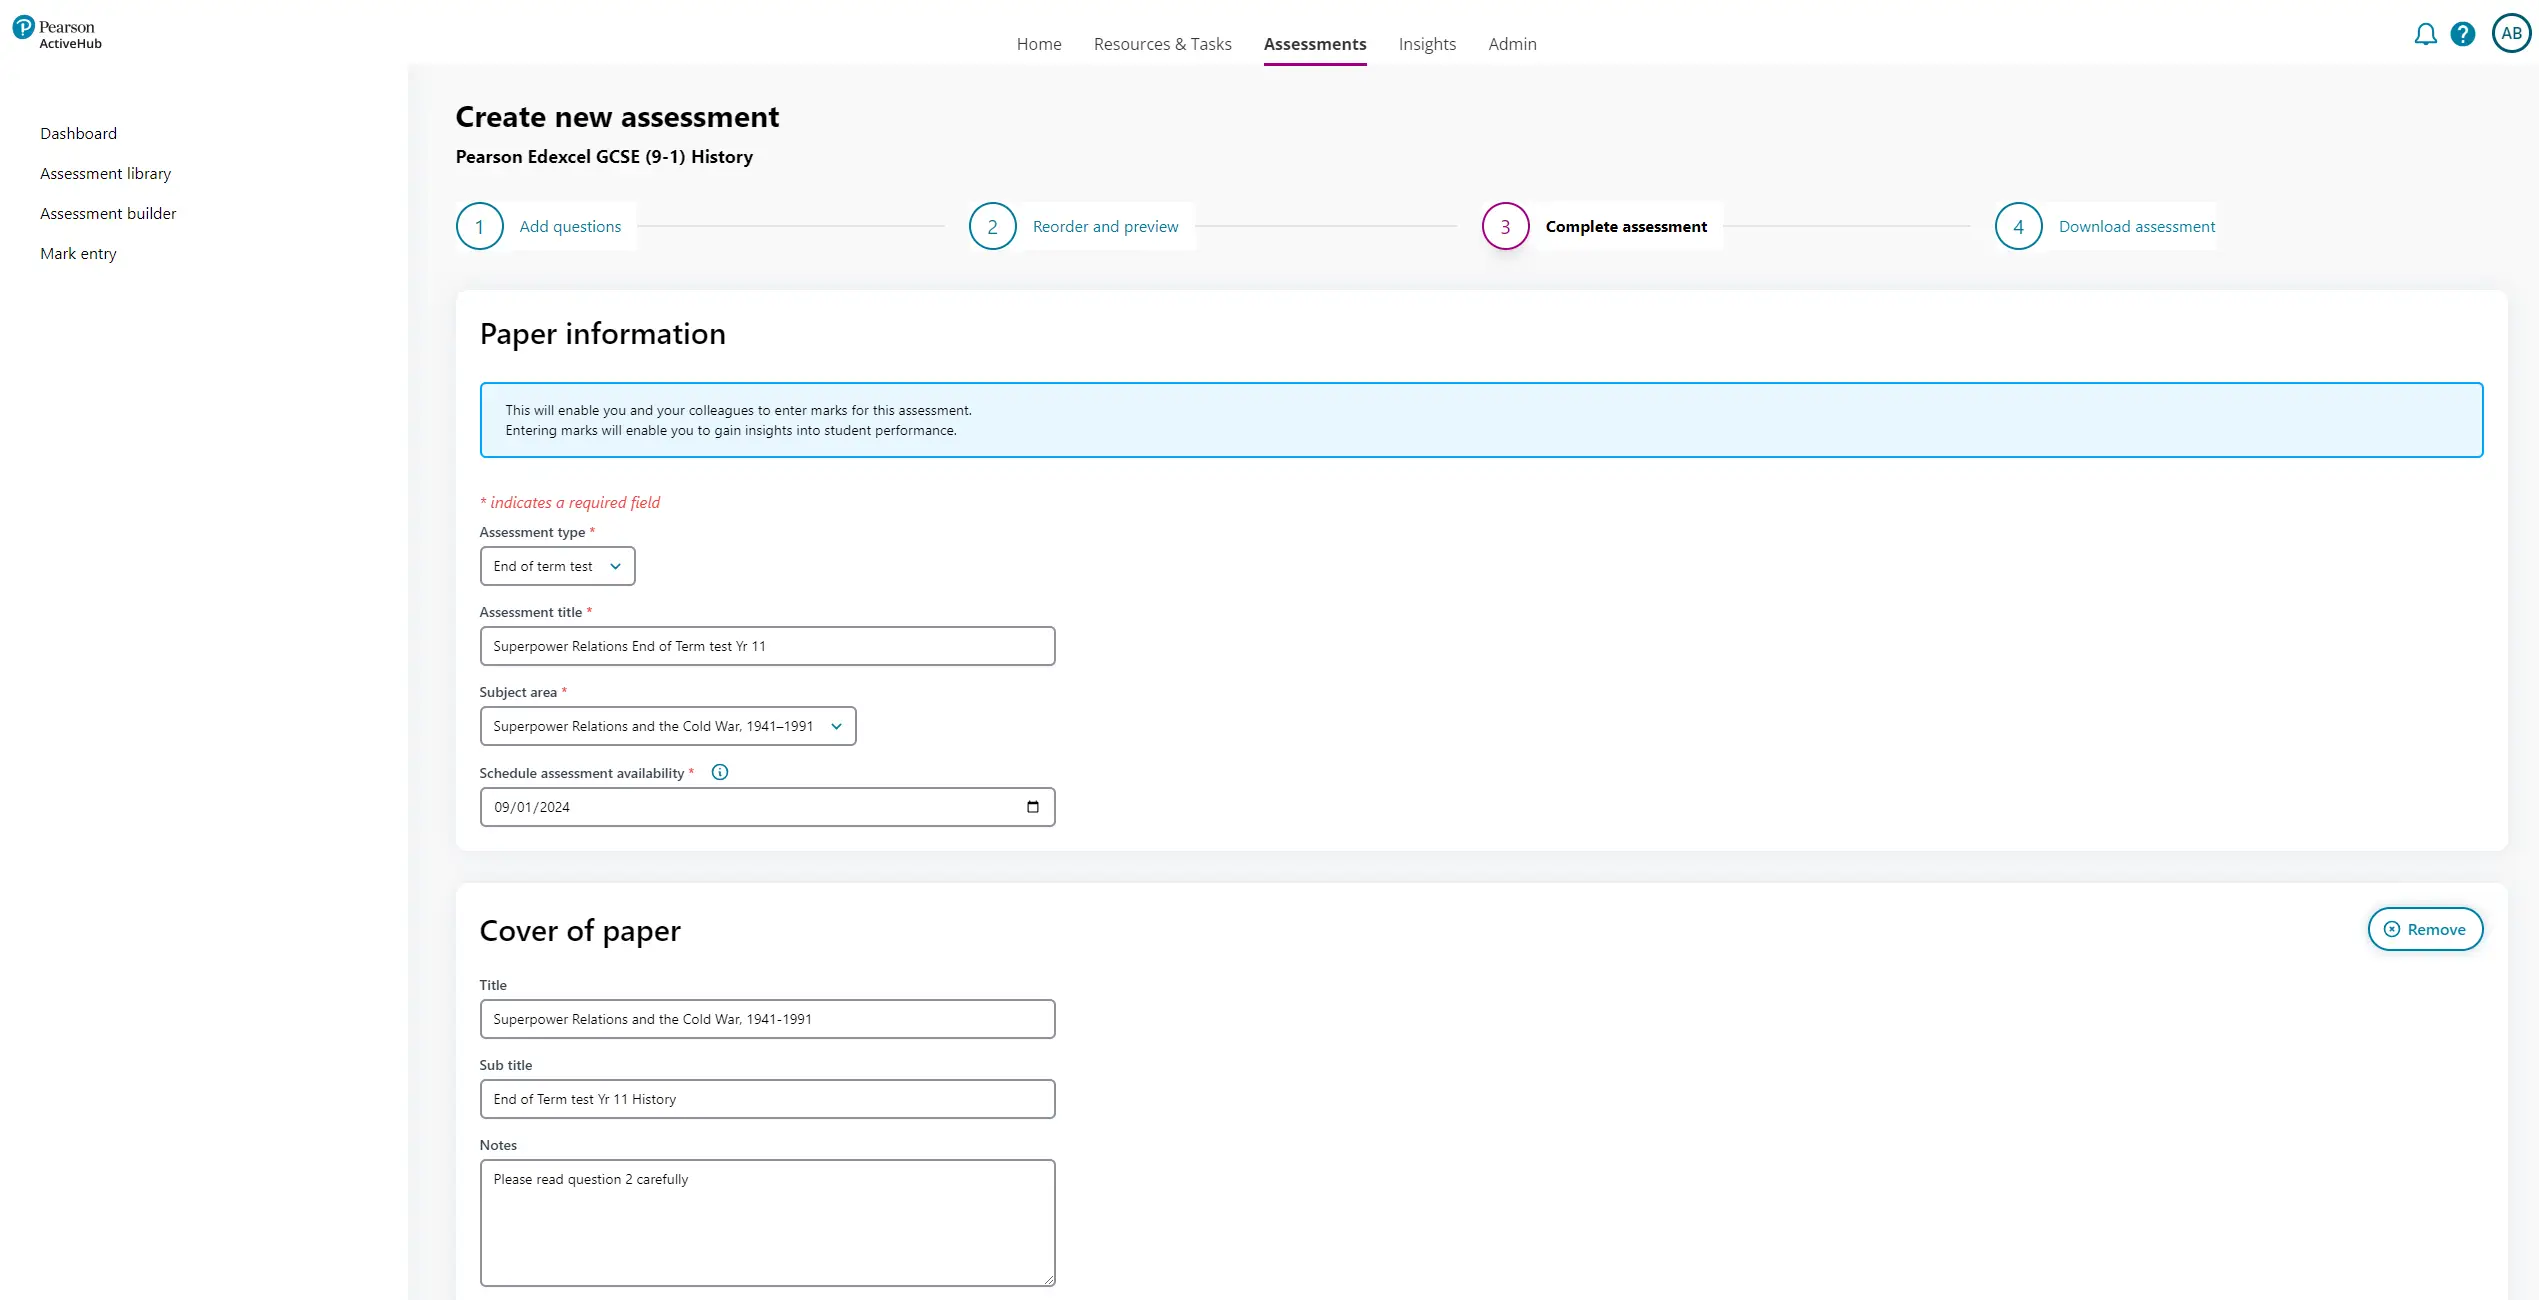
Complete your assessment
There are some required fields needed in order to save your assessment; this includes the assessment type, assessment title and the date the assessment will be made available to others in your school. If you want to hide your assessment from other staff, or if you want to continue editing it, then set a publish date in the future.
To add a cover sheet for your assessment, enter the relevant fields. Once your assessment is complete, you can download it.
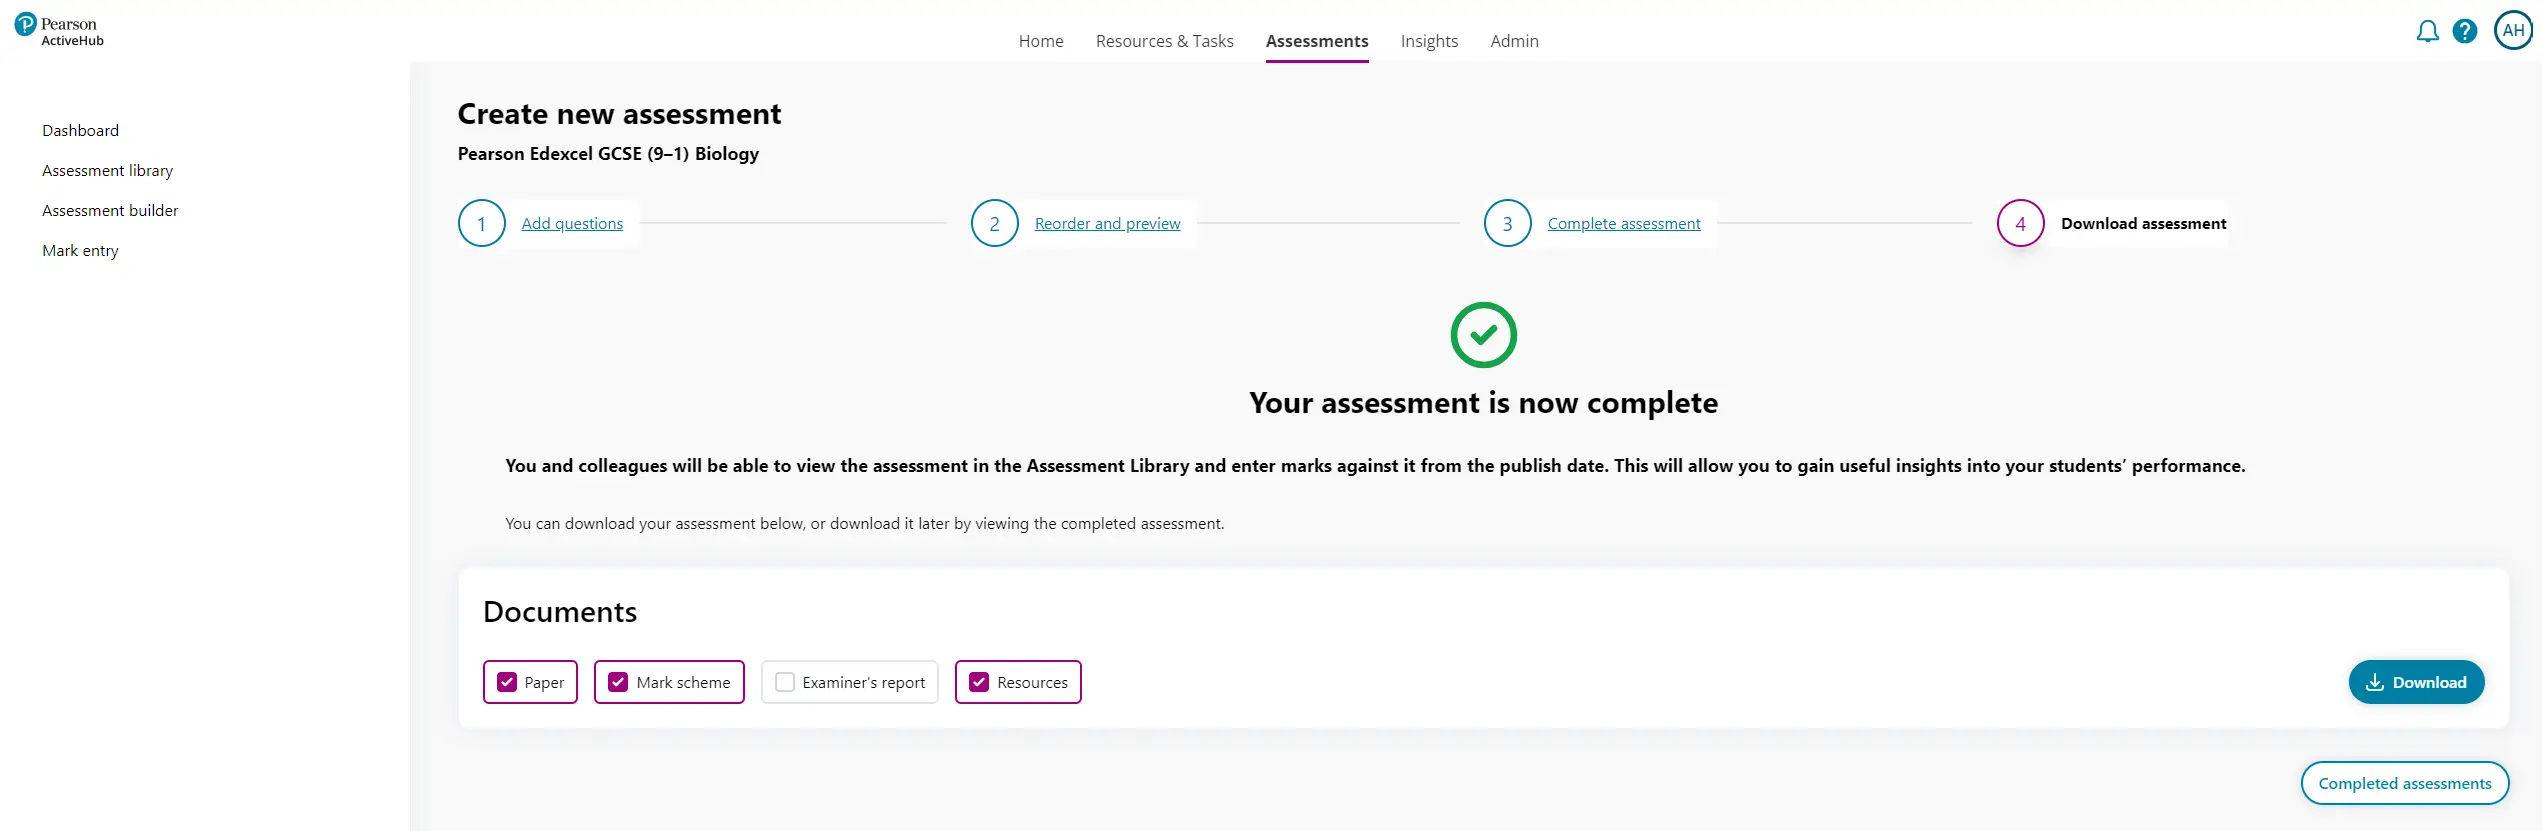
Download your assessment
Download your bespoke assessment paper, mark scheme and/or examiner report. Examiner reports are only available for past paper questions.
Mark Entry

Enter marks online to see valuable insights.
In this video we will show you all the steps on how to input your results for your assessments in ActiveHub.
Once your students have sat their assessment, entering marks into ActiveHub means you will see the rich analysis and next steps recommendations from the Insights screens.
The Mark entry screen shows all the assessments where marks have been entered and any that are still in progress. To edit any marks, for example where a student was absent and sat the paper later, select edit on the relevant assessment title.
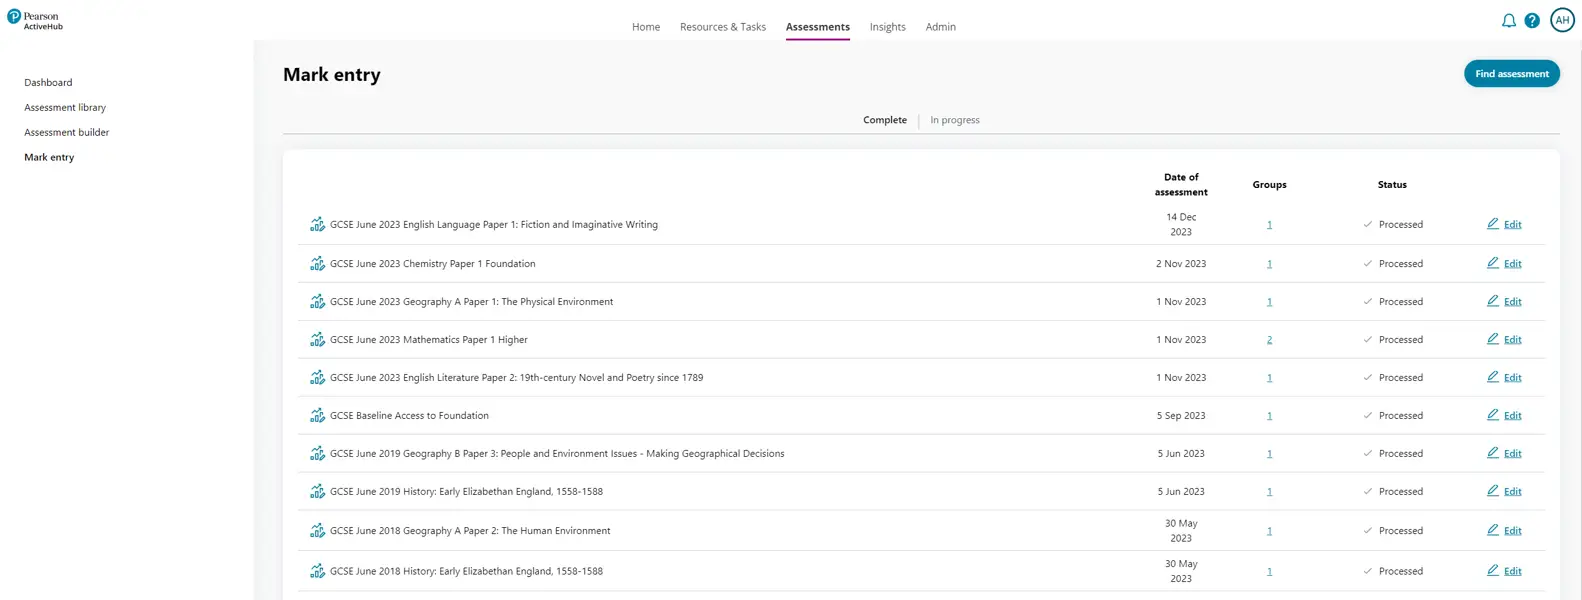
To enter marks, first find the assessment you want to enter the marks against. Use the filter options on the left to narrow down the list of assessments or simply type in part of the assessment title into the search bar.
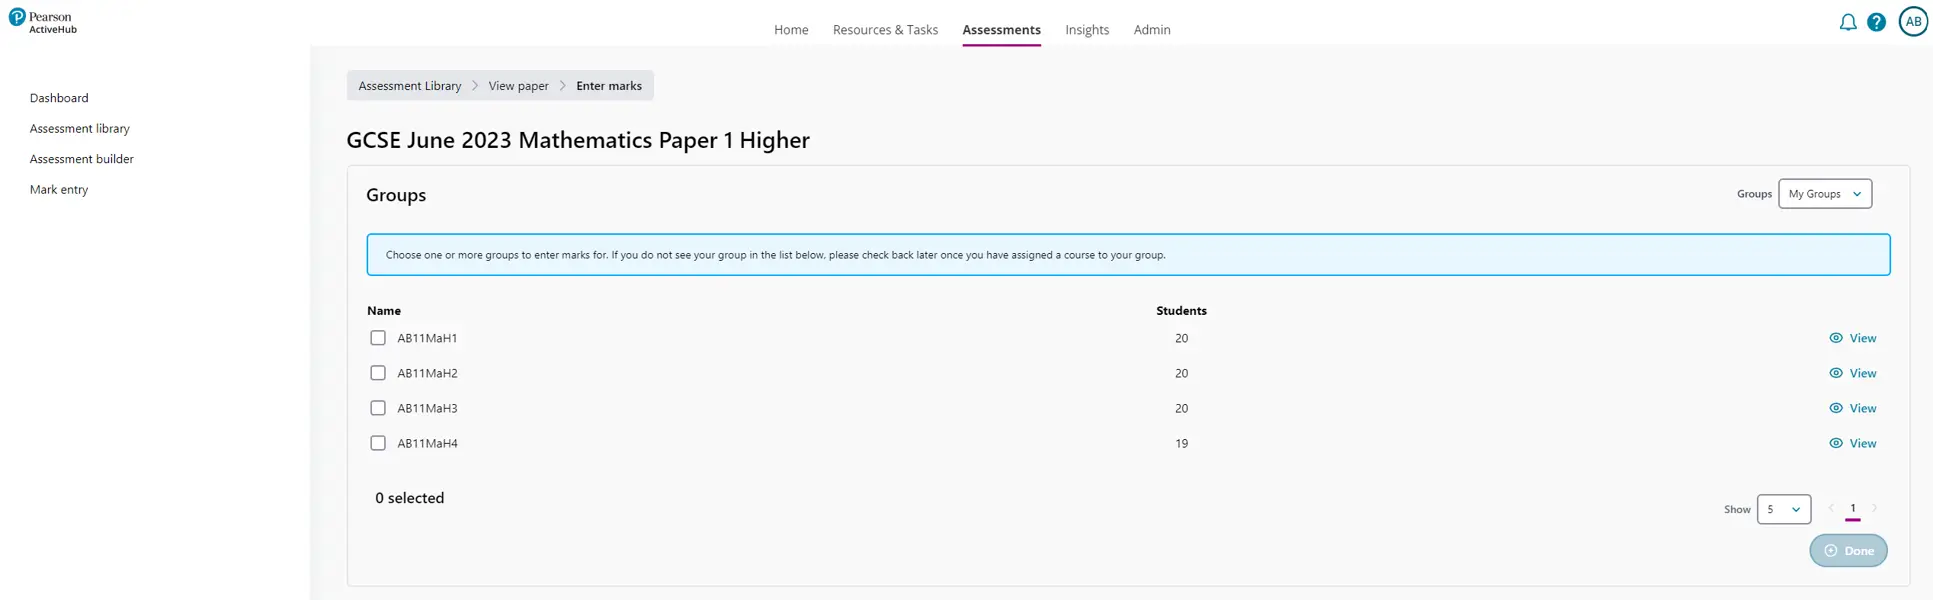
From the list of your groups displayed, select one or more groups that you want to enter results for and choose Done. You can view a list of students in each group.
There are two ways to enter marks:
- Online input - enter marks for each student directly into the markbook in ActiveHub.
- CSV upload - download the CSV template, enter marks into the CSV file and then upload into ActiveHub. This may be easier if you have results stored in another system such as your MIS.
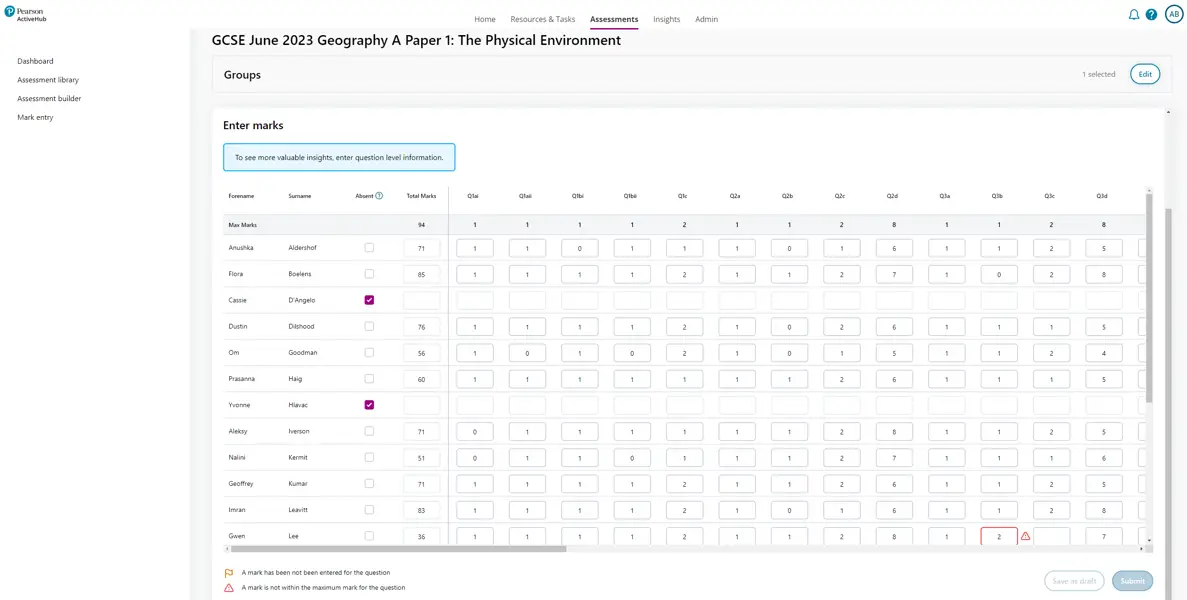
Online Input
If you only enter the Total Marks for each student, you will get limited analysis in ActiveHub Insights. If you enter marks for each question, you will get question-level analysis, topic analysis and next steps in ActiveHub Insights. Firstly, enter the date of the assessment. Next, enter the mark for each question, for each student and record any notes against the student too. (The notes are not visible to students, they are to help you keep a record of circumstances for your own purpose.) If you enter a mark higher than the maximum mark possible, you will get a warning icon and will not be able to submit your results.
If a student did not sit the assessment, mark them as absent rather than not entering marks or giving them 'zero'. This helps keep the analysis in Insights accurate. You can edit your marks at a later date if the student sits the paper later. If a student did not attempt a particular question, leave the box empty. If they attempted the question and got it wrong, give them 'zero' marks.
Once you have entered all marks correctly, select the Submit button and the data will be fed through to ActiveHub Insights. This process may take up to an hour. You can Save as draft at any point and then retrieve the part-completed marking from your 'In progress' screen in Mark entry.
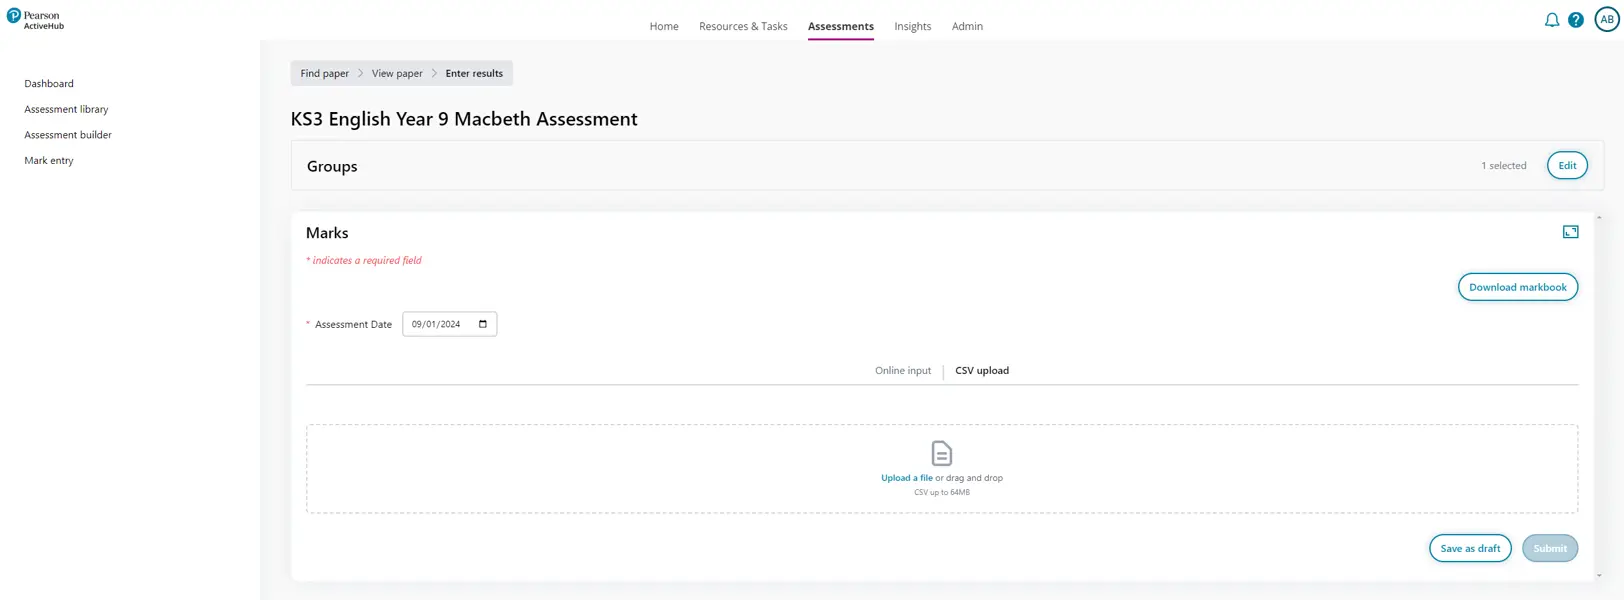
CSV Upload
Firstly, enter the date of the assessment selected from the Mark Entry screen. Secondly, download the empty csv markbook template to your local device. Either copy and paste results from another system, or type them directly into the csv. Save your file. Once complete, select upload a file to import the results into ActiveHub. Note: there will be an error check and the results will not be submitted until all errors have been corrected. Submit the results.
Insights
Dashboard
Overview of Insights
Overview of Insights
The Insights Dashboard gives a quick overview of the groups you are teaching.
For each group, you will see any students that need your attention and have quick access to their most recent assessments and tasks.
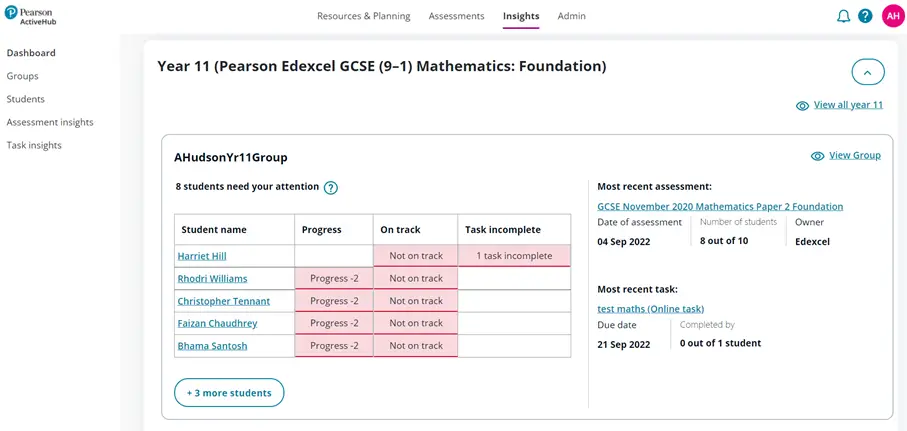
Anything that is blue and underlined, indicates a link. From the dashboard, you can either click on the blue links, or use the left side menu to navigate around the Insights pages.
There are three areas that students might need your attention (see the '?'):
| Progress | Highlights students who have seen a fall in grade between their latest assessment and their baseline grade (excluding unit tests). |
| On track? | Highlights students whose latest assessment indicates they are not on track to hit their target grade, based on the difference between progress from baseline to their target grade (excluding unit tests). |
| Tasks incomplete | Highlights students who have completed less than half their assigned tasks on time. |
In order to see these valuable insights, it is important to do the following:
- Enter results from assessments into the Assessments > Mark Entry screen
- Set tasks for students into the Resources & Tasks > Tasks screen
- Enter baseline and target grades for your students in the Insights > Groups screen.
Group Insights

Look at group performance in assessments and tasks
In this video we will show you all the insights available for students from a particular class or group.
The Groups page shows how a group has performed on average over time across all their assessments. The Tasks tab shows how they did in their task
Note: remember to enter your baselines and target grades first from the Groups page. You will see a greater level of detail to the insights available.
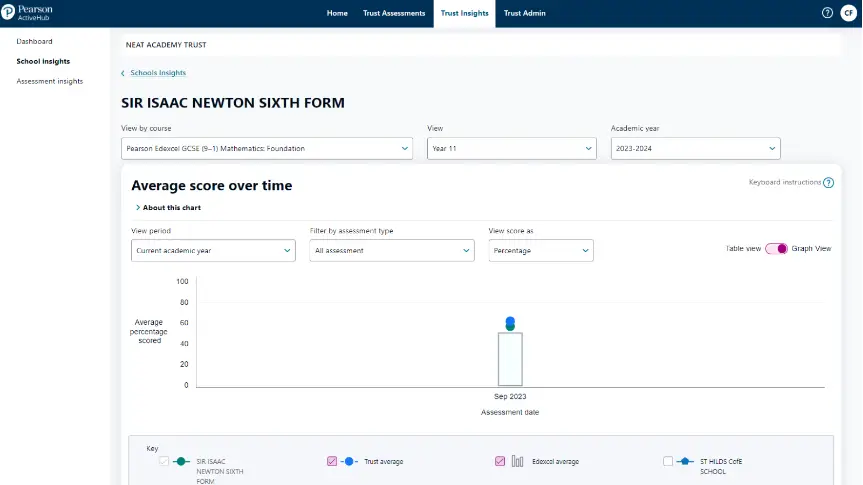
The Average score over time chart shows the average score for assessments taken for each group. For past papers, an Edexcel comparison is shown (see yellow bar on chart when selected). Use the filters to focus on specific assessment types and to change the view to see either the number or the percentage of students. Use the key to add or remove groups from the chart.

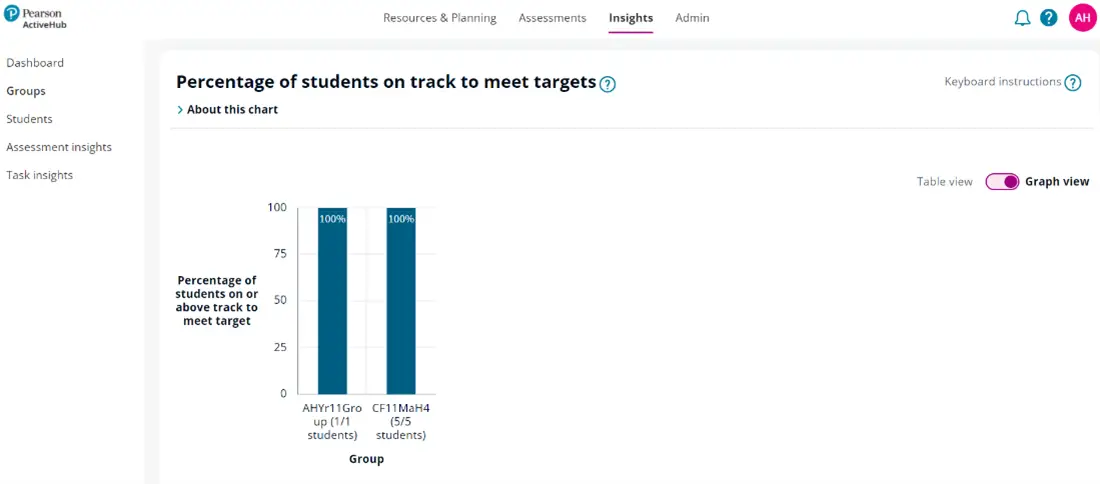
Scroll down to see the percentage (or number) of students in your group that are on track to meet their target (based on their last assessment). Use the key to add or remove groups from the chart.
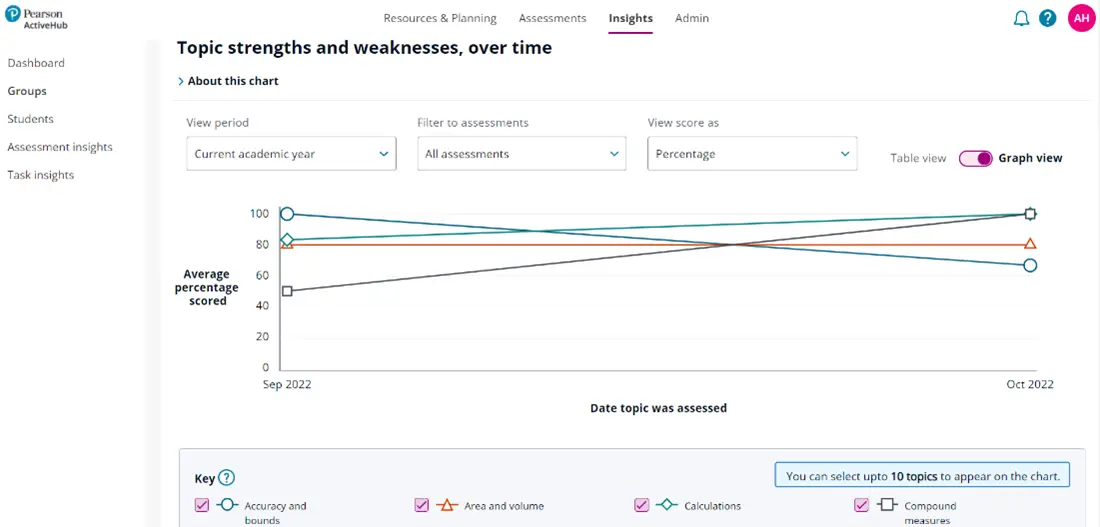
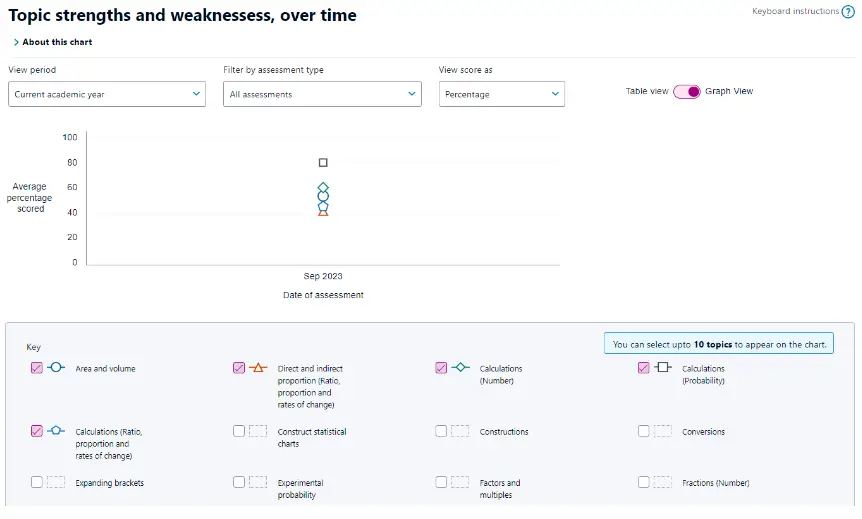
Next you will see the topic strengths and weaknesses over time chart, which displays the group’s attainment in all the skills relating to a subject. You can select the average score to be displayed for up to 10 topics at a time across varying time periods and assessment types. You can toggle this chart between the table and the graph views
Scroll down further to see the Assessments table, which shows all the detail that sits behind the chart at the top; it shows the grade (or mark or percentage) that each student achieved for each assessment, as well as comparisons for the group average, year average and Edexcel average.
Student Insights

Look at a student's performance in assessments and tasks
In this video we will show you all the assessment and task performance insights available for an individual student.
The Students page shows how an individual student has performed on average over time across all their assessments and tasks. Use the tabs to switch the view to other subjects. It also provides detailed analysis of how the student did in a particular assessment, including next steps.
Course Progress
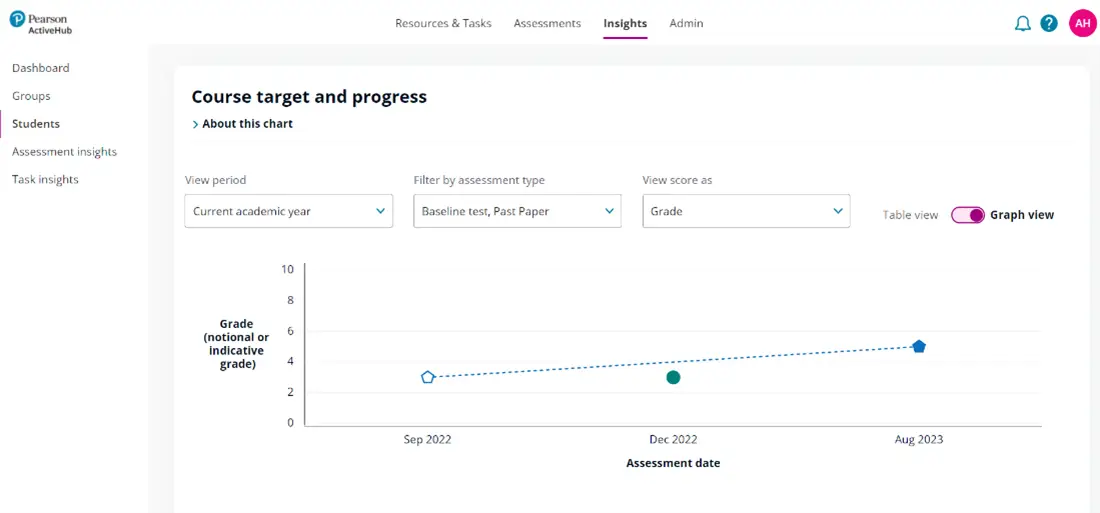
This chart shows the average score for assessments taken by this student. Use the filters to focus on specific assessment types and to change the view to see the assessments by grade or percentage. Compare actual results to the dotted line (showing linear progress from the baseline to the target).
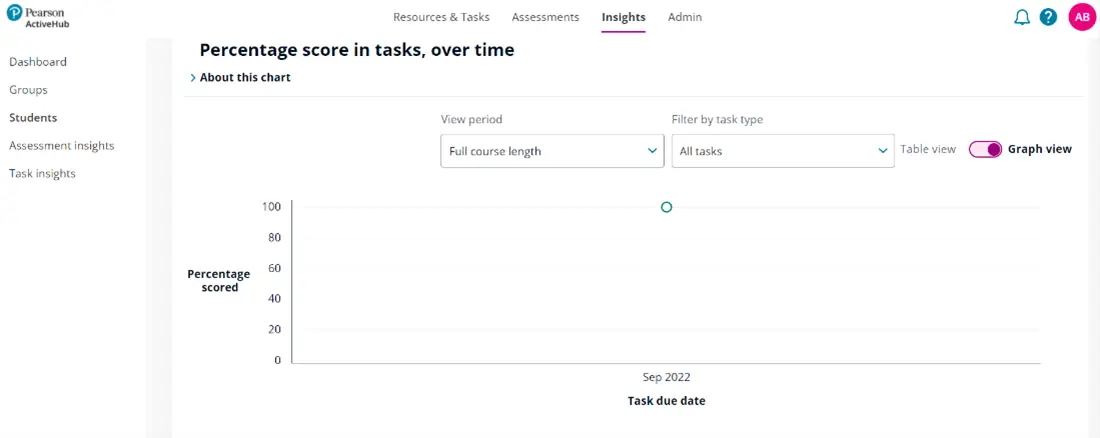
You will also see a summary of any tasks completed over time.
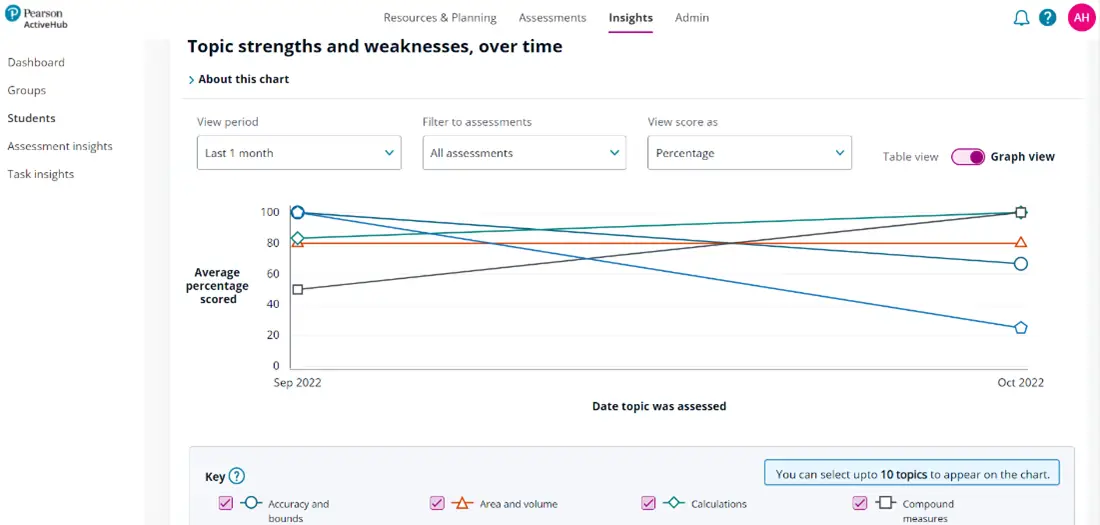
Next you will find the topic strengths and weaknesses over time chart, which displays the individual student’s attainment in all the skills relating to a subject. You can select the average score to be displayed for up to 10 topics at a time across varying time periods and assessment types. You can toggle this chart between the table and the graph views.
Scroll down to see all of the student’s assessment and task results, including comparisons to the group and year averages. Click on an assessment or task name to see how the student did in that assessment or task.
Student Assessment Insights
These charts show how an individual student performed in a specific assessment. You can find this by selecting any assessment in Insights and clicking on a student that has completed that assessment.
From here, you can see a breakdown of the insights through various tabs. Start with the Grade chart, then move on to the Questions, Topics, Skills and Next Steps.
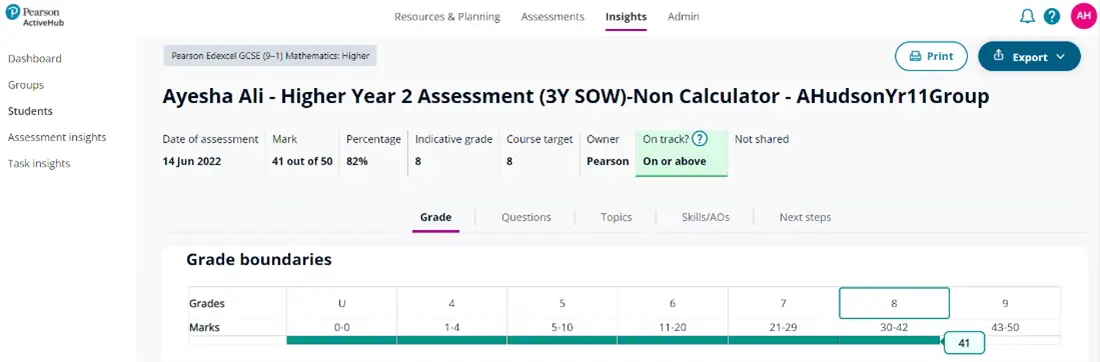
The Grade view shows the mark, percentage and grade a student achieved in an assessment. The grade boundaries chart shows how close they were to the boundary.
Questions
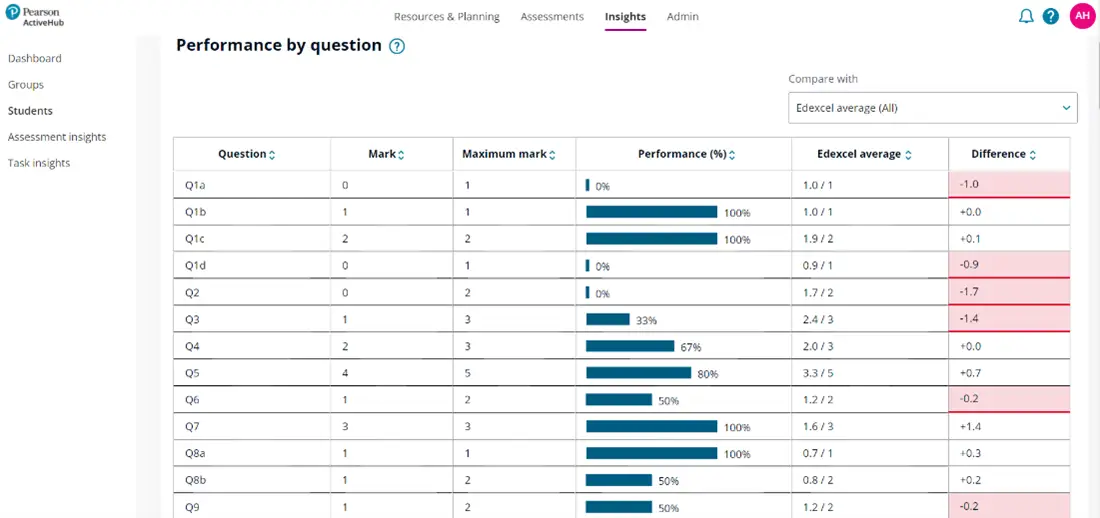
This chart shows how a student performed in each question in an assessment. Click on the column headers to sort the data by the different criteria. For past papers, an Edexcel comparison is available. You can filter results to compare to students who achieved specific grades in the live assessment.
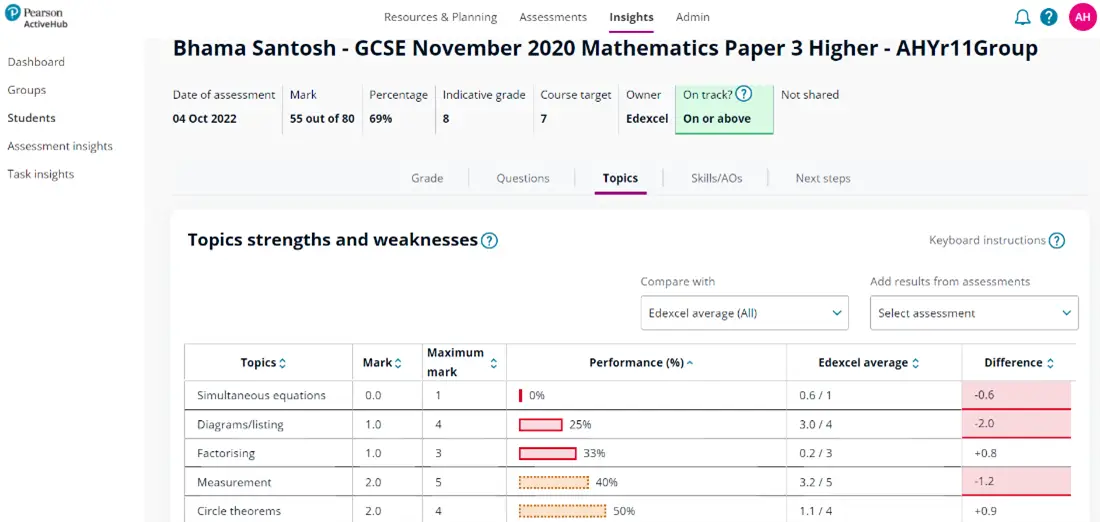
The Topics chart shows how a student performed in each topic in an assessment. The colour coding helps to distinguish the strengths (green) and weaknesses (red). For past papers, an Edexcel comparison is available. You can add results from other assessments to get a more balanced picture of a student's topic performance.
Skills
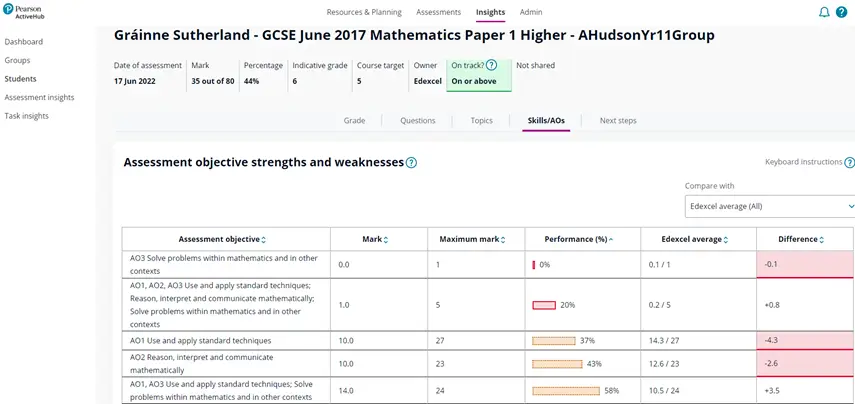
The Skills chart shows how a student performed in each skill in an assessment. It works in the same way as the topics chart but displays the student’s performance against all assessment objectives.
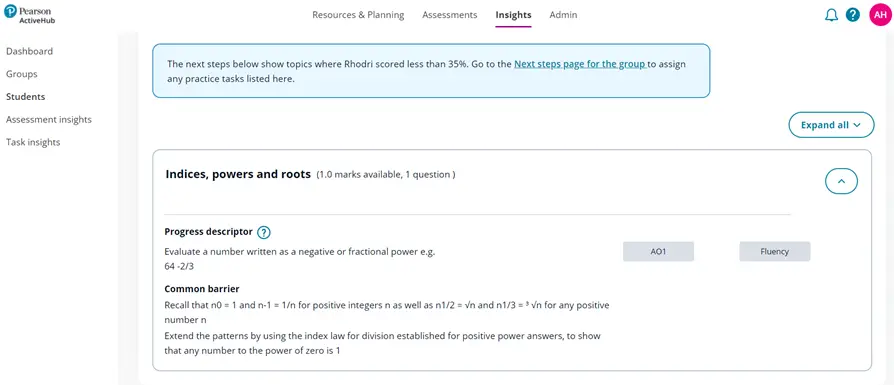
The Next steps view shows the topics that the student has performed less well in and the pre-requisites preceding the topic that might need to be revisited.
Assessment Insights
Valuable insights from your assessments
In this video we will show you all the insights available for students or groups that have completed a specific assessment.
These charts show how a group have performed in a specific assessment using the Grade breakdown, Question-Level Analysis, Topic & Skills Analysis and Next Steps. The assessment results must be entered into the Mark Entry markbooks in the Assessments area of ActiveHub. Once submitted, results may take up to 60 minutes to appear on the Assessment Insights. All these results can be shared directly with students.
The screens start with the Grade chart, then moves on to the Questions, Topics, Skills and Next Steps. (see ‘Sharing Results with Students’)
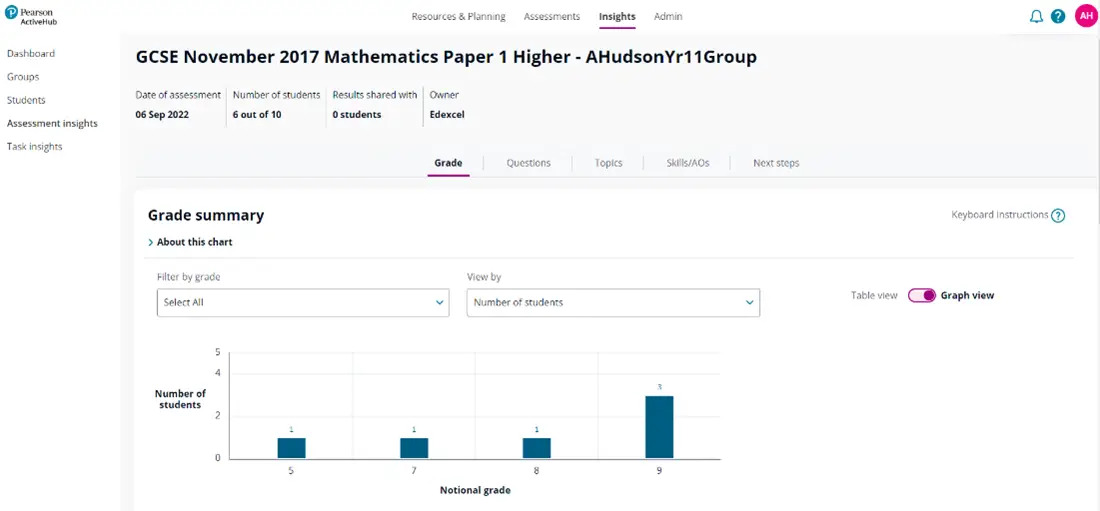
Grade view
This chart shows how many students achieved each grade in an assessment. Use the filters to focus on specific grades and to change the view to see either the number or the percentage of students. Use the key to add or remove groups from the chart. Following this chart, any students that have taken the assessment that are not on track to meet their course target have been highlighted.
Questions view
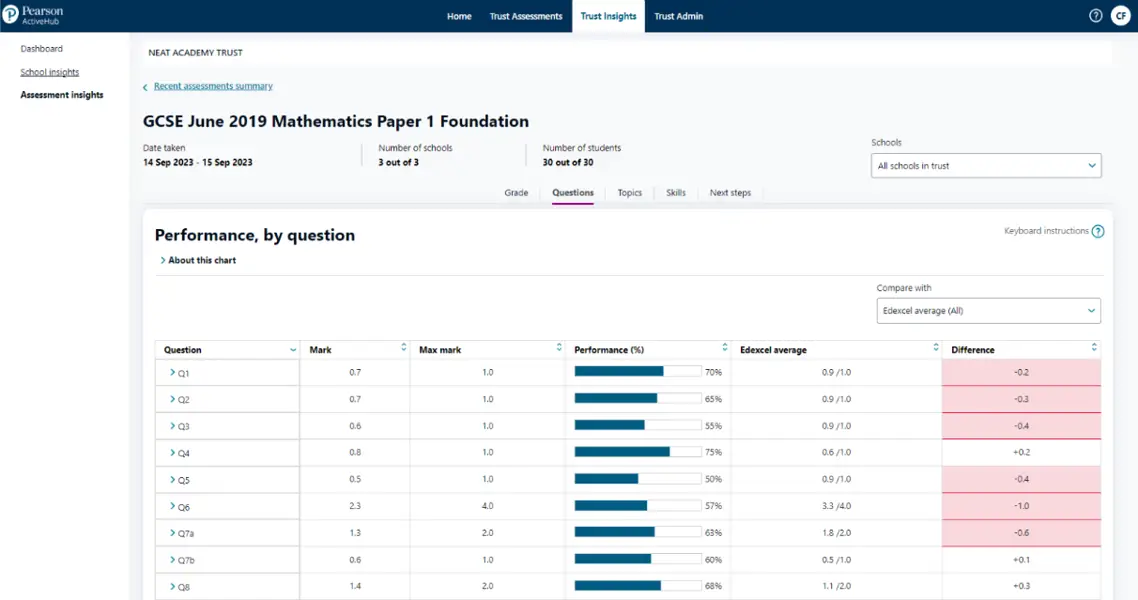
This chart shows how students on average performed in each question in an assessment. Click on the column headers to sort the data by the different criteria and click on the arrow next to the question number to see a description of what the question was testing, including topics and skills. For past papers, an Edexcel comparison is available. You can filter results to compare students who achieved specific grades in the live assessment.

Following on from the performance by question graph, you can find the details and an individual analysis of each question.
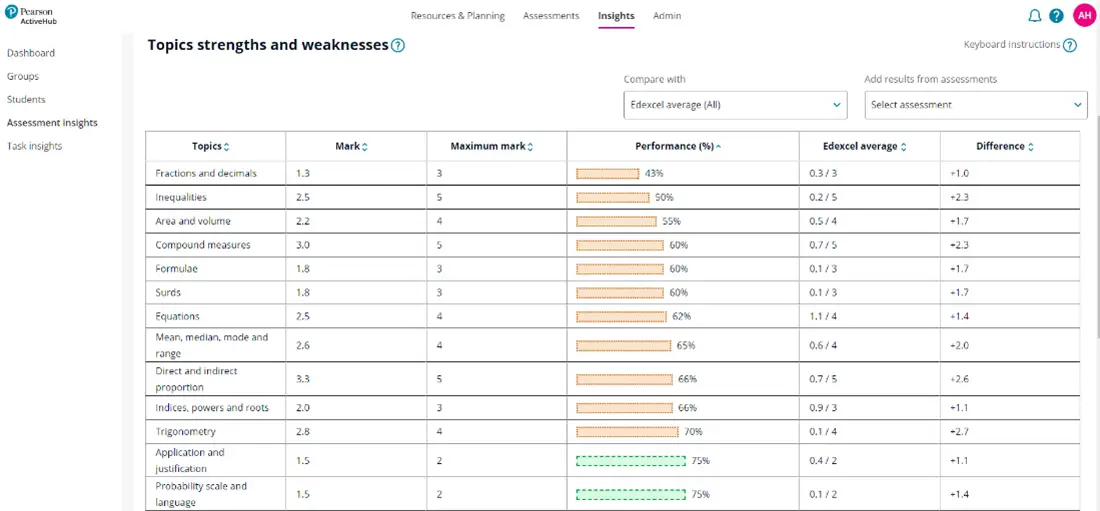
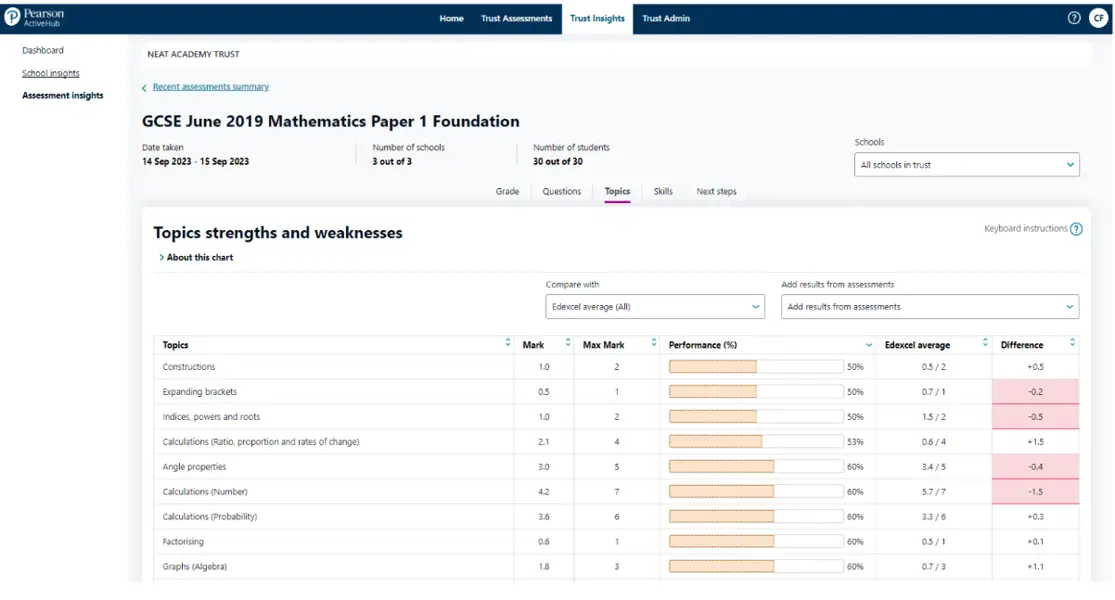
Topics view
The topics chart shows how students on average performed in each topic in an assessment. The colour coding helps to distinguish the strengths (green) and weaknesses (red). For past papers, an Edexcel comparison is available. You can add results from other assessments to get a more balanced picture of your students' topic performance.
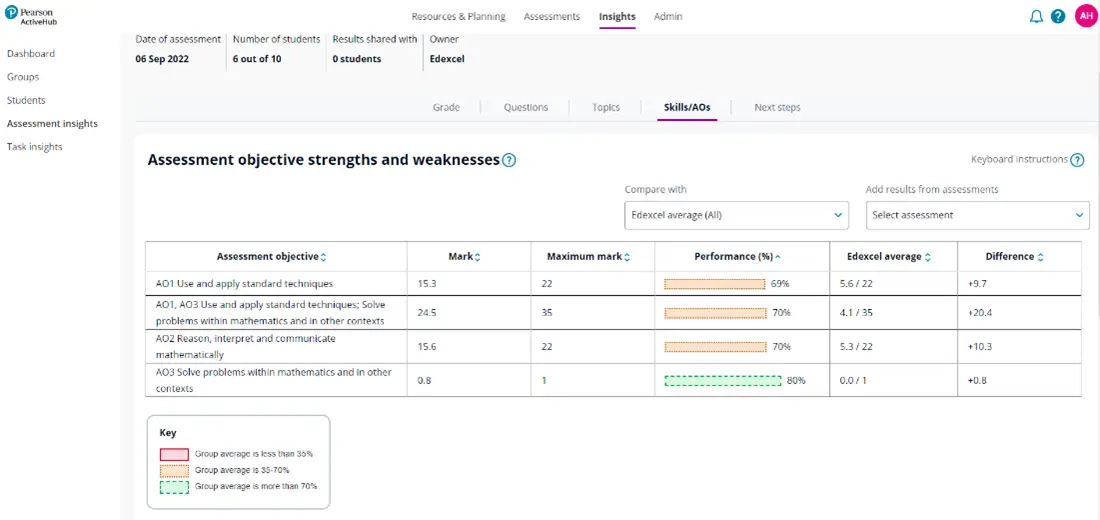
Skills view
The skills chart shows how students on average performed in each skill in an assessment. It works in the same way as the topics chart, but uses assessment objectives instead.
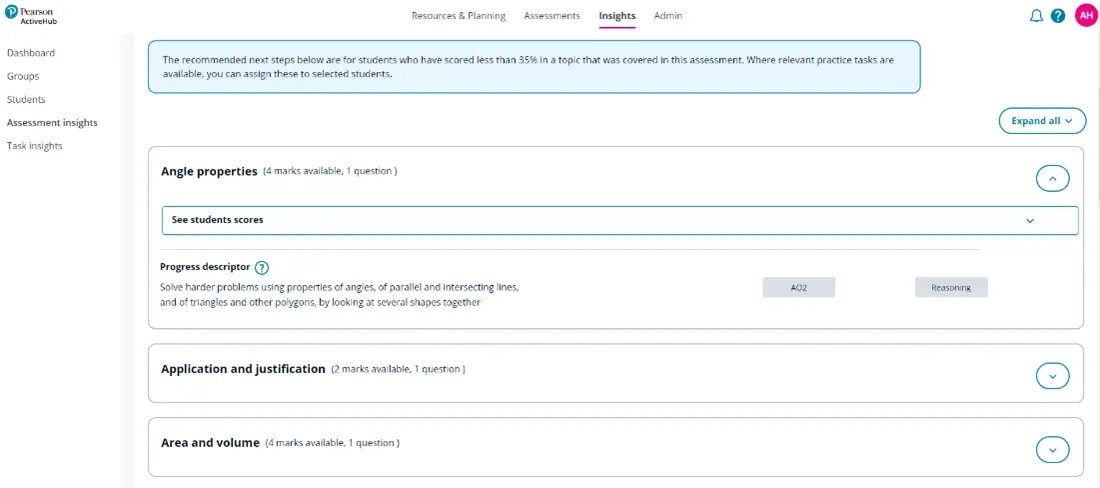
Next steps view
This shows the topics that the students on average performed less well in and the pre-requisites preceding those topics that might need to be revisited.
Task Insights

Valuable insights from your tasks
In this video we will show you all the insights available for students or groups that have completed a specific task.
These charts show how a group have performed in specific tasks using the Summary, Breakdown, Topics, Skills and Next Steps windows. The task results are pulled from the Resources and Tasks area of ActiveHub, where students will have been set tasks to do online, e.g. for homework, or whole independent lessons. Once submitted, results may take up to 60 minutes to appear on the Task Insights.
The screens start with the Summary chart, then move on to the Breakdown and Next Steps.
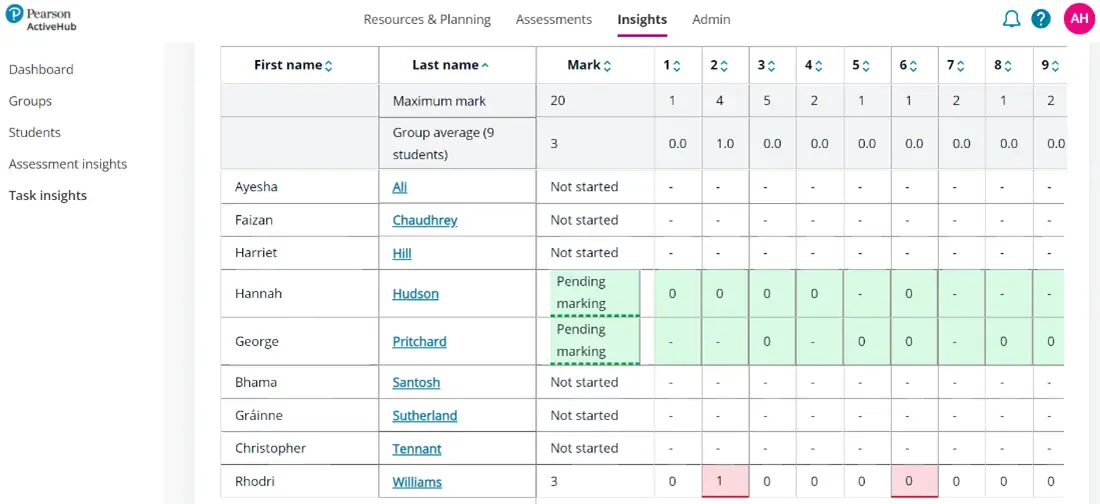
Summary Chart
This table shows a summary of how each student performed in a specific task and the status (eg 'Not started'). It also highlights any students that did not complete the task by the due date. In the Tasks Analysis Table, it shows the mark, the time taken and whether it was completed on time for each student in a group.

Breakdown of Tasks
This shows the average mark for the group broken down by individual items within a task. You can view the items as marks and also as percentages.
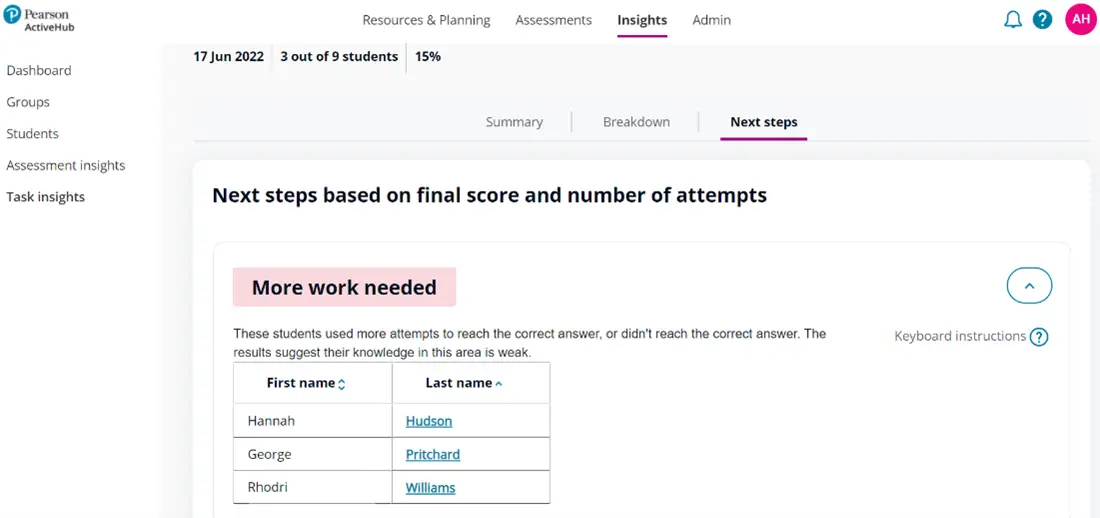
The Next Steps summarise how well students have understood the content covered in the task. It is intended to help the teacher decide if the content needs to be retaught or whether individual students might need additional support.
The Next Steps are broken down into three categories:
| More work needed (red) | These students used more attempts to reach the correct answer, or didn't reach the correct answer. The results suggest their knowledge in this area is weak. |
| Would benefit from further reinforcement (amber) | These students generally reached the correct answer, but not on the first attempt. The results suggest their knowledge is limited. |
| Stretch work needed (green) | These students generally reached the correct answer on the first attempt. The results suggest their knowledge in this area is strong. |
Sharing Results

Share assessment results with your students
All of the assessment results can be shared with students. Which means when students log in to see their tasks, they can also see their assessment results under My Results.
What is shared, when it is shared and who it is shared with is under your control. If you do not proactively select results to share, then students will not see any of their results.
In order to share results, go to the Assessment Insights page on the left hand menu to see your list of assessments. Each assessment will be 'Not shared' by default. Select 'Share with students' to see the sharing screens. Here you can decide which results you want to share. For example, you may want to share the mark from an assessment with students, but might not want to share the grade. Also, you may want to share the results of assessments, but not compared to a target. Tick the fields to be shared.
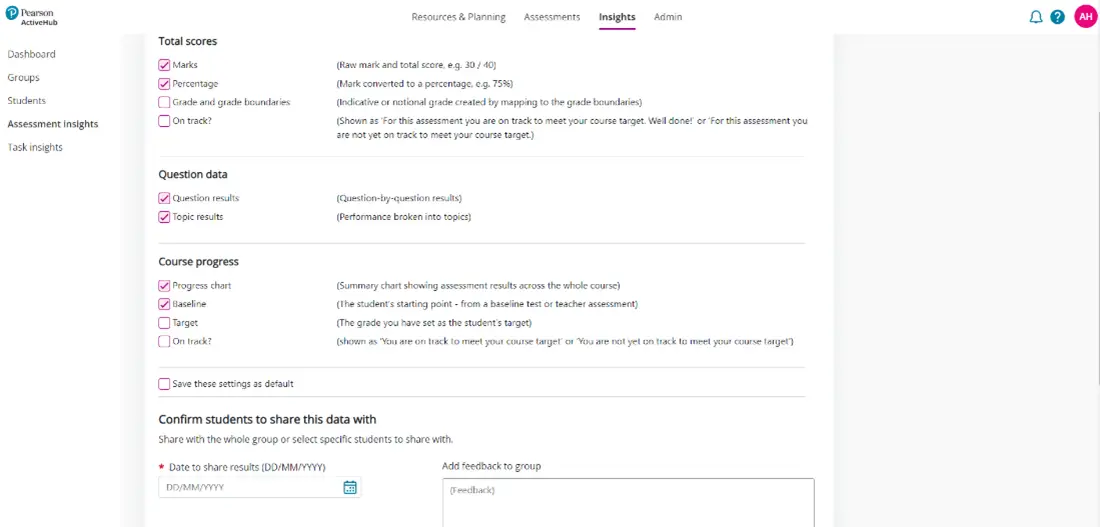
You are able to share results with the whole group, or specific individuals and add the date you want them to be shared. Add some feedback, either to the whole group or individual students, on how they did in the assessment.
To see what the results look like when shared with students, see the Student view: My Results section below.
Student view: My Results
Students see their latest assessment results (across all subjects) shown first.
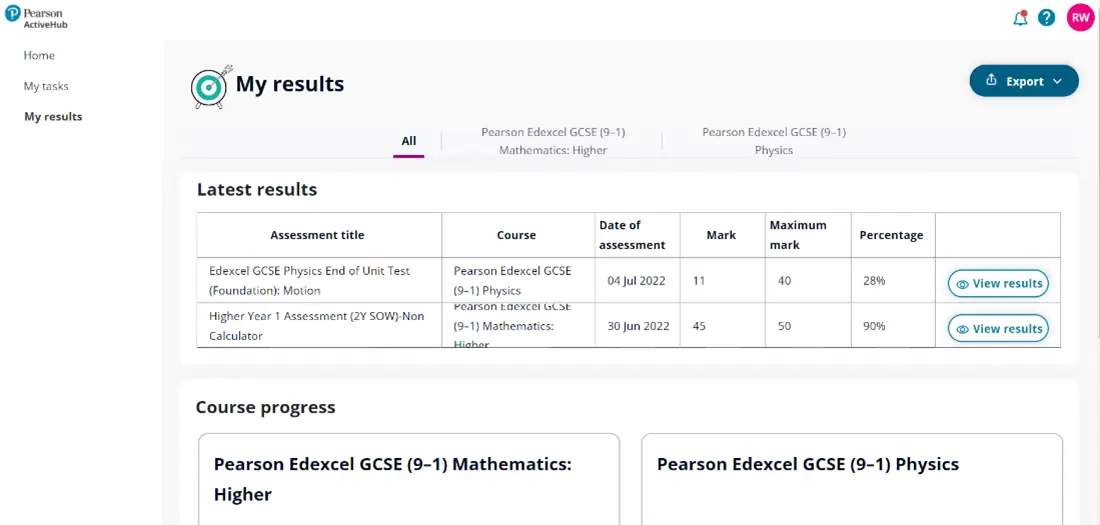
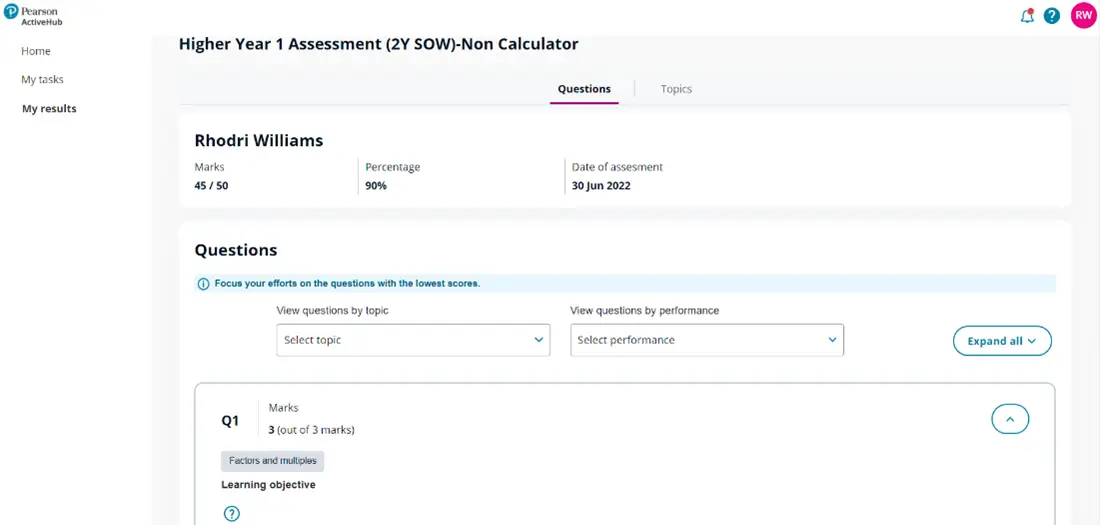
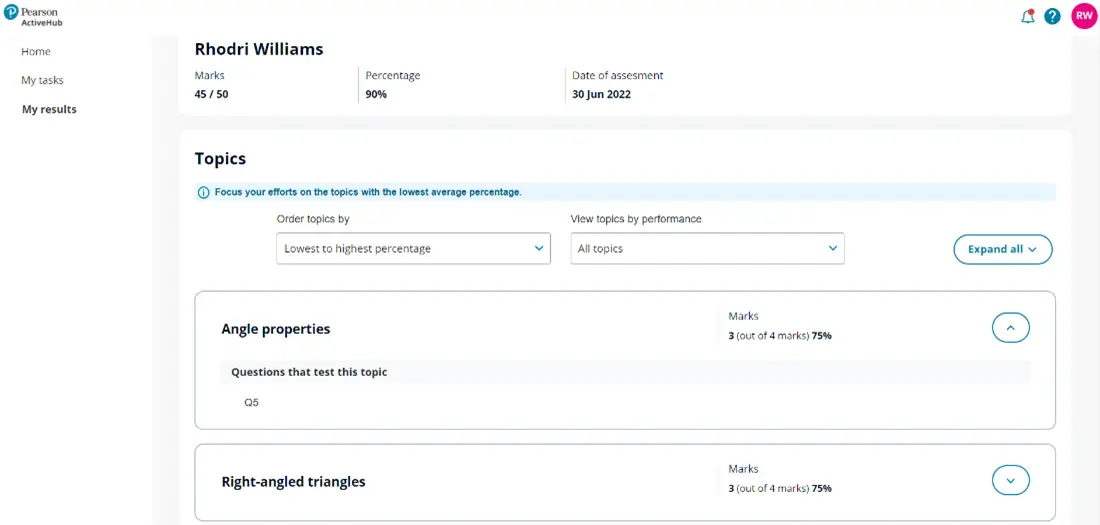
View results will provide more detailed results from a specific assessment. This includes the grade boundaries, feedback from their teacher, question analysis and topics analysis. The question analysis and topic analysis will help the student understand what areas they are doing well in and any areas they need to improve.
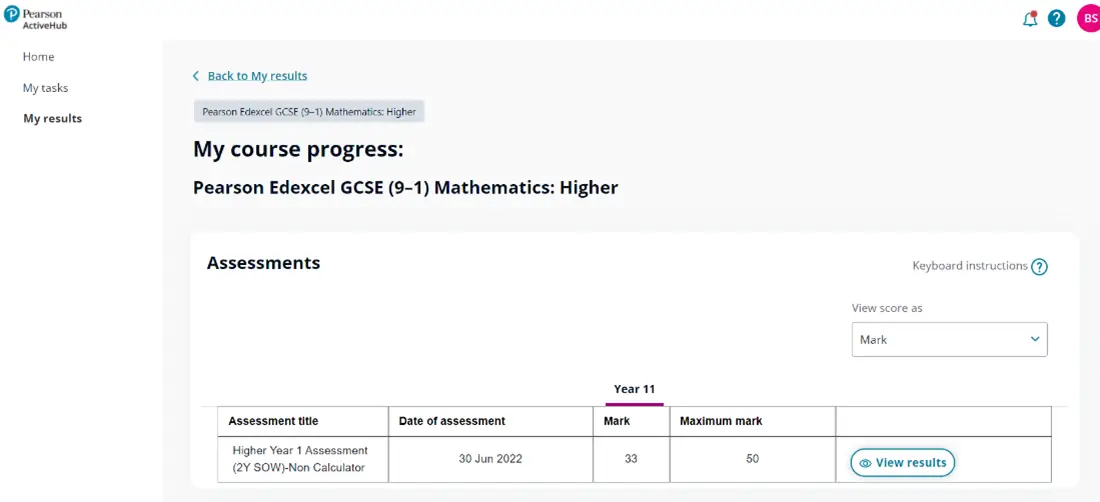
Student view: Course Progress
This chart shows a student how they have performed in assessments over time. It could include their baseline and target and state whether they are on track to meet their course target. Use the key to add or remove additional information.
ActiveHub Trust
Trust Admin
Manage user and view Trust details
User accounts and create single user account
There is only one user role in ActiveHub Trust and any existing user can add another user.
To add a new Trust user, enter their email address, first name and last name. An email will be sent to the new user with a link to sign up and set a password.
View Trust details
By default, Trust users cannot view a school’s Insights Dashboard. However, if the school grants access, the Trust user will be able to view the school’s Insights screens in a read-only format.
The Trust user can see which schools have ‘granted’, ‘not granted’ or ‘revoked’ access to all Trust users in the ‘View Trust details’ screen.
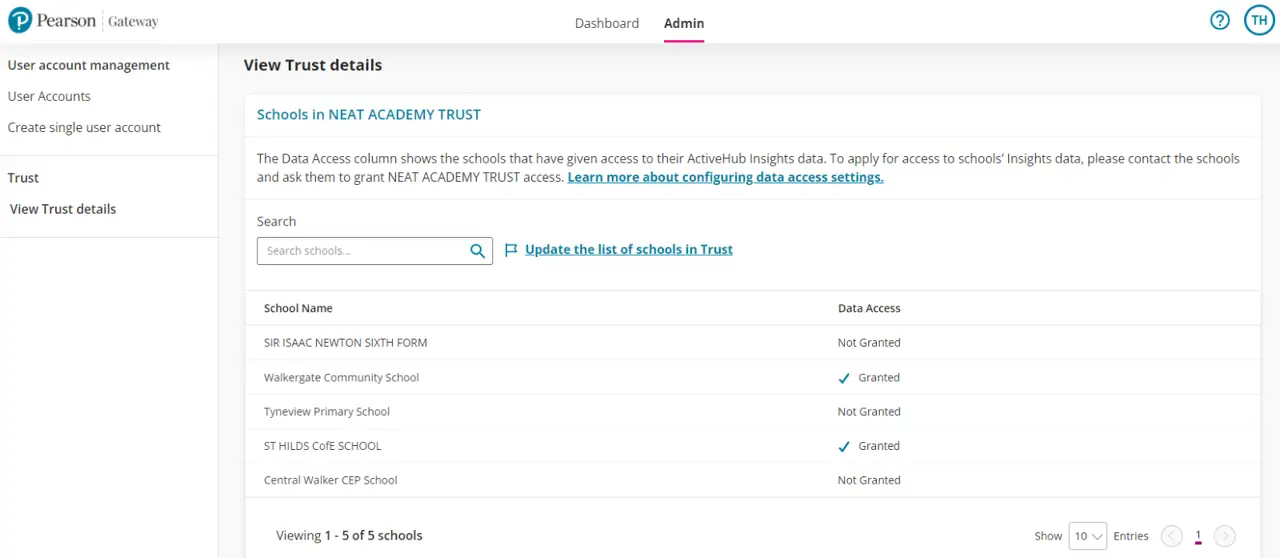
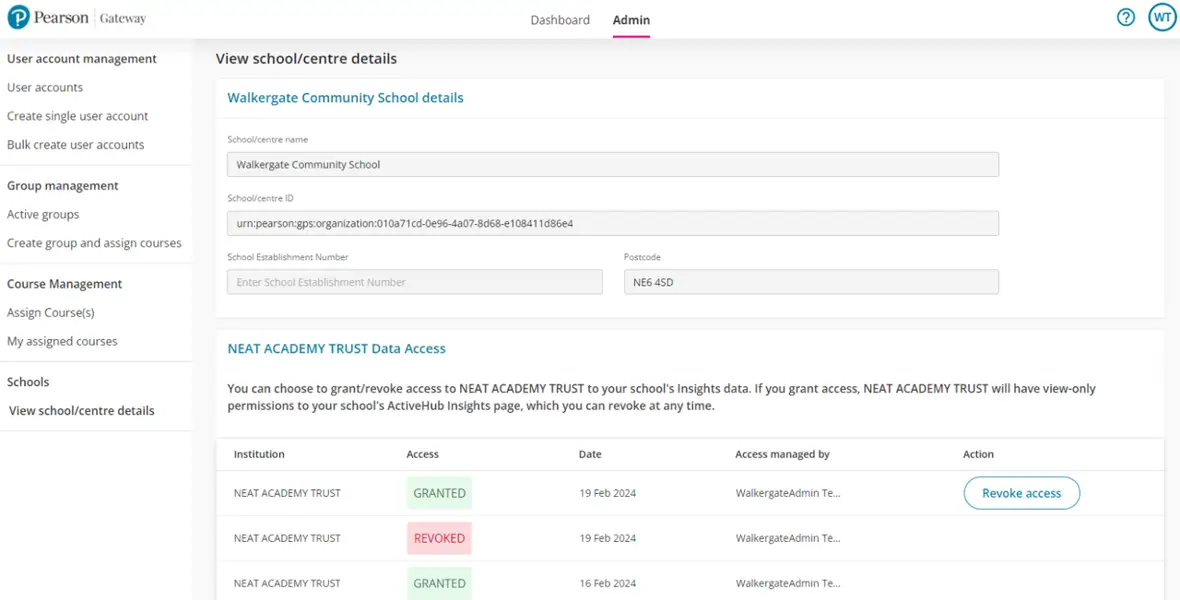
To set this up, the admin user in a school should go to ‘View school/centre details’ and ‘Grant access’ or ‘Revoke access’ in the ‘Action’ column.
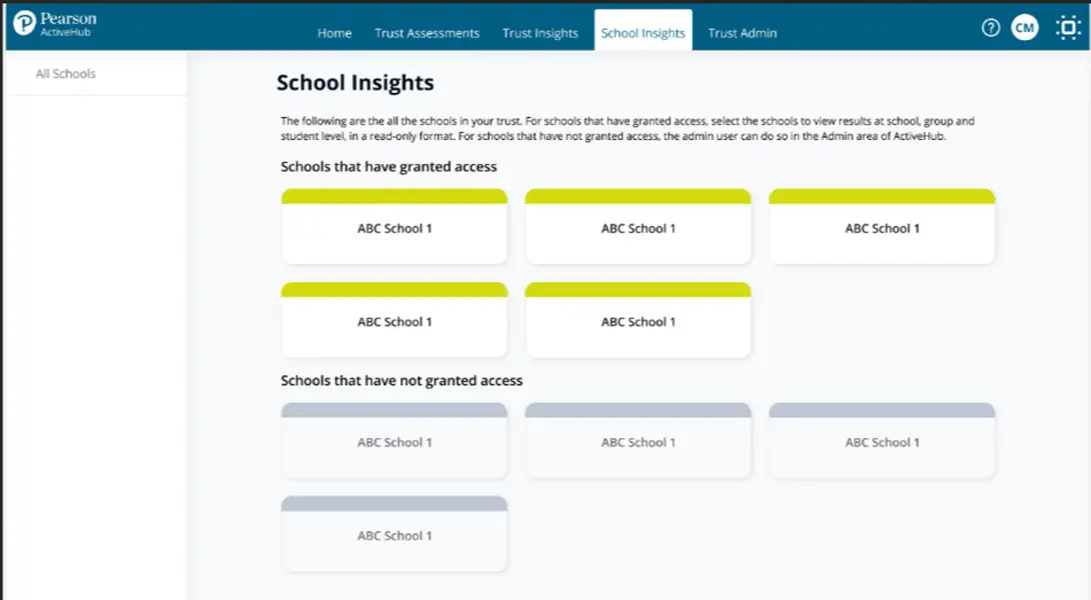
School Insights
To view a school’s Insights Dashboard, go to ‘School Insights’ on the Home screen. You will see a list of schools in your trust, split into those that have granted access to view their Insights, and those that have not. For those that have granted access, click on the tile with the school name so you can navigate around their Insights Dashboard in a read-only format. Navigate using the menu items on the left of the screen to see results for Groups, Students, Assessments and Tasks. To return to ActiveHub Trust, use the menu options at the top of the screen, or select ‘All Schools’ from the Dashboard.
Trust Insights
Valuable insights from across your trust
To align assessments, a trust must have a subscription for the ActiveHub Trust product, and schools will need to have subscriptions for the ActiveHub School product. This gives the ability to assign assessments centrally, for schools to enter results locally, and for results to be analysed centrally.
The process is:
- A trust user logs into ActiveHub Trust and finds an assessment paper(s) in the Assessment Library
- The trust user assigns the assessment to some/all schools in the trust with a relevant subscription, by setting up an ‘assessment window’
- The school user completes the assessments and inputs results into ActiveHub School
- Results are automatically shown in ActiveHub Trust and are aggregated up to the trust level. Note: only trust-wide assessments that have been ‘assigned’ will be visible to the trust user.
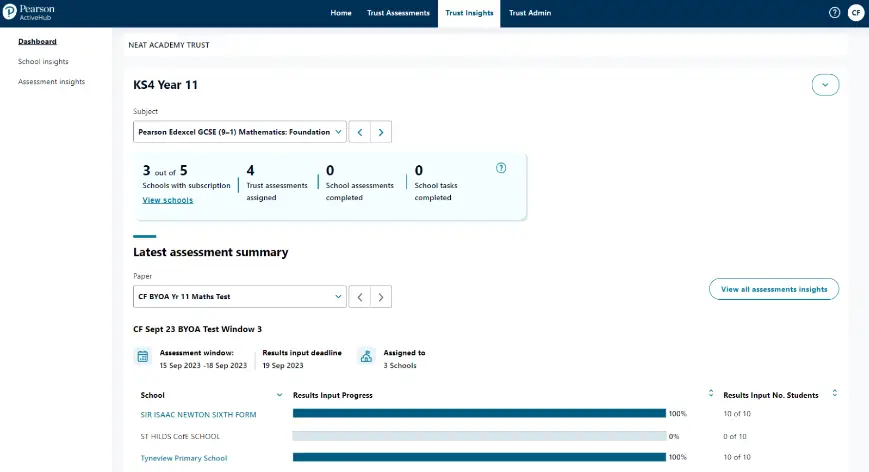
Dashboard
The Trust Insights Dashboard gives a quick overview of the assessment windows and which schools have entered results. Anything that is blue and underlined, indicates a link. From the dashboard, you can either click on the blue links, or use the left-side menu to navigate around the Trust Insights pages.
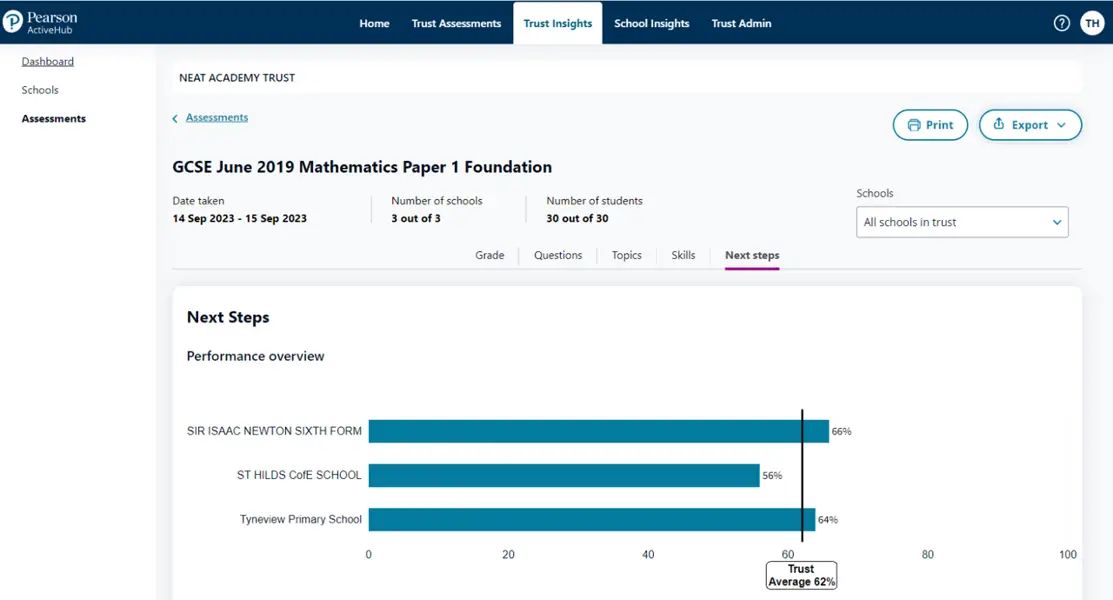
Look at school performance in trust-wide assessments
The School Insights shows how a school has performed on average over time across all their trust-wide assessments.
The Average score over time chart shows the average score for assessments taken by a school. For past papers, an Edexcel comparison is shown (see grey bar on chart when selected). Use the key to add or remove other schools and the ‘trust average’ from the chart.
Scroll down to see the Topic strengths and weaknesses over time chart, which displays the school’s attainment in all the topics. Select up to 10 topics to display on the chart, across various time periods and assessment types. Scroll down further to see the Assessments table, which shows all the detail that sits behind the chart at the top.
Assessment Insights
Valuable trust-wide insights from your assessments
These charts show how a trust has performed in a specific assessment using the Grade breakdown, Question-Level Analysis, Topic Analysis, Skill Analysis and Next Steps. All results are automatically aggregated up to the trust level, saving valuable time doing the analysis.
Grade view
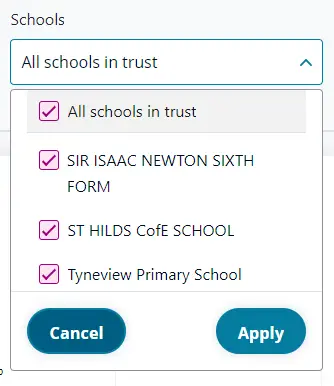
By default, the Grade page shows results for the whole trust, however, specific schools can be selected using the filter on the top right called ‘Schools’.
The Grade summary chart shows how many students achieved each grade in an assessment across the whole trust. Use the key to add or remove schools from the chart as a comparison.

The Grade analysis chart shows the grade distribution for each school, as well as the trust and the Edexcel average (where applicable). The column headers can be used to update the sort order, for example by the average grade.

Questions view
The Performance by question chart shows how students on average performed in each question in an assessment.
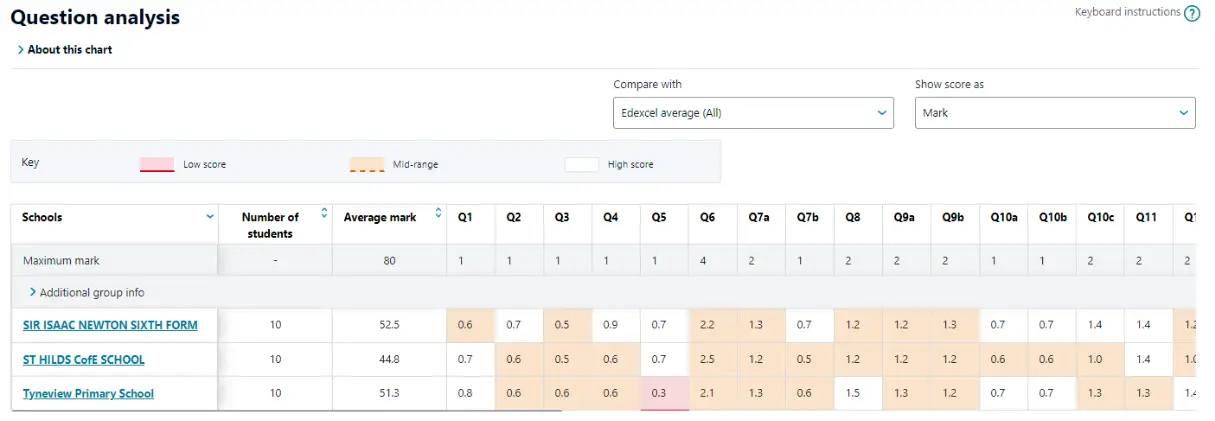
The Question analysis chart shows how each school performed on average at question as well as at assessment level.
Topics view
The Topics strengths and weaknesses chart shows how students on average performed in each topic in an assessment across the trust. You can add results from other assessments to get a more balanced picture of your students’ topic performance.
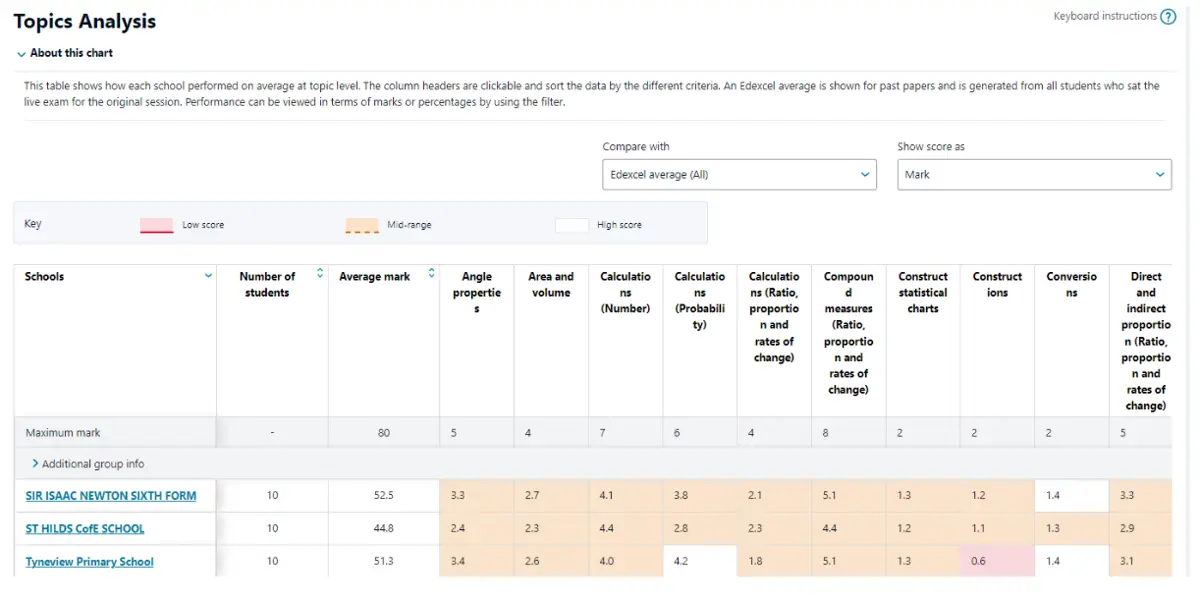
The Topic analysis chart shows how each school performed on average for each topic.
Skills view
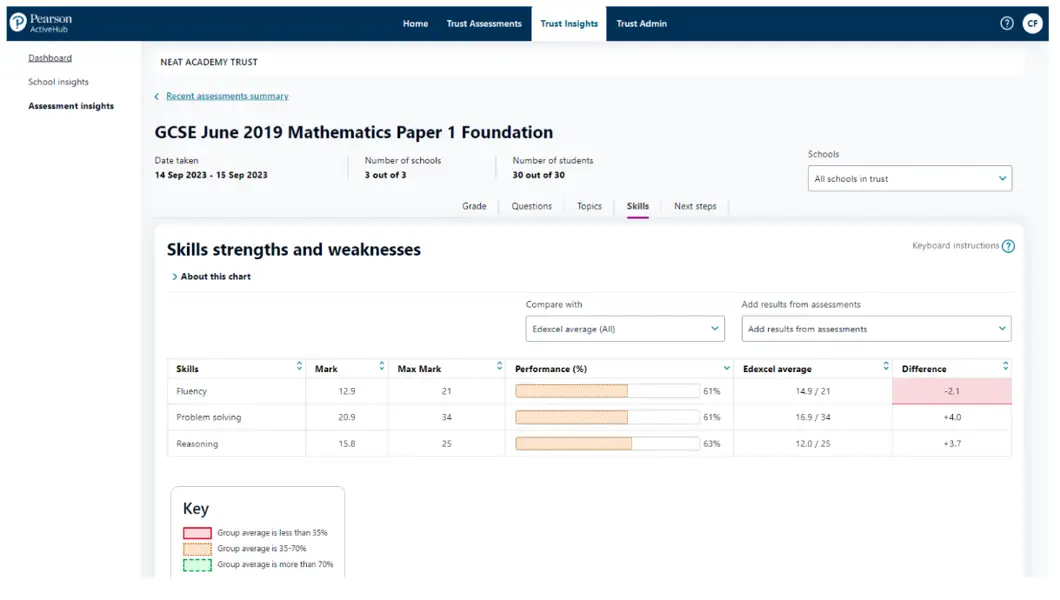
The Skills strengths and weaknesses chart shows how students on average performed in each skill in an assessment across the trust.
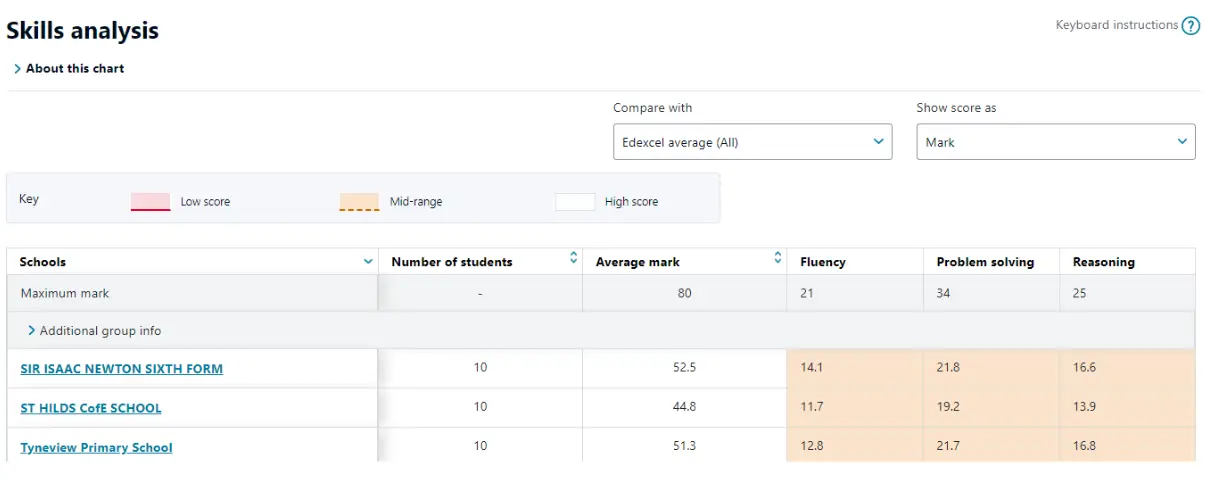
The Skills analysis chart shows how each school performed on average for each skill.
Next steps view
The Next Steps shows the average performance for each school in the trust, compared to the trust average.
There is then a breakdown by Topics and Skills to show which are the highest and lowest performing topics and skills for the whole trust.
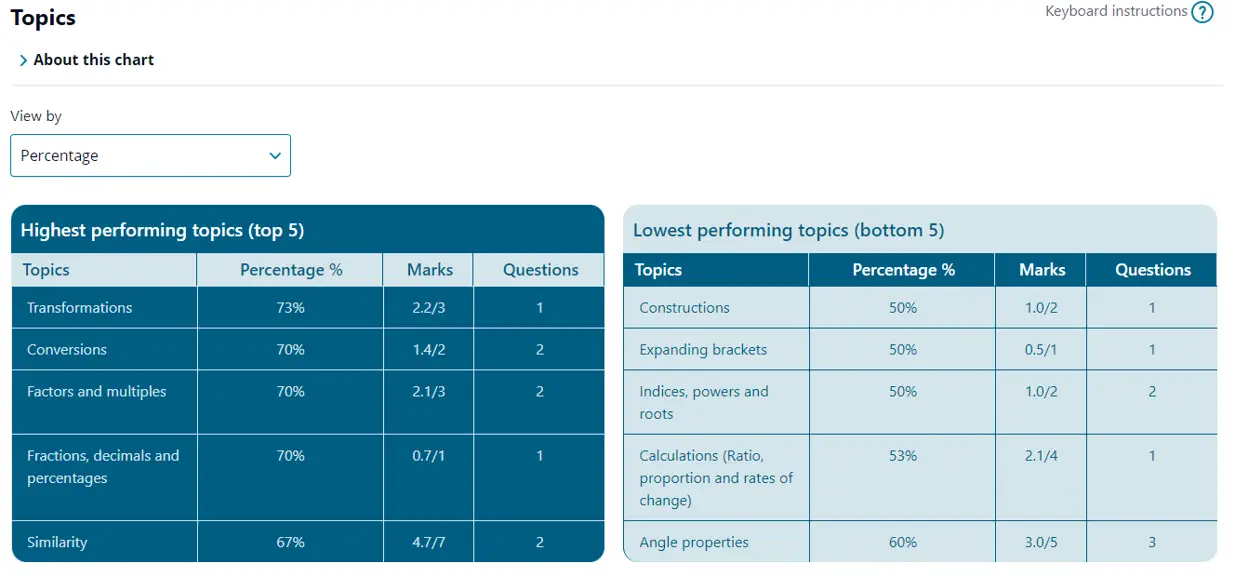
Change the ‘View by’ filter to show results by percentage, marks or total number of questions.
The ‘Schools’ drop down in the top right of the screen, allows the Next Steps to update for one, or more combinations of schools in the trust.
Trust Assessments
Align and assign assessments across a trust
To align assessments, a trust must have a subscription for the ActiveHub Trust product, and schools will need to have subscriptions for the ActiveHub School product. This gives the ability to assign assessments centrally, for schools to enter results locally, and for results to be analysed centrally.
The process is:
- A trust user logs into ActiveHub Trust and finds an assessment paper(s) in the Assessment Library
- The trust user assigns the assessment to some/all schools in the trust with a relevant subscription, by setting up an ‘assessment window’
- The school user completes the assessments and inputs results into ActiveHub School
- Results are automatically shown in ActiveHub Trust and are aggregated up to the trust level. Note: only trust-wide assessments that have been ‘assigned’ will be visible to the trust user.
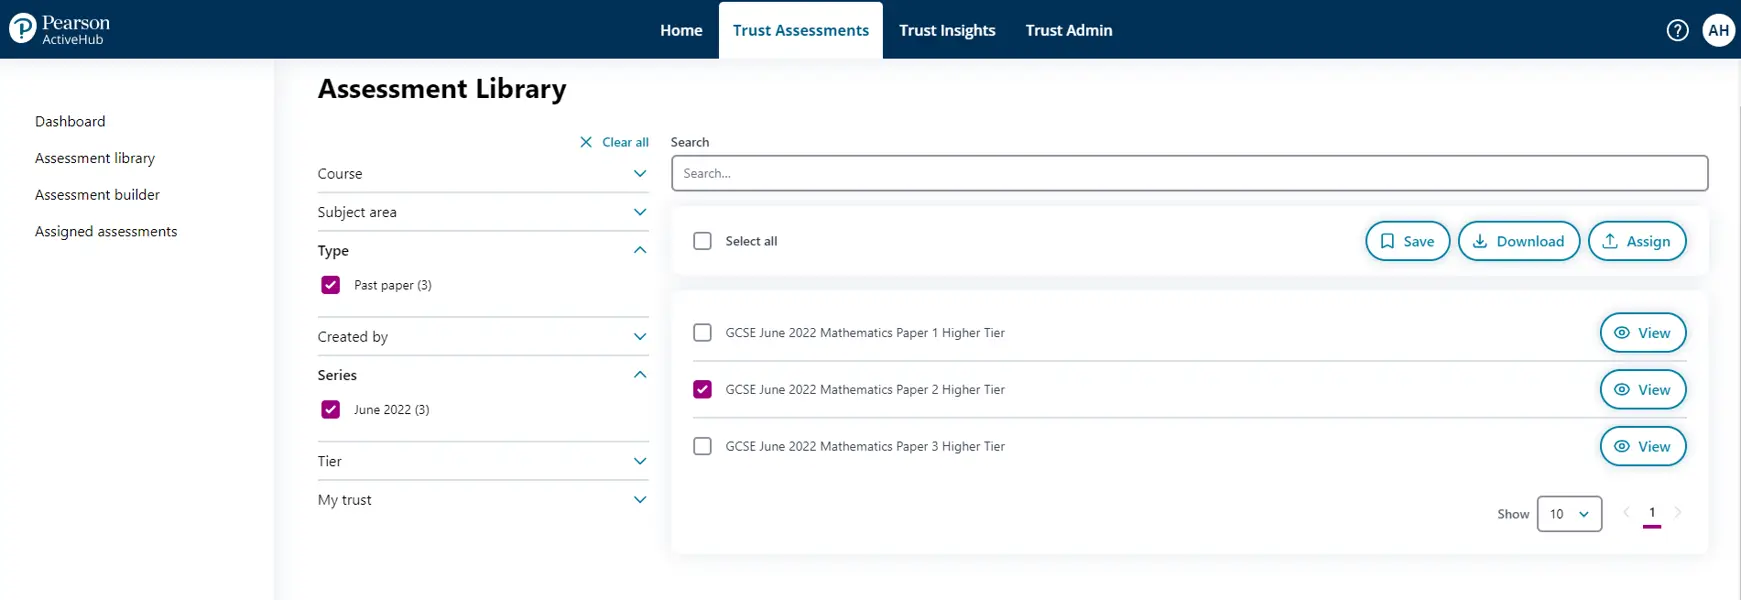
First, find an assessment
You can either assign assessment papers that are already sitting in the Assessment library or you can build your own using Assessment builder. Any assessments you have built, will display in the library after the publication date has passed.
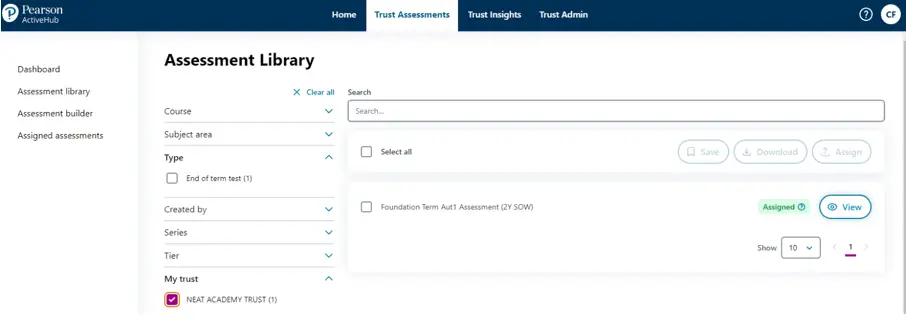
Use the filters in the Assessment library to find the relevant paper.
Tick one or more papers and then select the ‘Assign’ button on the top right.
Second, set up an assessment window
From the list of schools in your trust with a relevant subscription, tick those with whom you want to share the assessment.

Enter the following fields:
| Name | Description |
| Select year group | The year group of your students, e.g. 'Year 11' |
| Assessment window start date | The start date of when students can sit the assessment paper(s), e.g. 1/6/23 |
| Assessment window end date | The end date when students can sit the assessment paper(s), e.g. 30/6/23 |
| Results input deadline | The last date that schools can enter results, e.g. 31/7/23 |
| Description | A description of the window that everyone will recognise, e.g. "End of Year 11 Maths Exam 2023" |
Any assessments that have been assigned to schools in the trust will be marked with a green ‘Assigned’ label. Hovering over the label will show all the details.
Once an assessment window has passed, the green ‘Assigned’ label will no longer be visible and any new results entered by schools after this date will not be visible to the trust.
To quickly see which assessments have been assigned to schools, select the ‘My trust’ filter. Schools can also use this to show the trust-wide assessments in their own library.
Third, schools enter results
Schools enter marks in ActiveHub School in the Mark entry screen.
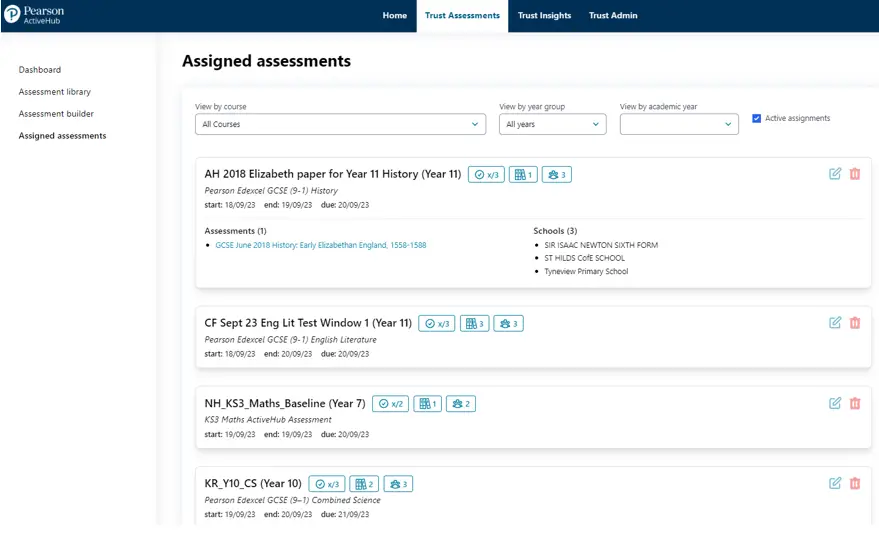
Assigned assessments
Manage your assessment windows in the Assigned assessments area. To see the details, click on the icons next to the assessment window description. You can edit and delete an assessment window up until the point where a school has entered results.